Are you looking for a low-impact, full-body workout that you can do at home with minimal equipment? If so, Wall Pilates may be exactly what you need. This 28-day beginner-friendly challenge uses the support of a wall to help you improve posture, build core strength, and gain flexibility—all while protecting your joints. In this comprehensive (and very detailed) guide, we will explore everything you need to know about Wall Pilates, from the benefits and safety tips to a day-by-day breakdown of each exercise. By the end, you’ll be well on your way to enjoying stronger muscles, improved balance, and a renewed sense of well-being.
Table of Contents
- What Is Wall Pilates?
- Benefits of Wall Pilates
- Essential Tips Before You Begin
- Key Exercises Explained
- 28-Day Wall Pilates Schedule
- Common Mistakes & How to Avoid Them
- Frequently Asked Questions
- Conclusion
1. What Is Wall Pilates?
Pilates is a form of exercise that focuses on core strength, stability, and controlled movements to improve overall fitness, posture, and flexibility. Wall Pilates uses the wall as a prop to provide additional support and guidance during various Pilates exercises. By performing moves with your spine, legs, or arms aligned against the wall, you can maintain better form, reduce the risk of injury, and gain immediate feedback on your posture.
Wall Pilates is especially beneficial for beginners who are looking to:
- Develop a strong core in a gentle, controlled manner.
- Improve their posture and alignment.
- Exercise safely, even if dealing with mild joint or back issues (always consult a healthcare professional before starting any new exercise routine).
- Gradually progress to more advanced Pilates routines in the future.
2. Benefits of Wall Pilates
- Improved Posture: Using the wall as a reference helps you maintain correct spinal alignment. Proper posture can help reduce neck, shoulder, and lower back discomfort.
- Core Strength: Pilates principles prioritize core engagement. Many of the movements in this 28-day challenge specifically target your abdominal muscles, obliques, and lower back.
- Low-Impact Exercise: Unlike running or high-intensity interval training, Pilates is gentle on the joints. This makes it an excellent option for people of various fitness levels, including beginners and those returning to exercise after a hiatus.
- Enhanced Flexibility: Movements like the Side Leg Swing and Active Calf Stretch can boost your flexibility and help reduce muscle tightness.
- Better Balance and Stability: Strengthening the core and stabilizing muscles around the hips and knees can lead to better overall balance—something that benefits you in daily life as well as during other workouts.
- Stress Relief: Like many mind-body exercises, Pilates can help calm the mind. Focusing on precise movements and controlled breathing can relieve stress and anxiety.
- Convenient and Minimal Equipment: All you really need is a clear wall space and perhaps a yoga mat for comfort. Minimal investment, maximum results!
3. Essential Tips Before You Begin
- Consult a Professional: If you have any existing injuries or concerns, speak with a healthcare provider before starting this or any exercise program.
- Find a Suitable Space: Ensure you have a clear, flat wall and enough room to stretch out your arms and legs without hitting furniture or other objects.
- Warm Up Properly: Although Pilates is low-impact, warming up is crucial. Simple arm circles, gentle head rolls, and light marching in place can prepare your muscles and joints.
- Listen to Your Body: Never force a movement if it feels painful or uncomfortable. Modify the exercise as needed or consult a fitness professional for alternatives.
- Breathing is Key: Pilates is about controlled, mindful movements coupled with steady inhalations and exhalations. Focus on breathing deeply throughout each exercise.
- Stay Hydrated: Even if Pilates feels gentle, you are still working your muscles. Keep water nearby and take small sips as necessary.
- Progress Gradually: This 28-day plan starts with shorter intervals and gradually increases difficulty. Respect the schedule, and don’t rush.
4. Key Exercises Explained
Throughout the 28-day plan, you’ll see certain exercises repeated with varying times or slight modifications. Here is a more detailed look at each movement, including how to perform them correctly.
A. Supported Roll Down
- How to Do It:
- Stand with your back against the wall, feet hip-distance apart and slightly away from the wall.
- Inhale deeply. As you exhale, begin to roll your spine down, letting your head and shoulders curl forward.
- Keep your core engaged and knees soft.
- Roll down as far as is comfortable while keeping the lower back gently supported by the wall.
- Inhale to pause; exhale to slowly roll back up to standing, vertebra by vertebra.
- Tips:
- Avoid locking your knees.
- Move slowly to feel each segment of your spine mobilizing.
- Keep your shoulders relaxed and away from your ears.
B. Wall Crunch
- How to Do It:
- Lie on your back with your feet resting flat on the wall. Your knees should be bent at about 90 degrees.
- Place your hands behind your head or cross them over your chest.
- Engage your core, inhale, and as you exhale, lift your head and shoulders off the ground in a small crunch movement.
- Inhale to lower back down.
- Tips:
- Keep your neck neutral (avoid tucking it too hard toward your chest).
- Focus on using your abdominal muscles rather than pulling from your neck or shoulders.
C. Wall Sit
- How to Do It:
- Stand with your back against the wall. Walk your feet out so that when you bend your knees, your thighs are parallel to the floor (like you’re sitting in an invisible chair).
- Keep your knees aligned over your ankles, not pushing forward past your toes.
- Engage your core and hold the position.
- Tips:
- If holding a deep wall sit is too challenging at first, start with a higher sit and gradually move lower.
- Avoid letting your knees cave inward.
- Keep your lower back against the wall for support.
D. Side Leg Swing
- How to Do It:
- Stand sideways with your inside arm supporting yourself against the wall.
- Engage your core and gently swing your outside leg forward and backward, maintaining a small, controlled range of motion.
- Gradually increase the swing as your balance improves.
- Switch sides when ready (if the routine calls for unilateral movement).
- Tips:
- Keep your upper body as still as possible; let the leg do the work.
- Focus on squeezing your glutes as you swing backward.
E. Unilateral Wall Slides
- How to Do It:
- Place one hand or forearm against the wall for balance.
- Stand on one leg (the leg closest to the wall). Your opposite leg (the outside leg) is free to bend or move gently.
- Slowly slide your supporting foot up and down the wall in a mini squat-like motion.
- Keep your upper body upright and your core engaged.
- Switch sides when needed (based on the routine).
- Tips:
- This exercise targets balance and lower body strength.
- Move slowly to maintain control.
- Keep your core activated to prevent swaying.
F. Active Calf Stretch
- How to Do It:
- Face the wall and place both palms flat against it at around shoulder height.
- Step one foot back, keeping that leg straight.
- Bend the front knee slightly, feeling a gentle stretch in the calf of your back leg.
- Hold for a few breaths, then alternate legs as needed.
- Tips:
- Keep your back leg straight for a deeper calf stretch.
- Avoid bouncing; move in a controlled manner.
- Push your heel down toward the floor to increase intensity.
G. Wall Angel
- How to Do It:
- Stand with your back against the wall, arms at your sides, palms facing outward.
- Bend your elbows to about 90 degrees, keeping them and your wrists in contact with the wall if possible.
- Slowly glide your arms overhead like making a snow angel, maintaining contact with the wall as much as your flexibility allows.
- Return to the starting position.
- Tips:
- This exercise focuses on shoulder mobility and upper back strength.
- If you can’t keep your arms fully pressed against the wall, just do your best. Over time, you’ll gain more range of motion.
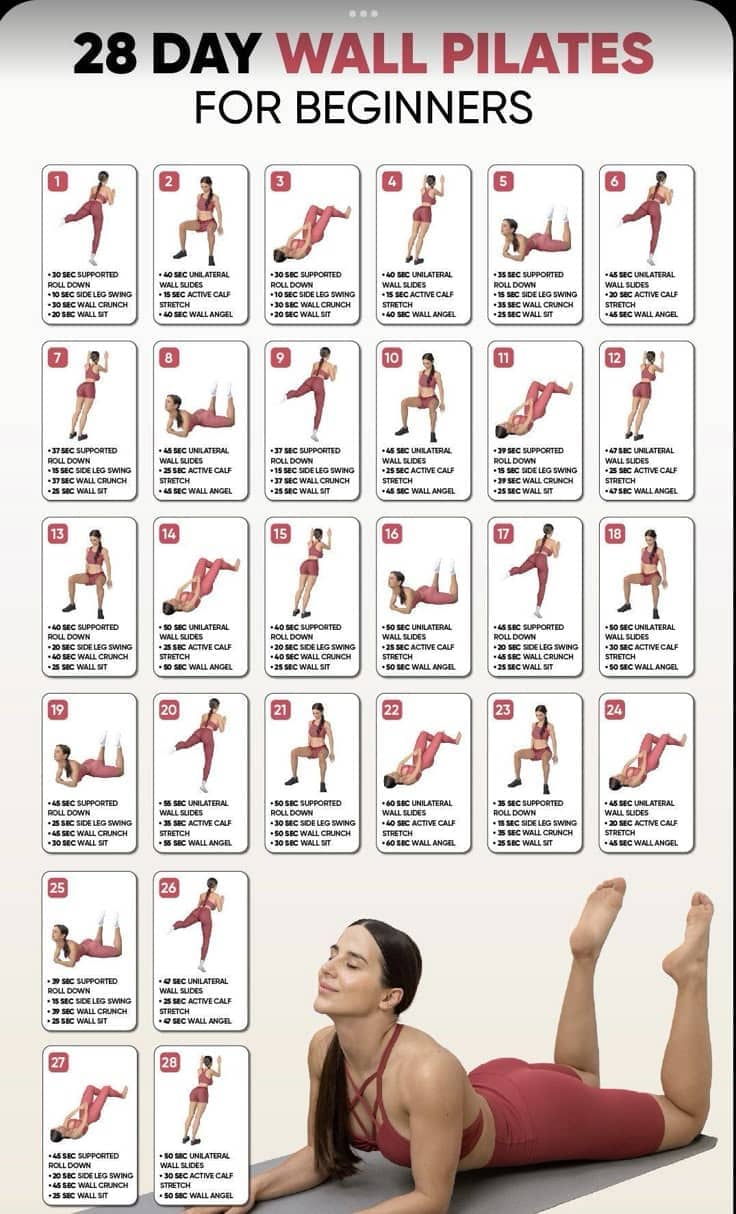
5. 28-Day Wall Pilates Schedule
Below is an overview of the daily exercises. Each day includes recommended time intervals. If at any point you feel fatigued or experience discomfort, reduce the time or number of repetitions.
Note: Times are approximate suggestions gleaned from a beginner-friendly progression. Feel free to adjust based on your comfort level.
Week 1 (Days 1–7)
Focus: Becoming familiar with basic movements, proper alignment, and breathing.
- Day 1
- 30s Supported Roll Down
- 15s Side Leg Swing (each side)
- 25s Wall Crunch
- 20s Wall Sit
- Day 2
- 40s Unilateral Wall Slides (20s each side)
- 15s Active Calf Stretch (each side)
- 30s Side Leg Swing (15s each side)
- 40s Wall Angel
- Day 3
- 30s Supported Roll Down
- 15s Side Leg Swing (each side)
- 30s Wall Crunch
- 25s Wall Sit
- Day 4
- 40s Unilateral Wall Slides (20s each side)
- 15s Active Calf Stretch (each side)
- 40s Wall Angel
- Day 5
- 35s Supported Roll Down
- 25s Side Leg Swing (around 12–13s each side)
- 25s Wall Crunch
- 25s Wall Sit
- Day 6
- 42s Unilateral Wall Slides (21s each side)
- 20s Active Calf Stretch (10s each side)
- 45s Wall Angel
- Day 7
- 37s Supported Roll Down
- 15s Side Leg Swing (each side)
- 25s Wall Crunch
- 26s Wall Sit
Week 1 Tips:
- Practice consistent breathing throughout each exercise.
- Keep track of how your body feels: any twinges or discomfort should be noted so you can adjust or consult a professional if needed.
- Use this week to nail down proper form.
Week 2 (Days 8–14)
Focus: Increasing time under tension and slightly challenging your balance.
- Day 8
- 46s Unilateral Wall Slides (23s each side)
- 25s Active Calf Stretch
- 25s Side Leg Swing
- 28s Wall Sit
- Day 9
- 37s Supported Roll Down
- 25s Side Leg Swing
- 30s Wall Crunch
- 26s Wall Sit
- Day 10
- 46s Unilateral Wall Slides
- 25s Active Calf Stretch
- 50s Wall Angel
- Day 11
- 40s Supported Roll Down
- 25s Side Leg Swing
- 35s Wall Crunch
- 28s Wall Sit
- Day 12
- 47s Unilateral Wall Slides
- 30s Side Leg Swing
- 25s Active Calf Stretch
- 47s Wall Angel
- Day 13
- 40s Supported Roll Down
- 20s Side Leg Swing
- 50s Wall Crunch
- 30s Wall Sit
- Day 14
- 45s Unilateral Wall Slides
- 30s Active Calf Stretch
- 50s Wall Angel
Week 2 Tips:
- The intervals are getting a bit longer. Pace yourself and take a brief pause between exercises if needed.
- Ensure you hydrate adequately and consider adding a light warm-up and cool-down routine.
- Focus on core engagement to protect your lower back and maximize the benefits of each exercise.
Week 3 (Days 15–21)
Focus: Building stamina, further improving flexibility, and adding slight variations in the times.
- Day 15
- 40s Supported Roll Down
- 25s Side Leg Swing (each side)
- 30s Wall Crunch
- 25s Wall Sit
- Day 16
- 50s Unilateral Wall Slides (25s each side)
- 20s Active Calf Stretch (each side)
- 50s Wall Angel
- Day 17
- 48s Supported Roll Down
- 25s Side Leg Swing
- 30s Wall Crunch
- 26s Wall Sit
- Day 18
- 50s Unilateral Wall Slides
- 25s Side Leg Swing
- 35s Active Calf Stretch
- 50s Wall Angel
- Day 19
- 45s Supported Roll Down
- 25s Side Leg Swing
- 35s Wall Crunch
- 30s Wall Sit
- Day 20
- 50s Unilateral Wall Slides
- 25s Active Calf Stretch
- 50s Wall Angel
- Day 21
- 50s Supported Roll Down
- 30s Side Leg Swing
- 35s Wall Crunch
- 30s Wall Sit
Week 3 Tips:
- By now, you should notice improvements in core strength and balance.
- Continue to pay attention to form—avoid rushing through reps.
- If you feel any strain in your neck, reposition your head and shoulders during crunches, ensuring your abs are doing the work.
Week 4 (Days 22–28)
Focus: Consolidating progress, enhancing muscular endurance, and preparing to maintain or progress beyond the challenge.
- Day 22
- 60s Unilateral Wall Slides (30s each side)
- 30s Side Leg Swing
- 50s Active Calf Stretch
- 35s Wall Sit
- Day 23
- 50s Supported Roll Down
- 30s Side Leg Swing
- 35s Wall Crunch
- 32s Wall Sit
- Day 24
- 46s Unilateral Wall Slides
- 25s Active Calf Stretch
- 45s Wall Angel
- Day 25
- 70s Supported Roll Down
- 30s Side Leg Swing
- 50s Wall Crunch
- 35s Wall Sit
- Day 26
- 50s Unilateral Wall Slides
- 30s Side Leg Swing
- 25s Active Calf Stretch
- 50s Wall Angel
- Day 27
- 45s Supported Roll Down
- 25s Side Leg Swing
- 30s Wall Crunch
- 30s Wall Sit
- Day 28
- 50s Unilateral Wall Slides
- 25s Active Calf Stretch
- 50s Wall Angel
Week 4 Tips:
- This final stretch is designed to test the endurance you’ve built.
- It’s perfectly normal to feel a deeper muscle burn, but be mindful not to overdo it.
- If you find any one exercise is too intense, modify the duration or rest briefly and continue.
6. Common Mistakes & How to Avoid Them
- Arching Your Back Against the Wall:
- Always focus on neutral spine. If you feel your lower back peeling away excessively or arching, reduce range of motion.
- Holding Your Breath:
- Incorporate a consistent breathing rhythm. Inhale to prepare, exhale during exertion.
- Rushing the Movements:
- Pilates is all about control. Slow, steady motions are more beneficial than hurried, sloppy reps.
- Neglecting Warm-Up/Cool-Down:
- Even brief warm-up activities—like rolling shoulders or marching in place—help prevent injuries. A cool-down with gentle stretches can aid in recovery.
- Ignoring Pain or Discomfort:
- Discomfort that feels more than mild muscle fatigue should be addressed. Stop if you feel sharp pain and consult with a professional.
- Comparing Yourself to Others:
- Everyone’s body is different. Adapt the routine to your own level and gradually build up.
7. Frequently Asked Questions
Q1: Do I need any special equipment for Wall Pilates?
A: No special equipment is needed beyond a stable wall and possibly a yoga mat or exercise mat for comfort during floor exercises. You might find a small towel or cushion helpful for knee support.
Q2: How often should I do Wall Pilates if I’m just starting out?
A: This 28-day program is structured for daily practice with manageable time intervals. If you find daily workouts too challenging, you can alternate days or incorporate rest days, listening to your body as you go.
Q3: Can I pair this Pilates routine with other exercises?
A: Absolutely! Pilates compliments many forms of exercise. You can add light cardio or resistance training on alternate days, provided you’re not overtaxing your muscles.
Q4: What if I have trouble balancing during Unilateral Wall Slides?
A: Use the wall for extra support or keep a stable chair nearby to hold onto if needed. Focus on small, controlled movements rather than large ones.
Q5: Will I lose weight with Wall Pilates?
A: While Pilates can support weight management by building lean muscle and boosting metabolism, it’s primarily known for improving strength, posture, and flexibility. Combined with a balanced diet and other forms of exercise, it can contribute to healthy weight management.
Q6: Is it okay to do these exercises if I have mild back pain?
A: Many individuals with mild back pain find relief through Pilates. However, it’s crucial to consult a healthcare professional before starting. Modify any movements that exacerbate discomfort.
8. Conclusion
Embarking on this 28-Day Wall Pilates journey can be a transformative experience for beginners and seasoned practitioners alike. By integrating supportive and low-impact exercises, you can improve your core strength, posture, and flexibility—all while minimizing the risk of injury. Remember, the wall is an excellent tool for maintaining correct form and alignment, helping you build a strong foundation for more advanced Pilates routines.
In addition to physical benefits, many people find that the mindful breathing and focused movements of Pilates help reduce stress and promote mental clarity. The best part? You can complete these exercises at home without any expensive equipment, making this an accessible fitness challenge for nearly everyone.
As you progress through the 28 days, pay attention to how your body feels. Celebrate small victories, like being able to hold a Wall Sit longer or feeling more stable during the Unilateral Wall Slides. Consistency is key, so stick to the schedule as best you can, adapt if needed, and always remember that quality is more important than quantity.
Final Reminders
- Stay Hydrated: Drink enough water, especially if you’re also engaging in other workouts or live in a warm climate.
- Eat a Balanced Diet: Exercise is just one component of wellness; proper nutrition helps your body recover and function optimally.
- Listen to Your Body: Feeling sore is normal, but intense pain isn’t. Seek professional advice if you’re unsure.
- Keep It Up: After completing the 28 days, consider continuing with a more advanced Pilates routine, or repeat the cycle with slightly longer intervals.
By following this guide, you’re on track to reap the multifaceted benefits of Pilates—improved strength, mobility, posture, and more. We hope you enjoy this 28-day challenge and experience a newfound sense of wellness, both physically and mentally. Happy exercising!