Introduction
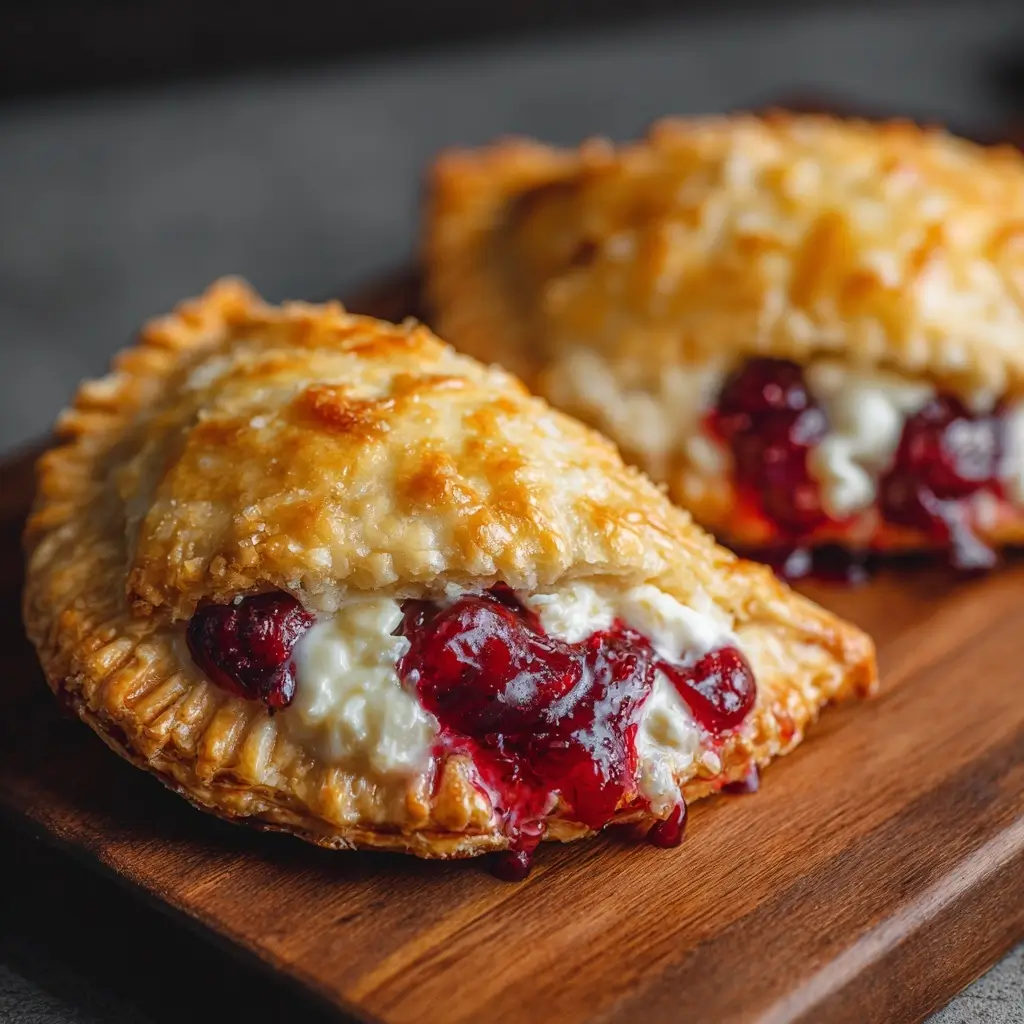
Cherry Cheesecake Hand Pies are the ultimate handheld dessert — a flaky, buttery pastry pocket bursting with creamy, tangy cheesecake filling and vibrant, tart-sweet cherry compote. Combining two beloved classics into one portable, shareable (though you’ll probably want to keep them all to yourself), and irresistibly nostalgic treat, these hand pies bridge the gap between bakery elegance and home-kitchen comfort. Perfect for picnics, lunchbox surprises, holiday cookie swaps, or an after-dinner indulgence that feels special without demanding hours in the kitchen, they deliver rich flavor, contrasting textures, and just the right balance of richness and brightness in every bite.
The History
Hand pies trace their roots back centuries — from medieval British “pasties” and Cornish miners’ portable meals to Eastern European pierogi and Latin American empanadas — all sharing the same ingenious concept: encasing flavorful fillings in dough for portability and preservation. In America, hand pies evolved alongside pie culture, gaining popularity in the 19th and early 20th centuries as convenient “pie pockets” for schoolchildren and working families. Meanwhile, cheesecake boasts ancient origins in Greece, later refined by Romans and reimagined across Europe before becoming an iconic New York-style dessert in the 20th century. The fusion of cheesecake and fruit pie — particularly cherry — is a relatively modern innovation, emerging in the late 2000s and early 2010s as food bloggers and artisanal bakeries began experimenting with hybrid desserts. Cherry Cheesecake Hand Pies gained viral traction on platforms like Pinterest and Instagram thanks to their photogenic layers, nostalgic appeal, and versatility — easily adapted for seasonal ingredients, dietary preferences, and even freezer-friendly meal prep. Today, they stand as a beloved symbol of creative baking: honoring tradition while delighting in playful, modern flavor layering.
Ingredients Breakdown
Understanding each component deepens both technique and flavor. Let’s explore the purpose and science behind every ingredient:
- All-Butter Pie Dough (or Store-Bought): Cold unsalted butter creates steam pockets during baking, yielding flakiness. The ratio of fat to flour (typically 1:2 by weight) ensures tenderness without greasiness. A splash of vinegar or vodka inhibits gluten formation for extra tenderness — optional but highly recommended for foolproof crust.
- Cream Cheese (Full-Fat, Block Style): Must be at room temperature for smooth incorporation. Low-moisture, high-fat cream cheese (like Philadelphia) provides structure and richness; whipped or reduced-fat versions introduce excess water or destabilize the filling, risking weeping or cracking.
- Granulated Sugar: Sweetens and stabilizes the cheesecake layer. Fine sugar dissolves more readily, preventing graininess. For depth, a portion can be replaced with light brown sugar (adds subtle molasses notes).
- Egg Yolk (not whole egg): Adds richness, emulsification, and binding power without excess moisture — crucial for a dense yet creamy texture. Whole eggs increase water content and risk puffing or cracking.
- Vanilla Extract & Lemon Zest: Brightens the richness of cream cheese and balances cherry’s acidity. Pure extract (not imitation) delivers nuanced aroma; fresh lemon zest adds volatile citrus oils that elevate the entire profile.
- Cherry Filling: Tart Montmorency or Balaton cherries offer ideal acidity and firmness. Frozen unsweetened cherries work exceptionally well (no need to thaw fully — helps prevent soggy crust). Fresh cherries require pitting and often benefit from a brief maceration with sugar and cornstarch to draw out juices and thicken naturally. Avoid canned cherry pie filling — it’s overly sweet, gummy, and contains preservatives that mute flavor.
- Cornstarch or Tapioca Starch: Critical thickener for the cherry layer. Cornstarch yields a glossy, clear set; tapioca gives a more translucent, jammy consistency with better freeze-thaw stability. Too little = runny leakage; too much = chalky or gluey texture.
- Unsweetened Heavy Cream or Sour Cream: Adds moisture, tang, and silkiness to the cheesecake layer without thinning it. Sour cream contributes lactic acidity that enhances perception of sweetness and cuts through fat.
- Salt: A pinch — never omitted — heightens all other flavors and counters cloying sweetness.
- Egg Wash (for finishing): 1 egg + 1 tbsp milk or cream, whisked smooth. Creates a deep golden-brown, glossy finish and seals edges. Optional addition: a light sprinkle of coarse turbinado sugar for crunch and sparkle.
Step-by-Step Recipe
- Prepare the Dough (Make Ahead Recommended): In a large bowl, whisk together 2½ cups (315g) all-purpose flour, 1 tsp granulated sugar, and 1 tsp salt. Cut in 1 cup (227g) cold, cubed unsalted butter using a pastry cutter or food processor until mixture resembles coarse crumbs with some pea-sized pieces. Add ¼ cup (60ml) ice-cold water mixed with 1 tsp apple cider vinegar (or vodka). Mix gently with a fork until dough just begins to clump. Divide into two equal discs, wrap tightly in plastic, and refrigerate for at least 1 hour (or up to 3 days) — essential for gluten relaxation and butter firmness.
- Make the Cherry Filling: In a medium saucepan, combine 3 cups (450g) pitted frozen or fresh tart cherries, ¾ cup (150g) granulated sugar, ¼ cup (30g) cornstarch, 1 tbsp lemon juice, and 1 tsp lemon zest. Cook over medium heat, stirring constantly, until cherries soften and release juices (about 5–7 minutes for frozen; 8–10 for fresh). Mixture will bubble and thicken significantly. Remove from heat, stir in 1 tsp pure almond extract (optional but highly recommended for depth), and cool completely — refrigerate for 30+ minutes. This prevents melting the cream cheese layer and ensures structural integrity.
- Prepare the Cheesecake Filling: Using a stand mixer or hand mixer, beat 16 oz (454g) full-fat brick cream cheese (room temperature) on medium speed until completely smooth and lump-free (2–3 minutes). Scrape bowl thoroughly. Add ⅓ cup (67g) granulated sugar and beat until light and fluffy (~1 minute). Beat in 1 large egg yolk, 2 tbsp (30g) sour cream, 1 tsp pure vanilla extract, and ¼ tsp fine sea salt. Mix only until fully incorporated — do not overbeat. Transfer to a piping bag or small zip-top bag with corner snipped; refrigerate while assembling.
- Roll & Cut Dough: On a lightly floured surface, roll one chilled dough disc to ⅛-inch thickness (about 12 inches in diameter). Use a 5-inch round cutter (or inverted bowl) to cut circles. Re-roll scraps once. Repeat with second disc. You’ll need 12–14 circles total (depending on size). Place rounds on parchment-lined baking sheets; refrigerate 15 minutes to re-chill.
- Assemble the Pies: Working with 2–3 chilled rounds at a time (keep others cold), place 1 rounded tablespoon (15g) of chilled cherry filling in the center of each round. Pipe or dollop 1 heaping teaspoon (12g) of cheesecake filling directly atop the cherries — do not spread. Fold dough over filling to create a half-moon shape. Crimp edges firmly with a fork, pressing out air pockets. Poke 2–3 small steam vents in the top with a toothpick. Transfer to parchment-lined baking sheets; refrigerate uncovered for 20 minutes (critical for sharp crimps and preventing shrinkage).
- Bake to Perfection: Preheat oven to 375°F (190°C) with rack positioned in the lower third. Brush chilled pies with egg wash. Bake for 25–32 minutes, rotating trays halfway, until crust is deeply golden brown and filling is bubbling slightly at the edges. Internal temperature of cheesecake layer should read 155–160°F (68–71°C) on an instant-read thermometer — this ensures safe setting without overbaking.
- Cool & Set: Cool pies on wire racks for at least 45 minutes — resist cutting! The fillings continue to set as they cool. For best texture and clean slicing, refrigerate for 2–3 hours before serving. Serve slightly chilled or at cool room temperature.
Tips
- Chill Everything — Seriously: Cold dough, cold fillings, cold hands, cold tools. Warmth = greasy, tough, misshapen pies. Keep dough discs wrapped and refrigerated until rolling; return assembled pies to fridge before baking.
- Don’t Overfill: Excess filling causes leakage, soggy bottoms, and poor sealing. Stick to precise measurements — use a measuring spoon, not eyeballing.
- Crimp Like a Pro: Press fork tines firmly and evenly, then rotate pie ¼ turn and crimp again. This double-crimp creates a stronger seal than single-pass crimping.
- Ventilation is Non-Negotiable: Steam buildup = burst seams or exploded pies. Always pierce 2–3 tiny holes — don’t skip this step.
- Bake on Preheated Surface: Place a heavy baking stone or inverted sheet pan in the oven while preheating. Slide pies onto it — radiant heat ensures crisp, evenly browned bottoms.
- Rotate & Monitor: Ovens have hot spots. Rotate trays front-to-back and top-to-bottom at the 15-minute mark. Watch closely after 22 minutes — browning accelerates rapidly.
- Cool Completely Before Cutting: Slicing warm pies releases steam and causes fillings to ooze. Patience rewards you with clean layers and defined structure.
- Freezer-Friendly Assembly: Assemble unbaked pies, freeze solid on trays (2 hours), then transfer to airtight freezer bags for up to 3 months. Bake straight from frozen — add 5–8 minutes to bake time and tent with foil if browning too fast.
Variations and Customizations
These hand pies are gloriously adaptable — embrace creativity while respecting structural fundamentals:
- Fruit Swaps: Blueberry-Lemon (add 1 tsp lemon zest to filling), Strawberry-Balsamic (reduce sugar, add 1 tbsp balsamic glaze), Blackberry-Ginger (add 1 tsp grated fresh ginger to filling), or Apple-Cinnamon (use peeled, diced tart apples cooked with cinnamon and a touch of Calvados).
- Cheesecake Twists: Add 2 tbsp finely chopped toasted walnuts or pecans to filling; swirl in 1 tbsp raspberry purée before piping; mix in ¼ tsp cardamom or orange blossom water for floral intrigue; substitute ¼ cup mascarpone for richer mouthfeel.
- Dough Alternatives: Whole wheat pastry flour (up to 50% substitution) for nutty depth; gluten-free 1:1 blend (ensure xanthan gum included); vegan butter + ice water + 1 tsp apple cider vinegar for dairy-free; or a quick biscuit-style dough (buttermilk + baking powder) for tender, slightly cakey contrast.
- Flavor Infusions: Steep cherry filling with 1 star anise pod or ½ cinnamon stick while cooking (remove before cooling); add 1 tbsp amaretto or kirsch to cherry compote; incorporate crushed graham cracker crumbs into cheesecake filling for “crust” essence.
- Glazes & Finishes: Drizzle with white chocolate ganache, cherry reduction glaze, or a simple powdered sugar–lemon juice icing. Sprinkle with flaky sea salt, chopped pistachios, or freeze-dried cherry dust before serving.
- Mini Version: Use a 3-inch cutter for bite-sized party treats — reduce bake time to 16–20 minutes. Perfect for weddings, baby showers, or elegant dessert tables.
- Savory-Sweet Option: Replace cherry with caramelized onions + goat cheese + thyme filling for an unexpected appetizer twist — adjust sugar/starch accordingly.
Health Considerations and Nutritional Value
While inherently indulgent, mindful tweaks can enhance nutritional balance without sacrificing joy:
- Portion Awareness: Each standard hand pie (approx. 5-inch diameter) contains ~320–380 calories, 18–22g fat (11–14g saturated), 32–38g carbs, and 4–5g protein. Enjoying 1 pie mindfully satisfies cravings without excess.
- Reduced-Sugar Options: Cut granulated sugar in cherry filling by 25% (¾ cup → ½ cup + 2 tbsp) and rely on natural fruit sweetness + lemon zest. Use monk fruit or erythritol blends (1:1) in cheesecake layer — test first, as some sugar alcohols affect texture.
- Boost Fiber & Nutrients: Substitute ¼ cup (30g) of flour with almond flour or oat flour. Stir 1 tbsp ground flaxseed or chia seeds into cheesecake filling. Add ¼ cup finely diced spinach (blanched & squeezed dry) to cherry filling for hidden greens — undetectable in flavor!
- Lower-Saturated Fat: Replace half the butter in dough with cold coconut oil (refined for neutral taste) — maintains flakiness with medium-chain triglycerides. Use low-fat (2%) cottage cheese blended until smooth instead of cream cheese — adds protein and reduces fat by ~30%.
- Allergen Notes: Naturally nut-free (unless adding nuts). For dairy-free: use vegan cream cheese (Miyoko’s or Kite Hill), plant-based butter, and unsweetened almond milk in egg wash. Gluten-free adaptation requires GF flour blend with xanthan gum and careful handling to prevent toughness.
- Functional Additions: Stir 1 tsp matcha powder into cheesecake filling for antioxidants and gentle caffeine; add ½ tsp turmeric + pinch black pepper to cherry filling for anti-inflammatory benefits (color will shift subtly — pair with orange zest).
- Mindful Pairing: Serve with a small scoop of plain Greek yogurt or a side of mixed berries to add protein, probiotics, and phytonutrients — turning dessert into a balanced, satisfying experience.
Ingredients
For the Flaky All-Butter Pie Dough:
- 2½ cups (315g) all-purpose flour, plus extra for dusting
- 1 tsp granulated sugar
- 1 tsp fine sea salt
- 1 cup (227g) unsalted butter, very cold, cubed
- ¼ cup (60ml) ice-cold water
- 1 tsp apple cider vinegar or vodka
For the Cherry Filling:
- 3 cups (450g) pitted tart cherries (frozen unsweetened or fresh)
- ¾ cup (150g) granulated sugar
- ¼ cup (30g) cornstarch (or tapioca starch)
- 1 tbsp fresh lemon juice
- 1 tsp finely grated lemon zest
- 1 tsp pure almond extract (optional but recommended)
For the Creamy Cheesecake Filling:
- 16 oz (454g) full-fat brick cream cheese, room temperature
- ⅓ cup (67g) granulated sugar
- 1 large egg yolk
- 2 tbsp (30g) full-fat sour cream
- 1 tsp pure vanilla extract
- ¼ tsp fine sea salt
For Assembly & Baking:
- 1 large egg + 1 tbsp milk or cream (for egg wash)
- Coarse turbinado or sanding sugar (optional, for sparkle)
- Flour for rolling surface
- Parchment paper
Directions
- Make the Dough: In a large bowl, whisk flour, sugar, and salt. Add cold butter; cut in with pastry cutter or pulse in food processor until mixture resembles coarse meal with visible pea-sized butter pieces. In a small bowl, combine water and vinegar. Gradually drizzle over flour mixture while stirring with fork until shaggy dough forms. Gather into ball, divide in half, flatten into 1-inch thick discs, wrap in plastic, refrigerate ≥1 hour.
- Prepare Cherry Filling: Combine cherries, sugar, cornstarch, lemon juice, and zest in saucepan. Cook over medium heat 7–10 min, stirring constantly, until thick, glossy, and bubbling. Remove from heat; stir in almond extract. Pour into shallow dish, cool 15 min, then refrigerate ≥30 min.
- Make Cheesecake Filling: Beat cream cheese until smooth (2–3 min). Add sugar; beat 1 min. Beat in egg yolk, sour cream, vanilla, and salt until just combined. Chill 15 min.
- Roll & Cut: Roll one dough disc to ⅛-inch thickness on floured surface. Cut 5-inch circles (12–14 total). Re-roll scraps once. Place rounds on parchment-lined sheets; refrigerate 15 min.
- Assemble: Place 1 tbsp cherry filling centered on each round. Top with 1 tsp cheesecake filling. Fold dough over; crimp edges firmly with fork. Poke 2–3 steam vents. Refrigerate 20 min.
- Bake: Preheat oven to 375°F (190°C) with baking stone or inverted tray inside. Brush pies with egg wash; sprinkle with turbinado sugar if desired. Bake 25–32 min, rotating halfway, until deep golden and bubbling at edges.
- Cool & Serve: Cool on wire racks ≥45 min. For clean slices, refrigerate 2–3 hours. Serve slightly chilled or at cool room temperature.
FAQ
- Can I make these ahead of time?
- Absolutely! Unbaked pies freeze beautifully for up to 3 months. Baked pies stay fresh refrigerated for 5 days or frozen for 2 months. Reheat frozen baked pies in a 350°F oven for 12–15 minutes.
- Why did my pies leak during baking?
- Most commonly: overfilling, insufficient crimping, skipping steam vents, or dough/warm fillings. Ensure cold components, precise portions, tight crimps, and proper venting.
- Can I use store-bought pie crust?
- Yes — use two 14.4-oz packages of refrigerated all-butter pie crusts (like Pillsbury or Wholly Wholesome). Skip homemade dough steps; proceed with chilling, rolling, and assembly.
- My cheesecake layer cracked — what went wrong?
- Overmixing after adding egg yolk, baking too long, or cooling too quickly. Mix minimally, bake to internal temp of 155–160°F, and cool gradually at room temp before refrigerating.
- How do I prevent a soggy bottom crust?
- Preheat baking surface, brush bottom crust lightly with egg white before filling (creates barrier), ensure cherry filling is fully cooled, and avoid overloading.
- Are these suitable for kids?
- Yes! Mildly sweet, fun to hold, and endlessly customizable (swap almond extract for vanilla-only version). Mini versions are especially kid-friendly.
- Can I make them vegan?
- Yes — use vegan butter and cream cheese (Kite Hill or Miyoko’s), flax “egg” wash (1 tbsp ground flax + 2.5 tbsp water), and maple syrup instead of sugar in filling (adjust starch slightly). Texture differs but remains delicious.
- What’s the best way to reheat?
- For best texture: 350°F oven for 8–10 minutes until warmed through. Avoid microwaving — it softens crust and separates fillings.
- Can I use cherry pie filling from a can?
- Not recommended — high in corn syrup, artificial flavors, and excess water. Homemade or frozen unsweetened cherries yield superior flavor, texture, and control.
- Do I need special equipment?
- No — just mixing bowls, saucepan, rolling pin, 5-inch round cutter (or glass), fork, baking sheets, parchment, and cooling rack. A kitchen scale ensures precision but isn’t mandatory.
Summary
Cherry Cheesecake Hand Pies are a masterclass in layered indulgence — flaky, buttery pastry enveloping velvety cream cheese and jewel-toned, tangy-sweet cherry compote, all baked to golden perfection and designed for joyful, mess-free eating.
With make-ahead ease, endless customization, and thoughtful adaptations for dietary needs, they’re as practical for weeknight treats as they are stunning for celebrations — proving that the most memorable desserts honor tradition while daring to innovate, one perfect, portable bite at a time.