Introduction
Welcome to the decadent world of Chocolate Cheesecake Tart—a luscious, sophisticated dessert that marries the rich intensity of dark chocolate with the velvety smoothness of classic New York–style cheesecake, all elegantly cradled in a buttery, crisp shortcrust or chocolate cookie tart shell. Unlike traditional layered cakes or heavy full-size cheesecakes, this tart strikes the perfect balance between elegance and approachability: it’s visually stunning with clean, defined edges; portion-friendly for gatherings; and remarkably versatile—equally at home on a holiday dessert table, a bridal shower buffet, or as an indulgent weeknight treat. Its hybrid identity bridges two beloved classics—chocolate cake and cheesecake—without leaning too heavily into either, resulting in a dessert that is deeply satisfying yet refreshingly refined. Whether you’re a seasoned baker seeking a showstopping centerpiece or a curious beginner eager to master texture, temperature, and technique, the Chocolate Cheesecake Tart offers both reward and revelation in every forkful.
The History
The Chocolate Cheesecake Tart is a relatively modern evolution within the broader lineage of cheesecake—an ancient confection with roots stretching back to ancient Greece, where simple cheese-and-honey mixtures were baked on hot stones and served to Olympic athletes for stamina. Over centuries, cheesecake migrated through medieval Europe, transformed by Renaissance innovations in dairy handling and sugar refinement, and eventually blossomed in America with the advent of cream cheese in the late 19th century (thanks to William Lawrence’s accidental creation in Chester, New York, in 1872). Meanwhile, chocolate—once a sacred Mesoamerican beverage reserved for royalty and ritual—entered European kitchens after Spanish colonization, evolving from bitter, spiced drinks into sweetened bars and cocoa powders by the Industrial Revolution. The fusion of these two iconic ingredients began appearing sporadically in mid-century American cookbooks, but it wasn’t until the 1980s and ’90s—during the rise of food magazines, culinary television, and the “gourmet home cooking” movement—that bakers began intentionally marrying chocolate ganache layers with no-bake or baked cheesecake fillings in tart form. The tart format gained traction as chefs and home cooks alike sought more elegant, controllable presentations—especially with the growing popularity of French pâtisserie techniques in North America. Today, the Chocolate Cheesecake Tart stands as a testament to culinary cross-pollination: a globally inspired, technically thoughtful, and deeply comforting dessert rooted in tradition yet unafraid to innovate—often reimagined with sea salt finishes, espresso infusions, boozy swirls, or vegan adaptations.
Ingredients Breakdown
Understanding each component—and why it matters—is essential to mastering this dessert. Below is a meticulous, function-driven breakdown of every ingredient, including scientific rationale and artisanal insight:
- Graham Cracker or Chocolate Cookie Crumb Base (1 ½ cups finely ground): Provides structural integrity and textural contrast. Graham crackers offer subtle molasses notes and neutral sweetness; chocolate wafer cookies (like Oreos sans filling or high-cocoa digestive biscuits) deepen the chocolate profile and add fat for extra richness. Finely ground crumbs ensure seamless adhesion when bound with melted butter.
- Unsalted Butter (6 tbsp, melted and cooled): Acts as the binding agent for the crust. Unsalted butter allows precise sodium control, while cooling prevents premature melting of crumbs and ensures even distribution. Clarified butter may be used for enhanced shelf stability and higher smoke point—but standard melted butter yields superior flavor and cohesion.
- Full-Fat Cream Cheese (16 oz / 454 g, room temperature): The backbone of the filling. Must be truly room temperature (68–72°F)—not just “softened”—to emulsify smoothly without curdling or air pockets. Low-fat versions destabilize the emulsion, leading to graininess and weeping. Philadelphia-brand is widely recommended for consistency, but any high-quality, block-style cream cheese (not spreadable tub varieties) works best.
- Granulated Sugar (¾ cup / 150 g): Sweetens, stabilizes, and aids aeration. Sugar’s hygroscopic nature helps retain moisture and delays starch retrogradation in the filling. For ultra-smooth texture, consider grinding granulated sugar to superfine in a food processor—reducing grittiness and accelerating dissolution.
- Sour Cream (½ cup / 120 g, full-fat, room temperature): Adds tang, moisture, and tenderness. Its acidity helps denature proteins gently during baking, yielding a creamier, less rubbery set. Avoid low-fat substitutes—they lack sufficient fat to emulsify properly and often contain stabilizers that interfere with texture.
- Heavy Cream (¼ cup / 60 ml, cold or room temperature): Enhances richness and fluidity. Cold cream slightly slows mixing, reducing over-aeration; room-temperature cream integrates faster. Whipping cream (30% fat) may substitute, but heavy cream (36–40% fat) delivers superior mouthfeel and resistance to cracking.
- Large Eggs (3, room temperature, plus 1 yolk): Eggs provide structure via protein coagulation and lecithin-rich yolks contribute emulsification and silkiness. Room-temperature eggs incorporate more evenly and reduce mixing time—critical for preventing excess air, which causes puffing and collapse. The extra yolk increases fat content and improves sheen and sliceability.
- Vanilla Extract (2 tsp pure, not imitation): Balances sweetness and enhances aromatic complexity. Madagascar Bourbon vanilla offers warm, creamy notes; Tahitian vanilla adds floral nuance. Alcohol-based extracts disperse more uniformly than pastes or beans in batter.
- Unsweetened Cocoa Powder (⅓ cup / 30 g, natural or Dutch-process): Natural cocoa (acidic, pH ~5.5) reacts with baking soda if present; Dutch-process (alkalized, pH ~7–8) is milder and darker. For this recipe, Dutch-process is preferred for its deeper color, smoother bitterness, and compatibility with dairy proteins—though natural works fine if you adjust acidity elsewhere (e.g., adding ¼ tsp lemon juice).
- Dark Chocolate (6 oz / 170 g, 60–70% cacao, finely chopped or grated): Not just flavor—it contributes cocoa butter for melt-in-the-mouth richness and stabilizes the protein matrix. Couverture chocolate is ideal; avoid chocolate chips (they contain stabilizers that hinder melting and create graininess). Tempering isn’t required here since it’s baked into the filling, but finely chopping ensures even dispersion and quick melting during water bath integration.
- Pinch of Fine Sea Salt (¼ tsp): Amplifies all other flavors and counters sweetness. Kosher or flaky sea salt is too coarse for uniform distribution; fine sea salt or Himalayan pink salt dissolves completely and delivers balanced savory depth.
- Optional Additions: Espresso powder (1 tsp) intensifies chocolate without adding bitterness; orange zest (1 tsp) introduces bright citrus lift; instant coffee granules (1 tsp) deepens roast notes; a splash of bourbon or Grand Marnier (1 tbsp) adds aromatic warmth and complexity.
Step-by-Step Recipe
- Prepare the Tart Pan: Select a 9-inch (23 cm) fluted tart pan with removable bottom. Lightly grease the base and sides with softened butter, then line the bottom with a round of parchment paper. This ensures effortless release and clean slicing—even after chilling.
- Make the Crust: In a food processor, pulse graham crackers or chocolate cookies with sugar (1 tbsp) and salt (a pinch) until fine crumbs form—about 15–20 seconds. Drizzle in melted butter while pulsing until mixture resembles wet sand and holds together when pinched. Transfer to tart pan and press firmly and evenly into bottom and up the sides using the back of a measuring cup or flat-bottomed glass. Chill uncovered for at least 30 minutes—or freeze for 15 minutes—to solidify fats and prevent shrinkage during baking.
- Pre-Bake the Crust: Preheat oven to 350°F (175°C). Line chilled crust with parchment and fill with pie weights or dried beans. Bake for 15 minutes. Carefully remove weights and parchment, then bake 8–10 minutes more until golden and fragrant. Cool completely on a wire rack—do not skip cooling; warm crust will melt the filling upon contact.
- Melt the Chocolate: Place chopped dark chocolate in a heatproof bowl. Set over a saucepan of barely simmering water (double boiler), stirring constantly with a silicone spatula until fully melted and glossy—about 3–4 minutes. Remove from heat and let cool to 90–95°F (32–35°C); too hot, and it’ll scramble the eggs later.
- Cream the Cheese Base: In a large stand mixer fitted with paddle attachment, beat cream cheese on medium-low for 2 minutes until completely smooth and free of lumps. Scrape down bowl thoroughly. Add sugar and beat 2 more minutes until pale and fluffy—no shortcuts; proper aeration builds volume and stability. Add sour cream and heavy cream; beat 1 minute until homogenous. Add eggs one at a time, beating just until incorporated (5–10 seconds per egg), followed by yolk. Scrape bowl after each addition. Finally, blend in vanilla, cocoa powder, and salt on low until just combined—overmixing at this stage incorporates excess air, inviting cracks.
- Incorporate the Chocolate: With mixer on lowest speed, slowly stream in the tempered, cooled chocolate in three additions, waiting until each is nearly absorbed before adding the next. Pause and fold gently with a spatula to ensure no streaks remain. Batter should be thick, glossy, and uniformly mahogany brown.
- Fill & Smooth: Pour batter into cooled crust. Tap pan sharply 4–5 times on counter to release trapped air bubbles. Use an offset spatula to smooth surface, then run a toothpick through batter in a gentle zigzag pattern to further eliminate micro-bubbles.
- Water Bath Setup (Crucial!): Wrap the *outside* of the tart pan tightly with two overlapping layers of heavy-duty aluminum foil—this prevents water seepage. Place pan inside a larger roasting pan. Carefully pour hot (not boiling) water into roasting pan until it reaches halfway up the sides of the tart pan. The water bath moderates heat transfer, preventing rapid expansion and collapse—thus eliminating cracks and ensuring custard-like tenderness.
- Bake with Precision: Place roasting pan in preheated 325°F (163°C) oven. Bake for 65–75 minutes—timing varies by oven accuracy and humidity. The tart is done when edges are puffed and lightly set, center jiggles *just slightly* like Jell-O (not sloshes), and internal temperature reads 150–152°F (65–67°C) on an instant-read thermometer inserted 1 inch from edge. Do not open oven door for first 50 minutes.
- Cool Gradually (Non-Negotiable): Turn off oven, crack door open 1 inch with a wooden spoon, and let tart cool inside for 1 hour. This slow cooldown prevents thermal shock-induced cracking. Then carefully lift tart (still in pan) onto cooling rack and cool completely at room temperature—another 2 hours minimum.
- Chill Overnight: Cover loosely with plastic wrap (touching surface to prevent condensation) and refrigerate for *at least 12 hours*, preferably 24. This allows full protein set, flavor melding, and optimal slice integrity. Do not rush—chilling transforms texture from soft-set to luxuriously firm-yet-giving.
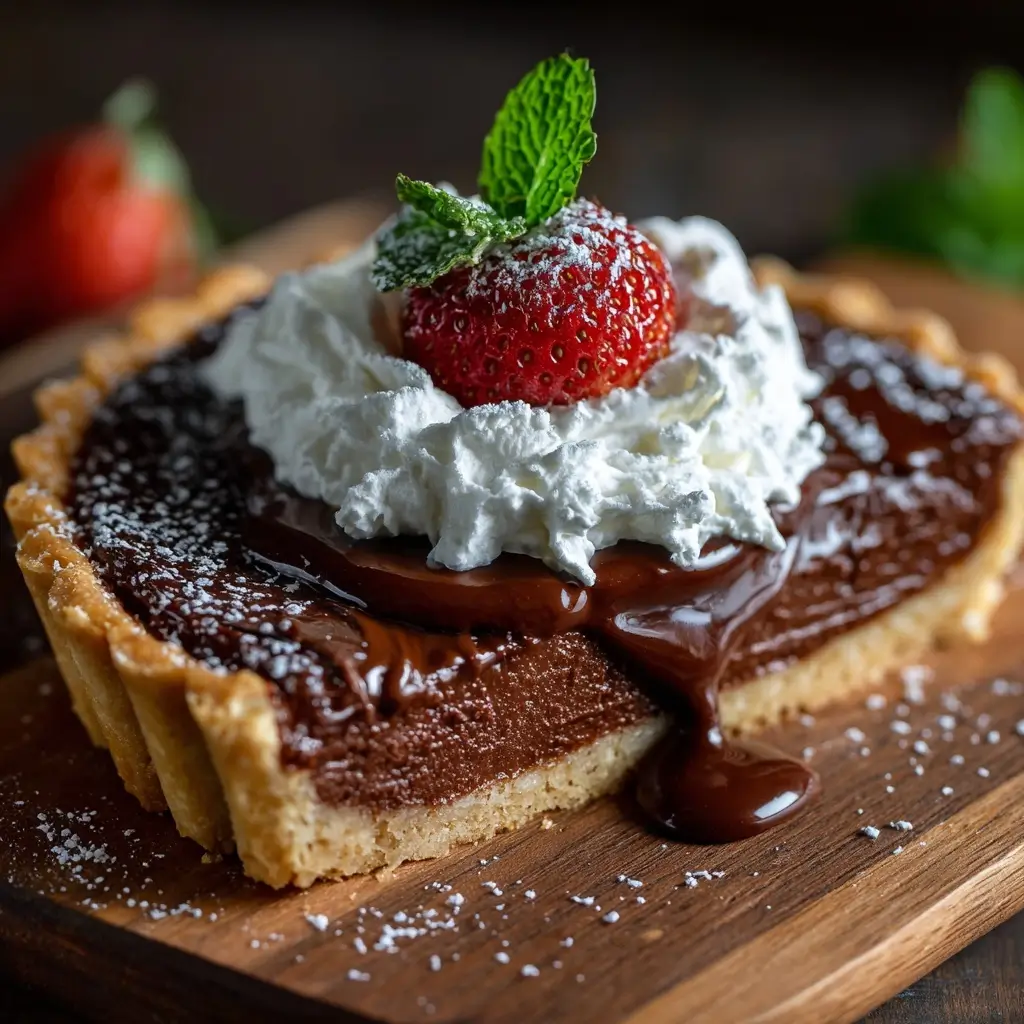
- Unmold & Finish: Run thin metal spatula around inner edge to loosen. Carefully release springform ring. Slide thin, flexible offset spatula under crust to lift tart onto serving plate. Optional garnishes: dust with cocoa or powdered sugar using a fine-mesh sieve; drizzle with salted caramel, raspberry coulis, or white chocolate ganache; top with fresh raspberries, edible gold leaf, or candied orange peel.
Tips
- Temperature Discipline Is Everything: Every dairy and egg ingredient must be at true room temperature—not cool, not warm. Pull cream cheese and eggs from fridge 3+ hours ahead. If rushed, submerge sealed cream cheese in warm (not hot) water for 10 minutes, then pat dry.
- No Overmixing—Ever: Once eggs enter the batter, switch to hand mixing if needed. Overbeating incorporates air that expands in oven, then collapses—causing cracks and sunken centers. Mix only until just combined.
- Double-Check Your Oven Thermometer: Ovens lie. An inaccurate reading by even 15°F can mean underbaked filling or cracked surface. Use a standalone oven thermometer placed on the middle rack.
- Foil Wrapping Technique Matters: Use *two* overlapping sheets of heavy-duty foil, molded snugly around the pan’s exterior seam. Crimp tightly at the top edge. Test for leaks by placing wrapped pan in sink and pouring in ½ cup water—no drips = good seal.
- Water Bath Water Should Be Hot—Not Boiling: Boiling water creates violent steam and temperature spikes. Use water heated to 180–190°F (82–88°C) for gentle, consistent conduction.
- Resist the Urge to Cut Too Soon: Even after 12 hours, the very center remains slightly softer. For razor-sharp slices, chill 24 hours and use a knife dipped in hot water and wiped dry between cuts.
- Fix Minor Cracks Gracefully: If small fissures appear, cover them artfully with a glossy ganache layer, whipped chocolate cream, or a delicate lattice of melted white chocolate piped over top.
- Storage Wisdom: Keep covered in refrigerator up to 5 days. Freeze *un-garnished* tart (well-wrapped in plastic + foil) up to 2 months. Thaw overnight in fridge—never at room temperature—to preserve texture.
Variations and Customizations
This recipe is a canvas—not a cage. Explore these thoughtfully engineered variations, each preserving structural integrity while expanding flavor horizons:
- White Chocolate Raspberry Swirl: Replace 2 oz dark chocolate with high-quality white chocolate. After pouring batter, dollop ⅓ cup seedless raspberry purée (strained) over surface and swirl gently with a toothpick. Adds vibrant acidity and floral brightness.
- Espresso Dark Chocolate: Dissolve 1 tbsp instant espresso powder in 1 tsp hot water; cool completely before adding with vanilla. Intensifies chocolate’s roasted depth without bitterness. Garnish with dark chocolate curls and espresso bean dust.
- Orange-Infused Ganache Topper: After chilling, prepare a glossy ganache using 4 oz dark chocolate + ½ cup heavy cream + 1 tsp orange zest + 1 tbsp Grand Marnier. Pour over chilled tart and tilt to coat evenly. Sets to mirror-like finish.
- Gluten-Free Adaptation: Use certified GF chocolate sandwich cookies (like Schär or Glutino) for crust. Ensure cocoa powder and baking staples are GF-certified. Texture remains indistinguishable from traditional version.
- Vegan Version (Baked): Substitute cream cheese with blended silken tofu (12 oz) + ⅓ cup refined coconut oil + ⅓ cup maple syrup + 3 tbsp cocoa powder + 1 tsp apple cider vinegar (for tang). Crust: GF oats + dates + cocoa + coconut oil. Requires precise timing adjustments—bake at 325°F for 55–65 min.
- No-Bake Chocolate Cheesecake Tart: Replace baked filling with no-bake version: blend soaked cashews (1 cup), melted dark chocolate (4 oz), maple syrup (⅓ cup), coconut cream (½ cup), cocoa (3 tbsp), vanilla, and salt until ultra-smooth. Pour into pre-chilled crust and freeze 6 hours, then thaw 20 min before serving.
- Spiced Mexican Chocolate: Add ½ tsp ground cinnamon, ¼ tsp chipotle powder (for smoky heat), and pinch of cayenne to dry ingredients. Top with crumbled pepitas and flaky sea salt.
- Mini Individual Tarts: Press crust into 12 standard muffin tin cups lined with paper liners. Fill with batter and bake in water bath (roasting pan filled with 1″ hot water) at 325°F for 28–32 minutes. Perfect for parties and portion control.
Health Considerations and Nutritional Value
A single generous slice (1/12 of a 9-inch tart) contains approximately:
- Calories: 420–460 kcal
- Total Fat: 30–33 g (18–20 g saturated)
- Carbohydrates: 32–36 g (22–25 g sugars)
- Protein: 6–7 g
- Fiber: 1.5–2 g (primarily from cocoa and crust)
- Calcium: ~8% DV (from dairy)
- Iron: ~6% DV (from cocoa)
- Magnesium: ~12% DV (dark chocolate is magnesium-rich)
- Antioxidants: High in flavanols—linked to improved endothelial function, reduced oxidative stress, and modest blood pressure support when consumed regularly in moderation.
Considerations: While indulgent, this tart offers nutritional nuance beyond “empty calories.” Dark chocolate (70%+) delivers polyphenols with anti-inflammatory properties. Full-fat dairy provides conjugated linoleic acid (CLA) and bioavailable calcium. However, portion awareness remains key—excess saturated fat may impact LDL cholesterol in sensitive individuals. For those managing blood sugar, note the glycemic load (~18); pairing with berries or unsweetened whipped cream adds fiber and slows glucose absorption. Lactose-intolerant individuals may tolerate small servings due to fermentation-derived lactase reduction in aged cheeses—but dairy-free versions are reliably safer. Always consult a registered dietitian for personalized guidance, especially with conditions like diabetes, hypertension, or cardiovascular disease.
Ingredients
- For the Crust:
– 1 ½ cups (150 g) finely crushed graham crackers or chocolate sandwich cookies (filling removed)
– 6 tablespoons (85 g) unsalted butter, melted and cooled
– 1 tablespoon (12 g) granulated sugar
– ¼ teaspoon fine sea salt - For the Filling:
– 16 ounces (454 g) full-fat cream cheese, at room temperature (68–72°F)
– ¾ cup (150 g) granulated sugar
– ½ cup (120 g) full-fat sour cream, at room temperature
– ¼ cup (60 ml) heavy cream (36–40% fat), at room temperature or cold
– 3 large eggs + 1 large egg yolk, at room temperature
– 2 teaspoons pure vanilla extract
– ⅓ cup (30 g) unsweetened Dutch-process cocoa powder
– 6 ounces (170 g) high-quality dark chocolate (60–70% cacao), finely chopped
– ¼ teaspoon fine sea salt - For Serving (Optional):
– Powdered sugar or cocoa powder, for dusting
– Fresh raspberries or strawberries
– Salted caramel or raspberry coulis
– Toasted hazelnuts or cocoa nibs
– Edible gold flakes or orange zest
Directions
- Position oven rack in center position and preheat oven to 350°F (175°C). Prepare a 9-inch fluted tart pan with removable bottom: grease base and sides lightly with butter, then line bottom with parchment paper round.
- In food processor, combine crushed cookies, 1 tbsp sugar, and ¼ tsp salt. Pulse until uniform fine crumbs form. Drizzle in melted butter while pulsing until mixture resembles damp sand and clings when squeezed. Press firmly and evenly into bottom and up sides of prepared pan. Chill uncovered for 30 minutes (or freeze 15 minutes).
- Bake crust: Line chilled crust with parchment and fill with pie weights. Bake 15 minutes. Remove weights and parchment; bake 8–10 minutes more until golden and fragrant. Cool completely on wire rack—minimum 45 minutes.
- Reduce oven temperature to 325°F (163°C). Prepare water bath: wrap *outside* of tart pan tightly with two overlapping sheets of heavy-duty foil.
- Melt chocolate: Place chopped chocolate in heatproof bowl. Set over saucepan of barely simmering water (don’t let bowl touch water). Stir constantly until smooth and glossy, ~3–4 minutes. Remove from heat; cool to 90–95°F (32–35°C).
- In stand mixer with paddle attachment, beat cream cheese on medium-low 2 minutes until perfectly smooth. Scrape bowl. Add sugar; beat 2 minutes until pale and airy. Add sour cream and heavy cream; beat 1 minute until blended. Add eggs one at a time, beating just until incorporated (5 sec each), then yolk. Scrape bowl thoroughly. Add vanilla, cocoa, and ¼ tsp salt; mix on low until just combined.
- With mixer on lowest speed, slowly drizzle in cooled chocolate in three additions, pausing to scrape bowl. Fold once with spatula to ensure uniform color and texture.
- Pour batter into cooled crust. Tap pan sharply on counter 4–5 times. Smooth top with offset spatula. Run toothpick through batter in zigzag to pop bubbles.
- Place foil-wrapped tart pan into larger roasting pan. Carefully pour hot (180–190°F) water into roasting pan until halfway up sides of tart pan.
- Bake 65–75 minutes until edges are set and center jiggles slightly. Internal temp should read 150–152°F (65–67°C) 1 inch from edge.
- Turn off oven. Crack door open 1 inch with wooden spoon; cool tart inside oven 1 hour. Remove to wire rack; cool completely at room temperature (2+ hours).
- Cover loosely with plastic wrap (touching surface) and refrigerate minimum 12 hours, ideally 24.
- To serve: Run thin spatula around edge, release ring, slide tart onto plate. Garnish as desired. Slice with hot, dry knife wiped between cuts.
FAQ
- Can I make this ahead?
- Absolutely—this tart improves with time. It keeps beautifully refrigerated for up to 5 days. For best results, bake and chill 1–2 days before serving.
- Why did my tart crack?
- Most commonly due to rapid temperature shifts (opening oven too soon, cooling too quickly), overmixing, or water bath failure. Follow gradual cooling instructions precisely—and never skip the water bath.
- Can I freeze it?
- Yes! Fully chilled, unwrapped tart freezes well for up to 2 months. Wrap tightly in plastic, then heavy foil. Thaw overnight in fridge—not at room temp—to prevent condensation and texture degradation.
- What if I don’t have a tart pan?
- You can use a 9-inch springform pan—but expect thicker sides and less elegant presentation. Alternatively, bake in a 9×13″ pan and cut into bars (reduce bake time by ~10 minutes).
- Can I use low-fat cream cheese or sour cream?
- Not recommended. Reduced-fat dairy lacks sufficient fat to emulsify properly, resulting in grainy, watery, or crumbly texture. Full-fat is non-negotiable for structural integrity and mouthfeel.
- Is a water bath really necessary?
- Yes—for this recipe, it’s essential. Without it, uneven heating causes the outer edges to overcook while the center remains underdone—or worse, leads to dramatic cracking and sinking. Don’t skip it.
- How do I get clean slices?
- Chill thoroughly (24 hrs ideal), use a long, thin knife warmed under hot water and wiped dry before each cut. Wipe and rewarm between slices.
- Can I add fruit on top before baking?
- Not recommended—juices will bleed and cause soggy spots. Instead, arrange fresh berries or edible flowers on chilled tart just before serving.
- What’s the best chocolate to use?
- High-cocoa couverture (Valrhona, Callebaut, Guittard) or premium grocery brands (Green & Black’s, Lindt Excellence). Avoid chocolate chips—they contain stabilizers that inhibit smooth melting.
- Can I make it gluten-free?
- Easily—substitute GF chocolate cookies (Oreo GF, Schär Digestive) for crust and verify all other ingredients (cocoa, vanilla) are certified GF.
Summary
The Chocolate Cheesecake Tart is a masterclass in harmony—where the bold, nuanced depth of premium dark chocolate meets the cloud-like richness of slow-baked, water-bathed cheesecake, all anchored by a crisp, buttery crust that shatters delicately with every bite.
It’s a dessert built on precision, patience, and respect for ingredients—yet accessible enough for determined beginners, endlessly adaptable for creative bakers, and unforgettable enough to become a lifelong tradition.