Introduction
Welcome to the ultimate no-bake dessert experience: No-Bake Oreo Cheesecake Jars — a decadent, creamy, and effortlessly elegant treat that brings the nostalgic crunch of Oreos together with the luscious tang of classic cheesecake—all served in charming, portable mason jars. Perfect for dinner parties, potlucks, bridal showers, holiday gatherings, or even a well-deserved solo dessert moment, these individual-sized delights require zero oven time, minimal equipment, and maximum flavor impact. Unlike traditional baked cheesecakes that demand precision, water baths, and hours of cooling, this version delivers restaurant-quality texture and richness in under 30 minutes of active prep—and then chills to perfection overnight. Whether you’re a seasoned baker or a complete kitchen novice, this recipe is designed for foolproof success, visual appeal, and crowd-pleasing versatility.
The History
The evolution of the No-Bake Oreo Cheesecake Jar is a delicious convergence of three iconic American food narratives. First, cheesecake traces its roots back over 2,000 years to ancient Greece, but its modern American incarnation—especially the no-bake version—gained popularity in the mid-20th century with the advent of stabilized cream cheese, whipped toppings, and gelatin-based set methods. Second, Oreos, introduced by Nabisco in 1912, became synonymous with creamy-crunchy contrast and inspired countless copycat desserts; their creme-filled chocolate wafers proved to be an ideal pairing for rich, tangy fillings. Third, the jar trend emerged in the early 2010s as part of the broader “deconstructed dessert” and “portable gourmet” movement—fueled by social media’s love for photogenic, layered, and portion-controlled treats. Food bloggers and home bakers began reimagining classics like tiramisu, parfaits, and cheesecakes in wide-mouth mason jars, prioritizing both aesthetics and practicality. The No-Bake Oreo Cheesecake Jar crystallized this fusion: it honors tradition while embracing convenience, celebrates nostalgia while leaning into contemporary presentation, and transforms pantry staples into something truly special—without ever turning on the oven.
Ingredients Breakdown
Every element in this recipe serves a precise functional and sensory purpose—no filler, no fluff. Let’s explore why each ingredient matters:
- Full-Fat Cream Cheese (8 oz / 225 g, room temperature): The structural and flavor backbone. Full-fat ensures richness, smoothness, and proper emulsification. Room temperature is non-negotiable—cold cream cheese will yield lumps and resist blending, compromising texture and stability.
- Granulated Sugar (⅔ cup / 135 g): Sweetens and balances acidity while aiding in aeration during beating. Powdered sugar can be substituted for ultra-smoothness, but granulated offers better control over viscosity.
- Fresh Lemon Juice (1½ tsp) & Lemon Zest (from ½ lemon): Bright acidity cuts through richness and enhances cheesecake authenticity; zest adds aromatic complexity and prevents cloying sweetness.
- Heavy Whipping Cream (1 cup / 240 mL, very cold): Provides luxurious mouthfeel and volume when whipped to stiff peaks. Fat content (≥36%) is essential—lower-fat alternatives (e.g., half-and-half or milk) will not hold structure and may cause separation.
- Unflavored Gelatin (1 tsp) + 1½ tbsp Cold Water: The silent stabilizer. Blooms in cold water, then dissolves into warm (not hot) cream cheese mixture to prevent weeping, ensure clean sliceability, and extend fridge life up to 5 days without graininess or collapse.
- Vanilla Extract (1½ tsp, pure, not imitation): Deepens flavor profile and harmonizes chocolate and dairy notes. Mexican or Tahitian vanilla adds subtle floral nuance.
- Classic Oreo Cookies (28–32 cookies, ~200 g): Used in two ways: finely crushed for the base layer and coarsely chopped for garnish and textural surprise. Double-Stuf versions add extra creaminess; Golden Oreos offer a vanilla-cinnamon twist. Avoid “Thins” or seasonal flavors unless intentionally experimenting—the standard cookie delivers optimal fat-to-cream ratio and structural integrity.
- Unsalted Butter (3 tbsp / 42 g, melted): Binds the crust crumbs and creates a firm, cohesive base that won’t crumble when spooned. Salted butter may oversalt the delicate balance—unsalted allows full control.
- Optional Enhancements: A pinch of sea salt (flaky Maldon) on top elevates all flavors; a drizzle of high-quality chocolate ganache (dark, milk, or white) adds polish; edible flowers (e.g., pansies or violets) lend sophistication for celebrations.
Step-by-Step Recipe
Follow these meticulously tested steps for guaranteed success—each stage builds upon the last to create layered stability, balanced sweetness, and stunning visual definition:
- Prepare the Oreo Crust Base: Pulse 20 Oreos (reserving 8–12 for garnish) in a food processor until fine, sandy crumbs form (~30 seconds). Transfer to a bowl, stir in melted butter until evenly moistened (it should hold together when pinched). Divide evenly among 4–6 clean, dry 8-oz wide-mouth mason jars (or glasses), pressing firmly into the bottom with the back of a spoon or small measuring cup. Refrigerate for at least 15 minutes to set.
- Bloom the Gelatin: In a small heatproof bowl, sprinkle gelatin over cold water. Let sit 5 minutes until spongy and opaque (“bloomed”). Meanwhile, gently warm 2 tbsp of the cream cheese mixture (see next step) in a microwave for 5–8 seconds—just enough to melt slightly—then whisk in bloomed gelatin until fully dissolved (no granules remain). Set aside.
- Cream the Filling Base: In a large mixing bowl, beat softened cream cheese, sugar, lemon juice, lemon zest, and vanilla on medium speed for 2–3 minutes until completely smooth, scraping down sides frequently. Overbeating introduces air bubbles that can destabilize layers—stop as soon as homogeneous.
- Incorporate Gelatin Mixture: With mixer on low, slowly stream in the dissolved gelatin mixture. Beat just until incorporated—about 10 seconds. Do not overmix.
- Whip the Cream: In a separate chilled bowl (preferably metal or glass), whip cold heavy cream on medium-high until soft peaks form (~2 minutes). Increase speed to high and whip just until stiff, glossy peaks hold—do not overwhip into butter. Fold one-third of the whipped cream into the cream cheese mixture using a silicone spatula with gentle, sweeping motions from bottom to top—this lightens the batter. Then carefully fold in remaining whipped cream in two additions until no white streaks remain. Overfolding deflates air—aim for uniform, airy consistency.
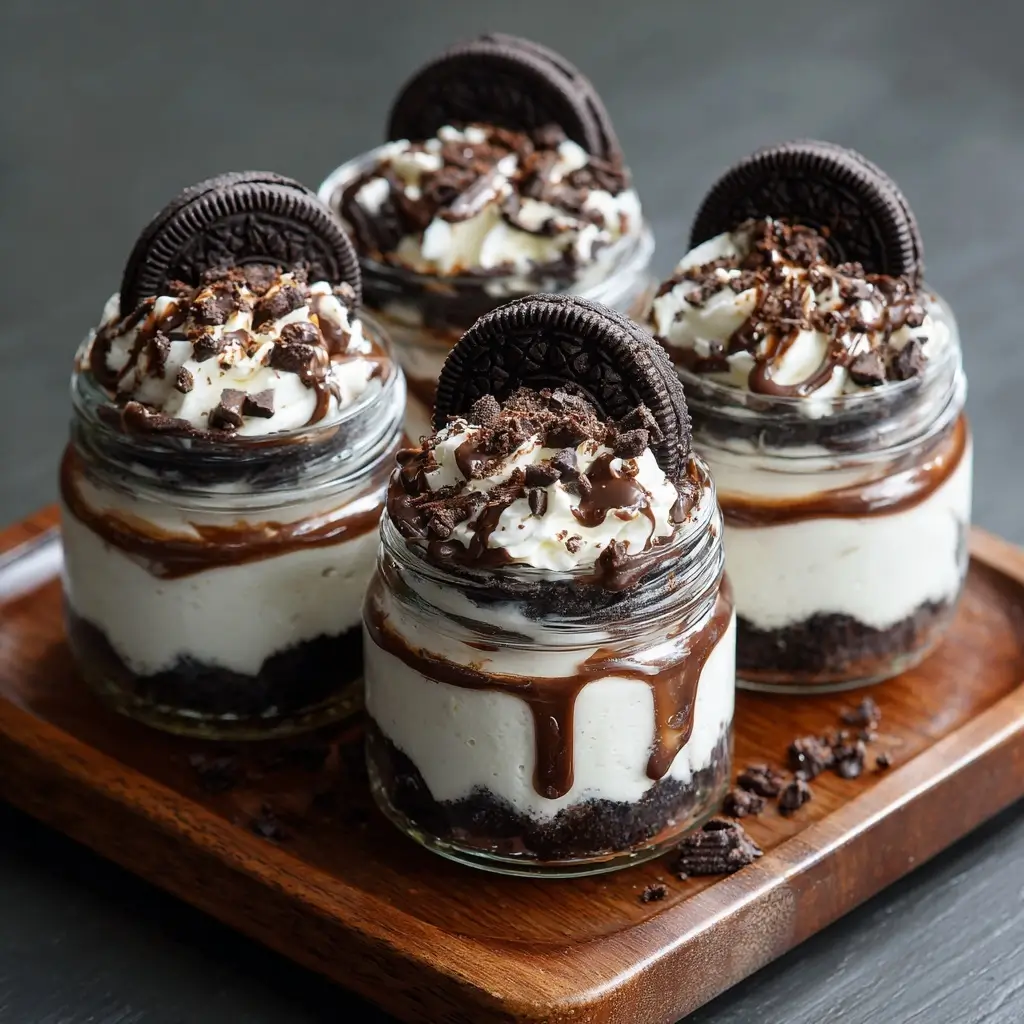
- Layer the Jars: Spoon or pipe filling over chilled crusts, filling each jar to within ¼ inch of the rim. Tap jars lightly on counter to release air bubbles and smooth surface. For professional presentation, use an offset spatula dipped in hot water and wiped dry for pristine edges.
- Add Texture & Garnish: Coarsely chop reserved Oreos (6–8 cookies) and press a generous pinch into the top of each jar. Optional: sprinkle with flaky sea salt or drizzle with cooled ganache.
- Chill Thoroughly: Cover jars loosely with plastic wrap or lids (not sealed airtight to avoid condensation). Refrigerate for minimum 6 hours—but ideally 10–12 hours or overnight. This allows gelatin to fully set, flavors to meld, and texture to mature from airy to luxuriously dense-yet-creamy.
Tips
- Temperature Is Everything: All dairy ingredients must be at correct temperatures—cream cheese at true room temp (68–72°F), cream ice-cold (35–40°F). Use a thermometer if uncertain. Warm cream will deflate; cold cream cheese won’t blend.
- Scrape, Scrape, Scrape: Use a flexible silicone spatula to scrape bowl sides and bottom after every mixing step. Unincorporated pockets of sugar or cream cheese cause graininess.
- Gelatin Precision: Never boil gelatin mixture—it breaks down proteins and loses setting power. Warm just enough to dissolve (120–130°F max). If lumps persist, strain through a fine-mesh sieve before folding in.
- Whipped Cream Wisdom: Whip cream only until stiff peaks form—overwhipped cream separates and makes filling greasy. Chill bowl and beaters for 10 minutes pre-whipping for best results.
- Jar Selection Matters: Use straight-sided, wide-mouth 8-oz mason jars (like Ball Regular Mouth Pint) for easy layering and spooning. Narrow jars frustrate piping and obscure beautiful strata. Ensure jars are impeccably clean and dry—any grease inhibits setting.
- Make-Ahead Magic: Assemble jars up to 2 days ahead. Store covered in refrigerator. Add final Oreo garnish no more than 2 hours before serving to preserve crunch.
- Freezing Option: Fully chilled jars freeze beautifully for up to 4 weeks. Wrap individually in parchment + foil, thaw overnight in fridge—not at room temp—to maintain texture and prevent condensation.
- Serving Tip: Run a thin knife around inner edge before spooning to ensure clean release. Serve chilled—but not straight from freezer (unless frozen version intended).
Variations and Customizations
This recipe is a canvas for creativity—here are 12 thoughtfully developed variations, each tested for structural integrity and flavor harmony:
- Strawberry Swirl: Fold ¼ cup seedless strawberry jam (simmered 2 min to thicken) into filling in ribbons before layering. Top with fresh hulled berries and mint.
- Peppermint Crunch: Replace 1 tsp vanilla with ¼ tsp pure peppermint extract. Mix 2 tbsp crushed candy canes into whipped cream portion before folding. Garnish with additional candy cane bits.
- Chocolate-Dipped: Dip rims of jars in melted dark chocolate, then in crushed Oreos or cocoa nibs before assembling. Drizzle tops with chocolate once set.
- Golden Oreo Delight: Substitute Golden Oreos for all cookies. Add ½ tsp ground cinnamon + ¼ tsp nutmeg to crust. Use vanilla bean paste instead of extract for depth.
- Espresso Fusion: Dissolve 1 tsp instant espresso powder in lemon juice before adding to cream cheese. Garnish with cocoa-dusted whipped cream and chocolate-covered coffee beans.
- Peanut Butter Cup: Swirl 3 tbsp smooth peanut butter (warmed 5 sec) into filling. Press crushed Reese’s Cups into crust and garnish with mini cups.
- Vegan Adaptation: Use dairy-free cream cheese (Kite Hill or Miyoko’s), full-fat coconut cream (chilled overnight, solid part only), agar-agar (1 tsp dissolved in 2 tbsp water, boiled 1 min), and vegan Oreos. Chill 14+ hours.
- Gluten-Free: Use certified GF Oreos (e.g., Enjoy Life brand) and verify all extracts/gelatin are GF. Note: texture may be slightly less crisp—add 1 tbsp almond flour to crust for binding.
- Low-Sugar/Keto: Replace granulated sugar with ⅔ cup erythritol-monk fruit blend (like Lakanto). Use keto-friendly chocolate sandwich cookies (e.g., Catalina Crunch). Add ¼ tsp xanthan gum to filling for stability.
- Matcha Zen: Whisk 1 tsp ceremonial-grade matcha into powdered sugar before creaming. Garnish with white chocolate curls and toasted sesame.
- Blueberry Basil: Simmer ½ cup blueberries + 1 tbsp honey until thickened; cool completely. Fold into filling with 4–5 fresh basil leaves, chiffonaded.
- Boozy Bonus: Add 1 tbsp bourbon, Baileys, or Kahlúa to cream cheese mixture. Reduce lemon juice by ½ tsp to balance. Garnish with candied orange peel.
Health Considerations and Nutritional Value
While undeniably indulgent, mindful preparation can enhance nutritional alignment without sacrificing joy:
- Nutrition Snapshot (per 8-oz jar, approx.): Calories: 520 | Total Fat: 34g (21g sat) | Carbs: 48g (34g sugars) | Protein: 6g | Sodium: 320mg | Calcium: 65mg | Iron: 2.1mg. Values vary based on Oreo count, butter amount, and cream cheese brand.
- Sugar Awareness: Oreos contribute ~14g added sugar per 3-cookie serving. To reduce: use fewer cookies in crust (16 instead of 20), opt for reduced-sugar Oreos (with maltitol), or substitute 25% of crust crumbs with unsweetened cocoa powder + 1 tsp stevia.
- Fat Profile: Primarily saturated from butter and cream cheese—but also contains beneficial short-chain fatty acids (butyrate) from fermented dairy and heart-healthy monounsaturated fats from cocoa butter in Oreos. Using grass-fed cream cheese adds omega-3s and CLA.
- Digestive Notes: Gelatin is naturally gut-soothing and collagen-rich—supporting intestinal lining health. For sensitive systems, ensure lactose-intolerant individuals know cream cheese contains trace lactose (most tolerate small amounts).
- Allergen Transparency: Contains dairy, wheat/gluten (unless GF cookies used), soy (in most Oreos and cream cheese), and eggs (in some cream cheese brands—check labels). Tree nuts not present unless added via variation (e.g., peanut butter).
- Portion Control Benefit: Individual jars inherently discourage overconsumption—a stark contrast to slab-style desserts. Serving size is physically defined, promoting mindful eating.
- Protein Boost Option: Stir 1 scoop (25g) unflavored collagen peptides into warm gelatin mixture—adds 20g protein, zero taste or texture change, supports skin/joint health.
- Mindful Indulgence Philosophy: This dessert fits beautifully within a balanced dietary pattern when enjoyed intentionally—not as background snacking, but as a cherished ritual. Its no-bake nature also reduces energy consumption and kitchen heat, aligning with sustainable lifestyle values.
Ingredients
- 20–22 Classic Oreo cookies (for crust), plus 8–12 extra for garnish
- 3 tablespoons unsalted butter, melted and cooled
- 8 ounces (225 g) full-fat brick-style cream cheese, at room temperature
- ⅔ cup (135 g) granulated sugar
- 1½ teaspoons fresh lemon juice
- ½ teaspoon lemon zest (from ½ lemon)
- 1½ teaspoons pure vanilla extract
- 1 teaspoon unflavored powdered gelatin
- 1½ tablespoons cold water
- 1 cup (240 mL) heavy whipping cream (≥36% fat), very cold
- Flaky sea salt, for finishing (optional)
- Chocolate ganache or fresh berries, for optional garnish
Directions
- Place 20–22 Oreos in a food processor and pulse until fine, uniform crumbs form (about 30 seconds). Transfer to a medium bowl and stir in melted butter until all crumbs are evenly moistened and resemble wet sand.
- Distribute crust mixture evenly among 4–6 clean, dry 8-ounce wide-mouth mason jars. Press firmly into the bottom using the back of a spoon or small measuring cup. Refrigerate for at least 15 minutes to set.
- In a small heatproof bowl, sprinkle gelatin over cold water. Let bloom for 5 minutes until spongy and opaque.
- In a large mixing bowl, beat cream cheese, sugar, lemon juice, lemon zest, and vanilla on medium speed for 2–3 minutes, scraping down sides often, until completely smooth and lump-free.
- Gently warm 2 tablespoons of the cream cheese mixture in the microwave for 5–8 seconds. Whisk in bloomed gelatin until fully dissolved (no granules). Pour mixture back into main bowl and mix on low for 10 seconds to incorporate.
- In a separate chilled bowl, whip cold heavy cream on medium-high until soft peaks form (~2 minutes), then increase to high and whip just until stiff, glossy peaks hold—do not overwhip.
- Fold one-third of the whipped cream into cream cheese mixture to lighten. Gently fold in remaining whipped cream in two additions until fully combined and airy—no streaks visible.
- Spoon or pipe filling over chilled crusts, filling each jar to within ¼ inch of the rim. Tap jars lightly on countertop to release air bubbles and smooth surface.
- Coarsely chop reserved Oreos and press a generous pinch into the top of each jar. Optional: finish with flaky sea salt or drizzle of ganache.
- Cover jars loosely with plastic wrap or fitted lids (not airtight). Refrigerate for minimum 6 hours—or preferably 10–12 hours or overnight—for optimal texture and flavor development.
- Before serving, run a thin knife around the inner edge of each jar. Spoon out and enjoy chilled.
FAQ
- Can I use low-fat cream cheese?
- No—low-fat or neufchâtel will result in a watery, unstable filling that weeps and lacks body. Full-fat is essential for emulsion and structure.
- Why does my filling look curdled?
- Most commonly due to cold cream cheese or overbeating. Ensure cream cheese is truly room temp (soft to touch, not melty) and stop mixing as soon as smooth. If curdled, try warming mixture gently over double boiler while stirring—then chill and re-whip cream.
- Can I make these without gelatin?
- Yes—but expect softer set, shorter fridge life (max 3 days), and potential weeping. Substitute with 2 tbsp instant clearjel or 1 tbsp cornstarch (mixed with 1 tsp cold water, cooked to translucent) for vegetarian stability.
- How do I prevent soggy crust?
- Ensure butter is fully absorbed before chilling, and never assemble more than 12 hours before serving. If humidity is high, add 1 tsp cocoa powder to crust to absorb excess moisture.
- Can I use Cool Whip instead of homemade whipped cream?
- Not recommended—Cool Whip contains stabilizers and air that interfere with gelatin setting and produce artificial texture. Homemade whipped cream delivers superior mouthfeel and clean flavor.
- My jars are weeping liquid—what went wrong?
- Overmixing after adding gelatin, using expired gelatin, insufficient chilling time, or temperature fluctuations during storage. Always chill overnight and keep refrigerated below 40°F.
- What size jars should I use?
- Standard 8-ounce wide-mouth mason jars (like Ball Pint Regular Mouth) are ideal—holds ~1 cup total volume and allows for beautiful layer visibility. Half-pint (8 oz) works; quarter-pint (4 oz) yields petite portions but requires recipe halving.
- Can I prepare the filling ahead and assemble later?
- Yes—filling can be made 1 day ahead and stored covered in refrigerator. Let sit at room temp 5 minutes before layering to soften slightly for easier spooning.
- Are Oreos really vegan?
- Traditional Oreos are vegan (no dairy/eggs), but check regional packaging—some countries use whey. Nabisco US Oreos are certified vegan by PETA.
- How long do they last?
- Refrigerated: 5 days (with gelatin); 3 days (without). Frozen: 4 weeks—thaw overnight in fridge before serving.
Summary
No-Bake Oreo Cheesecake Jars are a masterclass in effortless elegance—melding nostalgic Oreo crunch with velvety, tangy cheesecake in individually portioned, stunningly layered mason jars—requiring zero oven time, minimal tools, and delivering maximum wow factor.
With scientifically optimized techniques, customizable variations for every diet and occasion, and thoughtful attention to texture, stability, and nutrition, this recipe isn’t just dessert—it’s edible hospitality, crafted for celebration, comfort, and culinary confidence.