Introduction
Brown Butter Chocolate Chip Cookies represent the luxurious evolution of a beloved classic—elevating the humble chocolate chip cookie into a rich, complex, and deeply aromatic treat. With their golden-brown, slightly crisp edges, tender-chewy centers, and an unmistakable nutty, toasty depth from carefully browned butter, these cookies captivate with both texture and flavor. They’re not just dessert—they’re an experience: warm, nostalgic, yet sophisticated enough for dinner parties, holiday platters, or quiet moments of self-care. Whether you’re a seasoned baker or a curious beginner, mastering brown butter chocolate chip cookies opens the door to a new dimension of baking artistry—where patience, precision, and passion converge in every bite.
The History
The story of the chocolate chip cookie begins in 1938 with Ruth Wakefield’s now-legendary Toll House Inn in Whitman, Massachusetts. While experimenting with her Butter Drop Do cookies, she substituted chopped Nestlé semi-sweet chocolate bars—expecting them to melt and blend seamlessly—only to discover that the morsels held their shape, creating pockets of melty richness. The resulting “Toll House Chocolate Crunch Cookie” became an instant sensation, catapulting chocolate chips into American kitchens nationwide.
Yet the brown butter variation is a more recent innovation—one rooted in French culinary tradition (where beurre noisette has long been revered for its complex, caramelized notes) and embraced by modern artisanal bakers in the late 20th and early 21st centuries. Chefs like Dorie Greenspan, Alice Medrich, and Stella Parks championed the technique, recognizing how browning butter unlocks Maillard reactions that transform simple dairy fat into a fragrant, amber-hued elixir brimming with diacetyl, furans, and roasted pyrazines—compounds that echo toasted nuts, butterscotch, and even hints of crème brûlée. As food blogs surged in the 2010s and home bakers sought deeper flavor profiles, brown butter chocolate chip cookies exploded in popularity—not as a gimmick, but as a thoughtful, science-informed upgrade to a time-honored favorite. Today, they symbolize the convergence of heritage technique and contemporary creativity—a testament to how reverence for tradition can inspire bold, delicious reinvention.
Ingredients Breakdown
Every ingredient in this recipe plays a precise, functional role—far beyond mere taste. Understanding their chemistry ensures consistent, exceptional results:
- Brown Butter (1 cup / 2 sticks, unsalted): The cornerstone of the recipe. Browning transforms butter’s water content (≈15–17%) into steam, evaporates milk solids until they toast and caramelize, and concentrates butterfat. This yields intense nuttiness, reduced moisture (which affects spread and chew), and a lower smoke point—making temperature control vital. Always cool completely before mixing to prevent melting chocolate or scrambling eggs.
- Granulated Sugar (¾ cup): Provides sweetness, aids in spreading via caramelization during baking, and contributes to crispness. Its fine crystals dissolve easily and promote air incorporation when creamed with brown butter.
- Packed Light Brown Sugar (¾ cup): Adds molasses-derived moisture, acidity (which activates baking soda), and deep caramel notes. The moisture helps retain chewiness; the acidity enhances browning and balances richness.
- Large Eggs (2, room temperature): Act as emulsifiers and structural binders. Room temperature ensures uniform incorporation—cold eggs can cause the brown butter to seize or create lumps. The yolks contribute fat and lecithin for tenderness and richness; whites add structure and lift.
- Pure Vanilla Extract (2 tsp): Not just flavor—it contains alcohol that carries volatile aromatics and enhances perception of buttery and caramel notes. Opt for Madagascar bourbon or Tahitian vanilla for layered floral or spicy nuance.
- All-Purpose Flour (2¼ cups, spooned & leveled): Provides gluten-forming proteins (glutenin and gliadin). Too much flour = cakey or dry cookies; too little = excessive spread. Spoon-and-level prevents compaction—1 cup should weigh ≈120–125g. For refined texture, consider blending 1½ cups AP + ¾ cup bread flour (higher protein for chew) or adding 1 tbsp cornstarch (for ultra-tender crumb).
- Baking Soda (1 tsp): A strong base activated by brown sugar’s acidity. It creates carbon dioxide gas *immediately* upon mixing and again at high heat—lifting the dough, promoting spread, and contributing to golden-brown color via alkaline-driven Maillard reactions.
- Fine Sea Salt (1 tsp): Enhances all other flavors, suppresses bitterness, and balances sweetness. Fine salt dissolves evenly; flaky or coarse salt may leave uneven seasoning. Kosher salt requires adjustment (≈1¼ tsp Diamond Crystal or ¾ tsp Morton).
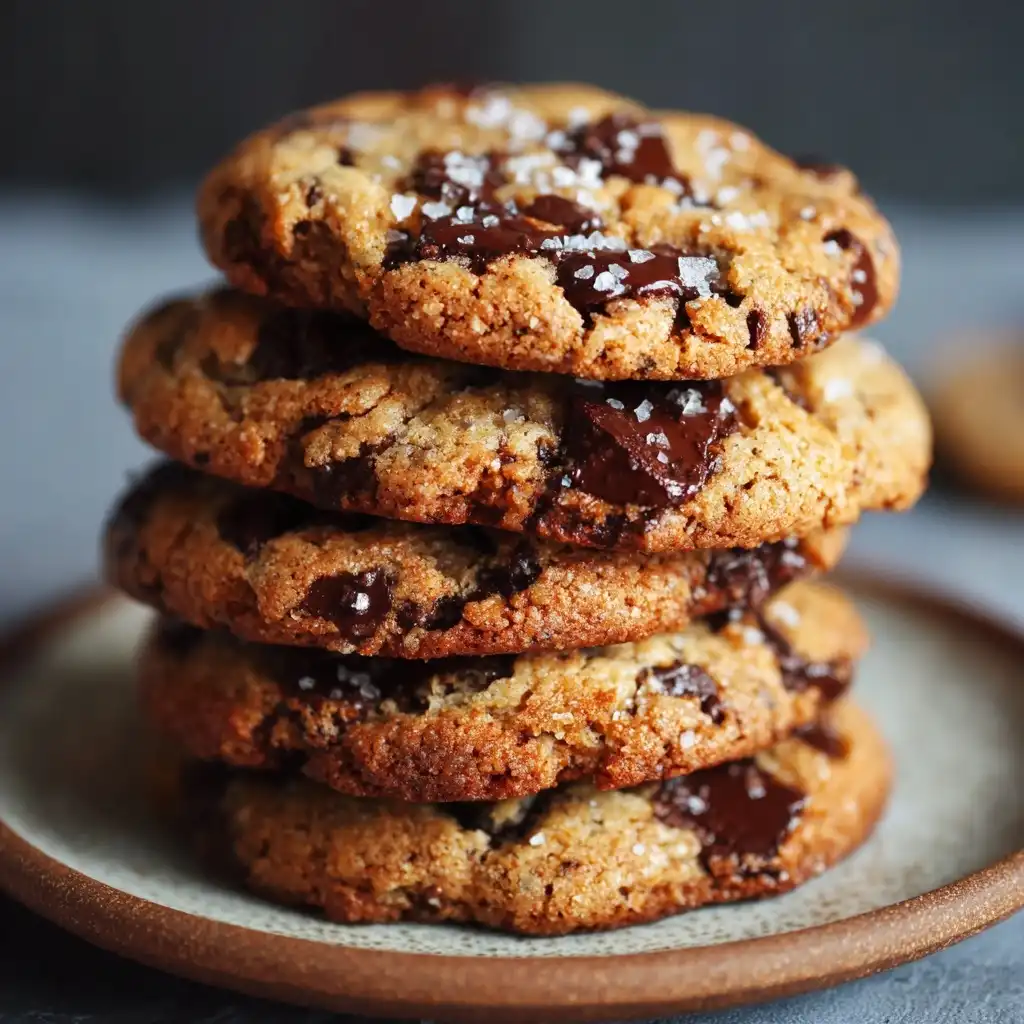
- High-Quality Semi-Sweet Chocolate (12 oz / 340g, chopped): Use bars—not chips—for superior cocoa butter content, richer flavor, and varied melt pools. Look for 55–65% cacao with single-origin beans (e.g., Dominican, Ecuadorian, or Peruvian) for nuanced fruit, spice, or earth notes. Chopping ensures irregular sizes—some melt fully, others retain shape for textural contrast.
- Flaky Sea Salt (for finishing, optional but highly recommended): A pinch per cookie just before baking intensifies flavor bursts and provides elegant visual contrast. Maldon or Fleur de Sel are ideal for delicate crunch and clean salinity.
Step-by-Step Recipe
- Brown the Butter: Place 2 sticks (1 cup) unsalted butter in a light-colored, heavy-bottomed saucepan (e.g., stainless steel or enamel-coated). Melt over medium-low heat, stirring constantly with a silicone spatula. As it melts, it will foam, then sputter gently as water evaporates. Continue stirring—scraping the bottom and corners—to ensure even browning. After 6–10 minutes, the foam will subside, and golden-brown specks (milk solids) will appear at the bottom. At the first whiff of toasted nuts and a rich, caramel-like aroma, immediately remove from heat. Pour into a heatproof bowl—do *not* scrape the very bottom sediment (it may be burnt). Let cool completely to room temperature (≈1 hour), then refrigerate 15–20 minutes until thickened but still soft and spreadable (like softened butter). Do not skip cooling—warm butter will melt chocolate and make dough greasy.
- Whisk Dry Ingredients: In a medium bowl, whisk together 2¼ cups all-purpose flour, 1 tsp baking soda, and 1 tsp fine sea salt. Set aside.
- Cream Sugars & Brown Butter: In a large bowl, using a hand mixer or stand mixer fitted with paddle attachment, beat cooled brown butter, ¾ cup granulated sugar, and ¾ cup packed light brown sugar on medium speed for 2–3 minutes until fluffy, pale, and smooth—no graininess. Scrape bowl thoroughly.
- Incorporate Eggs & Vanilla: Add eggs one at a time, beating on medium speed for 45–60 seconds after each addition until fully emulsified and glossy. Beat in 2 tsp vanilla extract until combined. The mixture should be cohesive and slightly airy—not separated or oily.
- Gradually Add Dry Ingredients: Reduce mixer speed to low. Add dry ingredients in three additions, mixing only until *just combined* after each—about 15–20 seconds. Overmixing develops gluten, leading to tough, dense cookies. A few streaks of flour are acceptable; they’ll disappear during folding.
- Fold in Chocolate: Using a flexible silicone spatula, gently fold in 12 oz finely chopped semi-sweet chocolate (and optional mix-ins like toasted walnuts or flaky salt) until evenly distributed. Avoid vigorous stirring.
- Chill the Dough: Cover bowl tightly with plastic wrap and refrigerate for *at least 24 hours*, ideally 36–72 hours. This critical step hydrates the flour (reducing spread), solidifies butter (preventing premature melting), oxidizes sugars for deeper caramelization, and concentrates flavors. Dough may appear firm but should yield slightly under thumb pressure.
- Preheat & Prep: Position oven racks in upper and lower thirds. Preheat oven to 375°F (190°C) for at least 20 minutes. Line two half-sheet pans (13″x18″) with parchment paper or silicone baking mats—*never greased surfaces*, which encourage excessive spread.
- Scoop & Portion: Use a 2-tbsp cookie scoop (or #40 scoop) for ~3-oz portions (~85g). Roll each into a tight ball—this encourages domed shape and minimizes cracks. Place 3″ apart on prepared sheets. Optional: Sprinkle tops lightly with flaky sea salt.
- Bake Strategically: Bake 1 sheet at a time for optimal airflow and even browning. Rotate pan front-to-back halfway through. Bake 11–13 minutes—until edges are deeply golden and set, centers look soft and slightly puffed but not raw, and surface shows fine cracks. *Underbake slightly*: cookies continue cooking on hot sheet for 2–3 minutes post-oven.
- Cool Completely: Let cookies rest on baking sheet for 5 minutes—this sets structure. Then transfer with thin spatula to wire racks to cool fully (≈20–30 minutes). Warm cookies are fragile; full cooling develops texture and allows residual steam to escape, preventing sogginess.
Tips
- Use a Light-Colored Pan for Browning Butter: Dark pans hide the subtle color change—you need visual cues (golden-brown solids) to avoid burning. A stainless steel or light enameled saucepan is ideal.
- Don’t Rush the Cool-Down: Patience is non-negotiable. Warm brown butter will melt chocolate, scramble eggs, and create greasy, flat cookies. If rushed, place bowl in freezer for 5–8 minutes—but stir frequently to prevent uneven hardening.
- Weigh Your Ingredients: Volume measurements vary wildly—especially flour. For consistency, use a digital kitchen scale: 2¼ cups AP flour = 270–280g; 12 oz chocolate = 340g. Even 10g extra flour can dry out cookies.
- Chill Dough Longer Than You Think: While 24 hours is minimum, 48–72 hours yields exponentially better flavor, chew, and caramelization. Dough can be frozen for up to 3 months—bake straight from freezer, adding 1–2 minutes to bake time.
- Rotate Pans Mid-Bake: Ovens have hot spots. Rotating ensures even browning—edges shouldn’t burn while centers remain doughy.
- Watch the Edges, Not the Timer: Ovens vary. Start checking at 10 minutes. Perfect doneness: edges deeply golden and crisp, centers soft and slightly jiggly—like set Jell-O. They’ll firm as they cool.
- Use Parchment or Silicone Mats—Never Grease: Greased pans accelerate spread and cause uneven browning. Parchment provides grip and easy release; silicone mats offer durability and heat distribution.
- Let Cookies Breathe After Baking: Leaving them on the hot sheet for 5 minutes allows carryover cooking and structural setting. Transferring too soon leads to breakage.
- Store Thoughtfully: Cool completely before storing in airtight container with parchment between layers. They stay fresh 5 days at room temp. For longer storage, freeze baked cookies (up to 3 months) or dough balls (up to 3 months)—bake frozen, no thaw needed.
- Revive Stale Cookies: Place in 300°F oven for 3–4 minutes—steam rehydrates starches, restoring chew and aroma.
Variations and Customizations
This foundational recipe is endlessly adaptable—each variation highlighting different dimensions of brown butter’s versatility:
- Dark Chocolate & Sea Salt: Swap semi-sweet for 70% dark chocolate (10 oz) + 2 oz white chocolate for bitter-sweet contrast. Finish with generous flaky salt and a drizzle of dark chocolate ganache post-cooling.
- Toasted Nut & Cinnamon: Fold in 1 cup toasted pecans or walnuts + 1½ tsp ground cinnamon + ¼ tsp freshly grated nutmeg. Toast nuts in same pan used for butter (after cleaning) for layered aroma.
- Espresso-Infused: Dissolve 1½ tsp instant espresso powder in 1 tsp hot water; cool, then add with vanilla. Enhances chocolate depth without coffee flavor—ideal for mocha lovers.
- Oatmeal Brown Butter: Replace ¾ cup flour with 1 cup old-fashioned rolled oats (not quick oats). Adds hearty chew and nutty resonance that complements brown butter beautifully.
- Double Chocolate: Add ⅓ cup unsweetened cocoa powder (Dutch-process preferred) to dry ingredients + ½ cup mini chocolate chips for intense chocolate density.
- Maple-Brown Butter: Substitute ¼ cup pure maple syrup for ¼ cup brown sugar. Adds woody-sweet complexity and glossy sheen—reduce granulated sugar to ⅔ cup to balance sweetness.
- Gluten-Free: Use 1:1 gluten-free flour blend (with xanthan gum) + 2 tbsp tapioca starch for elasticity. Add 1 extra tbsp brown butter (to compensate for GF flour’s absorbency) and chill dough 72+ hours.
- Vegan Adaptation: Use vegan butter (high-fat, European-style), flax eggs (2 tbsp ground flax + 6 tbsp water, rested 10 min), coconut sugar (for brown sugar), and vegan chocolate. Chill dough 48+ hours—vegan fats behave differently.
- Stuffed Cookies: Flatten dough balls, place ½ tsp caramel, dulce de leche, or peanut butter in center, seal, and reshape. Creates gooey, decadent surprise cores.
- Mini Cookies: Scoop with #60 scoop (1 tbsp) and bake 8–9 minutes at 375°F. Perfect for parties, lunchboxes, or portion control—retains all flavor in petite form.
Health Considerations and Nutritional Value
While brown butter chocolate chip cookies are inherently indulgent, mindful preparation can align them more closely with balanced eating principles—without sacrificing soul-satisfying joy:
- Nutrient Density Boost: Choose dark chocolate ≥70% cacao for higher flavonoids (antioxidants linked to cardiovascular health) and lower added sugar. Add 2 tbsp ground flax or chia seeds for omega-3s and fiber—blend into dry ingredients to avoid altering texture.
- Reduced Sugar Options: Cut granulated sugar to ½ cup and brown sugar to ⅔ cup—brown butter’s natural sweetness and caramel notes compensate significantly. Or use coconut sugar (lower glycemic index) with 25% less volume.
- Whole Grain Integration: Substitute up to ⅓ of flour with whole wheat pastry flour or oat flour for B vitamins, magnesium, and sustained energy—maintain ratio to avoid heaviness.
- Fat Quality Matters: Brown butter retains beneficial short- and medium-chain fatty acids (e.g., butyrate), shown in studies to support gut health and reduce inflammation. Pair with high-oleic chocolate for heart-healthy monounsaturated fats.
- Portion Awareness: A standard cookie (3 oz) contains ≈220–260 calories, 12–15g fat (7–9g saturated), 24–28g carbs (16–18g sugar), 2–3g protein. Enjoying 1–2 cookies mindfully fits within most dietary patterns—especially when balanced with whole foods.
- Allergen Notes: Naturally nut-free (unless added), but verify chocolate and vanilla for soy or dairy derivatives if needed. For egg allergies, flax or aquafaba work well—though texture shifts toward denser, fudgier.
- Not Low-Carb or Keto-Friendly: Significant carbohydrate load from sugars and flour makes traditional versions incompatible with strict low-carb diets. Keto adaptations require almond/coconut flour, erythritol blends, and butter oil—altering texture and browning dynamics substantially.
- Mindful Indulgence Philosophy: Research in nutritional psychology emphasizes that restrictive labeling (“bad,” “guilty”) backfires. Savoring a well-made brown butter cookie slowly—appreciating aroma, texture, and craftsmanship—supports intuitive eating and long-term satisfaction far more than deprivation.
Ingredients
- 2 sticks (1 cup / 227g) unsalted butter
- ¾ cup (150g) granulated sugar
- ¾ cup (165g) packed light brown sugar
- 2 large eggs, room temperature
- 2 teaspoons pure vanilla extract
- 2¼ cups (270–280g) all-purpose flour, spooned & leveled
- 1 teaspoon baking soda
- 1 teaspoon fine sea salt
- 12 ounces (340g) high-quality semi-sweet chocolate (55–65% cacao), finely chopped
- Flaky sea salt (Maldon or Fleur de Sel), for finishing (optional but recommended)
Directions
- In a light-colored, heavy-bottomed saucepan, melt butter over medium-low heat. Stir constantly until melted, foaming, then sputtering. Continue stirring as foam subsides and golden-brown milk solids form at bottom (6–10 min). At first nutty aroma, immediately remove from heat. Pour into heatproof bowl, discarding any dark sediment. Cool to room temperature (≈1 hr), then refrigerate 15–20 min until thickened but spreadable.
- Whisk together flour, baking soda, and fine sea salt in medium bowl. Set aside.
- In large bowl, beat cooled brown butter, granulated sugar, and brown sugar with mixer on medium 2–3 min until fluffy and pale.
- Add eggs one at a time, beating 45–60 sec after each until fully incorporated. Beat in vanilla.
- Reduce speed to low. Add dry ingredients in three parts, mixing only until just combined (15–20 sec each). Do not overmix.
- Fold in chopped chocolate with silicone spatula until evenly distributed.
- Cover dough tightly; refrigerate min. 24 hrs (ideally 36–72 hrs).
- Preheat oven to 375°F (190°C) with racks in upper/lower thirds. Line two half-sheet pans with parchment.
- Scoop 3-oz portions (2 tbsp), roll into tight balls, place 3″ apart on pans. Sprinkle tops with flaky salt.
- Bake one sheet at a time 11–13 min—until edges are deeply golden and set, centers soft and puffed. Rotate pan halfway.
- Cool on sheet 5 min, then transfer to wire racks to cool completely (20–30 min).
FAQ
- Can I use salted butter?
- No—salted butter contains variable sodium and added preservatives that interfere with browning control and flavor balance. Unsalted butter ensures precision in salt addition and clean browning.
- Why does the dough need to chill so long?
- Extended chilling hydrates flour fully (reducing spread), allows enzymes to break down starches into simpler sugars (enhancing caramelization), solidifies butter for controlled melt, and melds flavors. Skipping this step yields flat, greasy, bland cookies.
- My cookies spread too much—what went wrong?
- Top causes: butter too warm when mixing, insufficient chilling, expired baking soda, too little flour (scooping error), or greased pans. Also check oven temperature with oven thermometer—many run hot or cold.
- Can I freeze the dough?
- Absolutely. Portion dough balls onto parchment, freeze solid (2 hrs), then transfer to airtight freezer bag. Bake frozen—add 1–2 min to bake time. Dough keeps 3 months.
- Why do my cookies taste greasy?
- Most often due to warm brown butter or over-creaming. Ensure butter is cooled to thickened-but-soft stage, and mix sugars/butter only until fluffy—not liquidy. Also confirm proper flour measurement.
- Can I make these gluten-free?
- Yes—with caveats. Use a reputable 1:1 GF blend containing xanthan gum. Add 2 tbsp tapioca starch for chew. Chill dough ≥72 hrs. Expect slight texture shift—more tender, less elastic—but flavor remains stellar.
- What’s the best chocolate for this recipe?
- Bars over chips: Valrhona Guanaja (64%), Ghirardelli Intense Dark (72%), or Callebaut 60/40. Chop finely for varied melt pools. Avoid “baking chips” with stabilizers—they resist melting and dull flavor.
- Can I substitute brown sugar with coconut sugar?
- Yes—but reduce by 25% (use ½ cup) and add 1 tsp molasses to restore moisture and acidity. Coconut sugar browns faster—watch cookies closely; may bake 1 min less.
- How do I fix dough that’s too hard after chilling?
- Let sit at room temp 10–15 min before scooping. Do not microwave—it melts butter unevenly. If still stiff, gently knead with hands for 30 sec to generate warmth.
- Why are my cookies too cakey?
- Overmixing after adding flour develops excess gluten. Also check baking soda freshness (replace every 6 months) and avoid over-flouring—spoon-and-level meticulously.
Summary
Brown Butter Chocolate Chip Cookies are a masterclass in transformative baking—where patiently browning butter unlocks profound nutty, caramelized depth, and extended chilling melds flavors into something greater than the sum of its parts. They deliver an irresistible harmony of crisp edges, chewy centers, complex aroma, and luxurious mouthfeel.
More than just a cookie, they embody intentionality: respect for technique, reverence for quality ingredients, and the joyful reward of patience—yielding a timeless treat that feels both profoundly comforting and quietly extraordinary.