Introduction
Triple Chocolate Chunk Cookies represent the ultimate indulgence for chocolate lovers — a rich, decadent, and deeply satisfying confection that layers three distinct forms of chocolate into one tender, chewy, golden-edged cookie. Unlike standard chocolate chip cookies, this elevated version intentionally combines dark chocolate chunks for intensity, milk chocolate chunks for creamy sweetness, and white chocolate chunks for buttery, vanilla-kissed richness — creating a symphony of cocoa notes, textures, and melting profiles in every bite. Whether served warm from the oven with a glass of cold milk or artfully arranged on a dessert platter for special occasions, these cookies embody luxury, nostalgia, and culinary craftsmanship. They’re more than just a treat; they’re an experience — one that invites slow savoring, shared joy, and repeat baking.
The History
The evolution of the triple chocolate cookie is a delicious chronicle of American baking innovation meeting global chocolate traditions. While the classic chocolate chip cookie was famously invented by Ruth Wakefield in 1938 at the Toll House Inn in Whitman, Massachusetts — using broken Nestlé semi-sweet chocolate bars — bakers spent decades experimenting with variations: adding cocoa powder, swapping in different chocolates, or incorporating chocolate coatings. The “triple chocolate” concept emerged gradually in the late 20th century as artisanal bakeries and gourmet food magazines began celebrating layered flavor complexity. By the early 1990s, cookbooks like Martha Stewart’s Baking Handbook and The Joy of Cookies featured recipes combining bittersweet, milk, and white chocolate — not merely as chips, but as irregular, hand-chopped chunks to maximize textural contrast and melt-pooling. The rise of premium couverture chocolate brands (Valrhona, Callebaut, Guittard) and increased accessibility of high-cacao dark chocolate further fueled the trend. Today, triple chocolate chunk cookies appear on menus at Michelin-starred patisseries, feature in viral baking reels, and anchor holiday cookie tins worldwide — a testament to chocolate’s timeless allure and the human desire for layered sensory delight.
Ingredients Breakdown
Every ingredient in this recipe serves a precise functional and flavor role — no element is arbitrary. Below is a comprehensive, science-informed breakdown:
- Unsalted Butter (1 cup / 2 sticks / 227g): Provides fat for tenderness, moisture retention, and flakiness in the crumb. Using unsalted butter ensures full control over sodium levels and avoids off-flavors from iodized salt. For optimal texture, butter should be softened to 65–68°F (18–20°C) — cool enough to hold a fingerprint but warm enough to cream smoothly.
- Granulated Sugar (¾ cup / 150g): Adds sweetness, promotes spreading, and contributes to crisp edges through caramelization. Its fine crystals dissolve easily during creaming, aiding aeration.
- Brown Sugar (1 cup packed / 220g): Contains molasses, which adds moisture, acidity (to activate baking soda), deep caramel notes, and chewiness. Packed firmly ensures consistency and prevents under-measurement.
- Eggs (2 large, room temperature): Act as emulsifiers and structural binders. Room-temperature eggs incorporate more evenly into the batter and help stabilize the air bubbles created during creaming. The yolks add richness and tenderness; whites contribute slight lift.
- Pure Vanilla Extract (2 tsp): A high-quality, alcohol-based extract (not imitation) enhances all chocolate flavors and adds aromatic complexity. Madagascar or Tahitian vanilla beans offer nuanced floral or fruity undertones.
- All-Purpose Flour (2¼ cups / 280g): Provides gluten structure. Measured by weight for precision; if measuring by volume, use the “spoon-and-level” method to avoid compaction and excess flour (which causes toughness).
- Natural Unsweetened Cocoa Powder (½ cup / 40g): Adds deep chocolate flavor without extra sugar or fat. Natural (non-alkalized) cocoa reacts with baking soda for optimal rise and delivers bright, slightly acidic cocoa notes. Dutch-process cocoa may be substituted, but reduce baking soda by ¼ tsp and add ¼ tsp baking powder to maintain leavening balance.
- Baking Soda (1 tsp): Reacts with the acid in brown sugar and cocoa to produce carbon dioxide, encouraging spread and lift. Freshness is critical — test by mixing ¼ tsp with 2 tsp vinegar; vigorous fizzing indicates potency.
- Fine Sea Salt (1 tsp): Enhances sweetness, balances bitterness, and amplifies all other flavors. Fine grain ensures even distribution — avoid coarse kosher salt unless ground first.
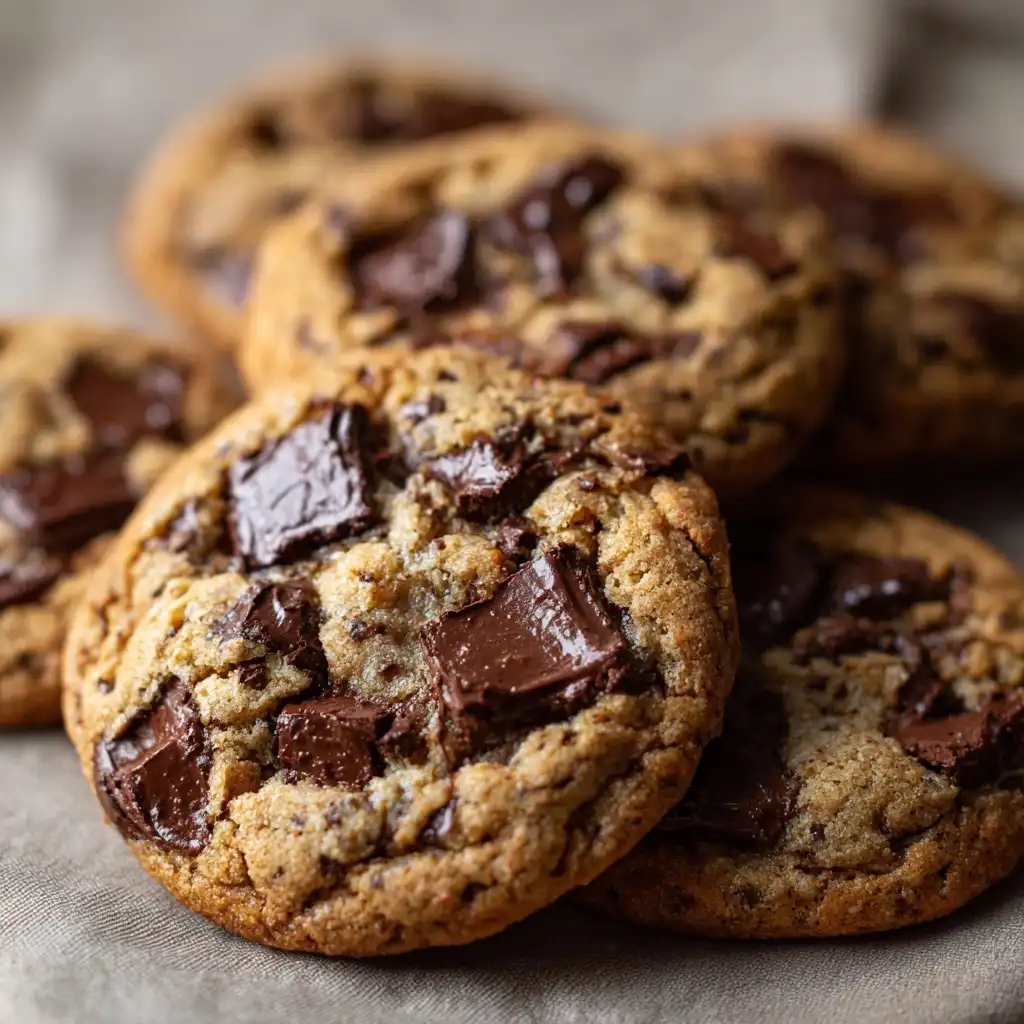
- Dark Chocolate (70% cacao, 1 cup chopped / ~170g): Offers bold, complex bitterness and fruity or earthy undertones. Chopping yields irregular, thick shards that retain integrity during baking and create dramatic melt pools.
- Milk Chocolate (35–40% cacao, 1 cup chopped / ~170g): Brings creamy, caramelized sweetness and smooth mouthfeel. Opt for high-cocoa milk chocolate (e.g., Valrhona Jivara or Guittard Milk Chocolate) to prevent excessive softening or greasiness.
- White Chocolate (32–35% cocoa butter, 1 cup chopped / ~170g): Technically not chocolate (contains no cocoa solids), but rich in cocoa butter and milk solids. Look for real white chocolate with cocoa butter listed first — avoid “white baking chips” containing palm oil or hydrogenated fats, which don’t melt authentically and can seize.
- Optional Additions: Flaky sea salt (Maldon or Fleur de Sel) for finishing, espresso powder (1 tsp) to deepen chocolate notes without adding coffee flavor, or toasted walnuts or pecans (¾ cup) for crunch and nutty contrast.
Step-by-Step Recipe
This meticulously tested method prioritizes texture control, flavor development, and reliability. Each step is timed and temperature-specific:
- Prepare & Chill Ingredients: Measure all ingredients by weight. Cut butter into tablespoon-sized pieces and let soften at room temperature for 45–60 minutes. Remove eggs from refrigerator 30 minutes before starting. Chop all chocolates separately onto parchment-lined cutting boards using a serrated knife — aim for ¼” to ½” irregular chunks (not uniform chips). Place chopped chocolates in separate small bowls and refrigerate for 20 minutes to firm up (prevents premature melting during mixing).
- Cream Butter & Sugars: In the bowl of a stand mixer fitted with the paddle attachment, combine softened butter, granulated sugar, and brown sugar. Beat on medium speed for 3–4 minutes until pale, fluffy, and significantly increased in volume. Scrape down bowl and paddle halfway through. Over-creaming leads to excess air and cakey texture; under-creaming yields dense cookies. The mixture should hold soft peaks when lifted.
- Incorporate Wet Ingredients: Add eggs one at a time, beating on medium-low for 30 seconds after each addition until fully incorporated and glossy. Add vanilla and mix for another 15 seconds. Batter will look cohesive but slightly curdled — this is normal and resolves upon flour addition.
- Whisk Dry Ingredients: In a separate medium bowl, sift together flour, cocoa powder, baking soda, and salt. Whisk vigorously for 30 seconds to aerate and evenly distribute leavening and salt.
- Combine Dry & Wet: Reduce mixer speed to low. Gradually add dry ingredients in three equal additions, mixing only until *just* combined after each — about 15–20 seconds per addition. Do not overmix; streaks of flour are acceptable. Overmixing develops gluten and creates tough, rubbery cookies.
- Fold in Chocolate Chunks: Using a flexible silicone spatula, gently fold in the chilled dark, milk, and white chocolate chunks in two batches. Rotate the bowl 180° between folds and use a gentle “cut-and-fold” motion. Stop when evenly distributed with minimal smearing. Some small cocoa streaks are ideal — they indicate proper folding.
- Chill Dough (Non-Negotiable Step): Divide dough into two equal portions. Shape each into a 2-inch-thick log using parchment paper to assist. Wrap tightly and refrigerate for *at least 24 hours*, preferably 36–48 hours. This allows full hydration of flour, cocoa, and sugar; redistributes butter; and solidifies chocolate. Cold dough spreads less, bakes more evenly, and develops deeper, rounded chocolate flavor via enzymatic activity.
- Preheat & Prep: At least 30 minutes before baking, place oven racks in upper and lower thirds. Preheat oven to 350°F (177°C). Line two half-sheet pans (13″x18″) with parchment paper — do not grease or use silicone mats (they insulate and inhibit browning).
- Portion & Bake: Using a 2.5-ounce ice cream scoop (or ¼-cup measure), portion chilled dough into 12–14 mounds per sheet, spaced 3 inches apart. Gently press 2–3 extra dark chocolate chunks onto the top of each mound for visual appeal and intensified flavor bursts. Bake for 11–13 minutes, rotating pans top-to-bottom and front-to-back at 7 minutes. Cookies are done when edges are set and deeply golden, centers look soft and slightly puffed, and surface appears matte (not shiny or wet). A slight indentation remains when lightly touched — they will firm as they cool.
- Cool & Set: Let cookies cool on pans for exactly 8 minutes — this allows residual heat to finish baking centers and sets structure. Then transfer carefully to wire racks using a thin offset spatula. Cool completely (25–30 minutes) before serving. Warm cookies are fragile; fully cooled ones have ideal chewy-yet-tender texture.
Tips
- Use a Kitchen Scale: Volume measurements for flour and cocoa vary wildly — a digital scale eliminates inconsistency and guarantees reproducible results.
- Chop, Don’t Chip: Chocolate chips contain stabilizers that resist melting. Real chocolate chunks deliver superior mouthfeel, melt pools, and flavor release.
- Chill Twice: Refrigerating both chopped chocolate *and* dough prevents bloom, greasiness, and uneven baking. Skipping the dough chill guarantees flat, greasy, overly spread cookies.
- Oven Thermometer Required: Most home ovens run hot or cold. An oven thermometer ensures accurate 350°F baking — even 25°F variance alters spread, browning, and texture dramatically.
- Rotate Pans Mid-Bake: Home ovens have hot spots. Rotating ensures even browning and consistent doneness across all cookies.
- Underbake Slightly: Pull cookies out when centers still appear soft — carryover cooking finishes them perfectly. Overbaked triple chocolate cookies become dry and chalky.
- Rest Before Scooping: If dough becomes too soft while scooping, return logs to fridge for 10 minutes. Warm dough melts prematurely in the oven.
- Freeze for Freshness: Portion dough balls onto a parchment-lined tray, freeze solid (2 hours), then transfer to airtight freezer bags. Bake straight from frozen — add 1–2 minutes to bake time. Dough keeps for 3 months.
- Revive Stale Cookies: Place in a 300°F oven for 3–4 minutes — the heat re-melts cocoa butter and restores chew.
- Storage Secret: Keep cooled cookies in an airtight container with a slice of plain white bread — the cookies absorb moisture from the bread, staying soft for 5–7 days.
Variations and Customizations
The triple chocolate foundation is remarkably adaptable — here are 12 chef-tested, crowd-pleasing variations:
- Espresso Triple Chocolate: Add 1 tbsp finely ground espresso powder to dry ingredients for heightened depth and zero coffee taste.
- Sea Salt & Dark Chocolate: Sprinkle ¼ tsp flaky sea salt per cookie immediately after baking — enhances sweetness and cuts richness.
- Nutty Triple Chocolate: Fold in 1 cup toasted walnuts, pecans, or hazelnuts with chocolates for crunch and tannic contrast.
- Orange-Zest Triple Chocolate: Add 2 tsp finely grated navel orange zest to wet ingredients — citrus lifts cocoa and brightens white chocolate.
- Spiced Mexican Triple Chocolate: Add 1 tsp ground cinnamon, ¼ tsp chipotle powder, and ⅛ tsp ground clove to dry ingredients for warm, smoky complexity.
- Peanut Butter Swirl: After portioning, swirl 1 tsp natural peanut butter into each mound with a toothpick — creates marbled texture and salty-sweet harmony.
- Gluten-Free Triple Chocolate: Substitute 2¼ cups certified GF 1:1 baking flour blend (with xanthan gum) and add ¼ tsp additional xanthan gum. Chill dough 48 hours for best structure.
- Vegan Triple Chocolate: Replace butter with refined coconut oil (1 cup), eggs with flax eggs (2 tbsp ground flax + 6 tbsp water), and use dairy-free dark/milk/white chocolates. Chill dough 36+ hours.
- Mini Triple Chocolate Bites: Scoop 1-tbsp portions and bake 7–9 minutes. Perfect for parties, gift boxes, or portion control.
- Stout-Infused Triple Chocolate: Replace 2 tbsp of the egg liquid with room-temp, reduced Guinness stout (simmer ¼ cup stout until reduced to 2 tbsp). Adds malty depth.
- Smoked Salt & Cacao Nib Triple Chocolate: Replace ½ tsp of salt with smoked sea salt and fold in ¼ cup roasted cacao nibs for bitter crunch.
- Matcha-White Chocolate Fusion: Replace 1 tbsp cocoa powder with ceremonial-grade matcha and increase white chocolate to 1¼ cups — creates elegant green-tea–white chocolate balance.
Health Considerations and Nutritional Value
A single Triple Chocolate Chunk Cookie (based on a 2.5-ounce portion, ~85g) contains approximately:
- Calories: 420–450 kcal
- Total Fat: 24–26g (15–17g saturated, primarily from cocoa butter and dairy)
- Carbohydrates: 48–52g (42–45g sugars, including naturally occurring lactose and added sucrose)
- Protein: 4–5g
- Fiber: 2–3g (from cocoa and whole-grain flour substitutions)
- Iron: ~15% DV (from non-alkalized cocoa)
- Magnesium: ~12% DV (abundant in dark chocolate)
- Antioxidants: High levels of flavanols (especially in 70%+ dark chocolate), linked to improved vascular function and reduced oxidative stress.
Considerations for Dietary Needs:
- Sugar Sensitivity: Reduce granulated sugar to ½ cup and add 2 tbsp pure maple syrup (reduce eggs by 1 tbsp to compensate for added liquid). Expect slightly softer texture.
- Dairy-Free: Use high-fat coconut oil and dairy-free chocolates with cocoa butter. Note: White chocolate substitutes often lack cocoa butter, affecting melt and mouthfeel.
- Lower-Fat Option: Replace ¼ cup butter with unsweetened applesauce — expect denser, cakier texture and muted chocolate intensity.
- Low-Glycemic Alternative: Swap sugars for ¾ cup erythritol + 2 tbsp monk fruit blend. Add 1 extra tbsp milk to maintain moisture. Texture will be drier; chill dough 48+ hours to hydrate.
- Allergen Note: Always verify chocolate labels for shared equipment warnings (peanuts, tree nuts, soy, dairy). Cross-contamination is common in facilities processing multiple allergens.
While undeniably indulgent, these cookies can fit mindfully into balanced eating patterns. Pairing one cookie with a cup of unsweetened green tea or a small handful of almonds slows glucose absorption. Enjoying them intentionally — savoring aroma, texture, and flavor — enhances satisfaction and reduces likelihood of overconsumption.
Ingredients
- 1 cup (227g / 2 sticks) unsalted butter, softened to 65–68°F
- ¾ cup (150g) granulated sugar
- 1 cup (220g) packed light brown sugar
- 2 large eggs, room temperature
- 2 teaspoons pure vanilla extract
- 2¼ cups (280g) all-purpose flour, spooned and leveled
- ½ cup (40g) natural unsweetened cocoa powder
- 1 teaspoon baking soda
- 1 teaspoon fine sea salt
- 1 cup (170g) high-quality dark chocolate (70% cacao), roughly chopped
- 1 cup (170g) high-quality milk chocolate (35–40% cacao), roughly chopped
- 1 cup (170g) real white chocolate (cocoa butter listed first), roughly chopped
- Flaky sea salt (optional, for finishing)
Directions
- Chop all three chocolates separately into ¼”–½” irregular chunks. Place in separate small bowls and refrigerate for 20 minutes.
- In the bowl of a stand mixer fitted with the paddle attachment, combine butter, granulated sugar, and brown sugar. Beat on medium speed for 3–4 minutes until pale, fluffy, and voluminous. Scrape bowl and paddle.
- Add eggs one at a time, beating 30 seconds after each until fully incorporated. Add vanilla and beat 15 seconds more.
- In a medium bowl, sift together flour, cocoa powder, baking soda, and salt. Whisk 30 seconds to aerate.
- With mixer on low, add dry ingredients in three parts, mixing 15–20 seconds after each until *just* combined. Do not overmix.
- Using a silicone spatula, gently fold in chilled dark, milk, and white chocolate chunks in two batches until evenly distributed.
- Divide dough into two portions. Shape each into a 2-inch-thick log using parchment. Wrap tightly and refrigerate for 24–48 hours.
- Preheat oven to 350°F (177°C) with racks in upper and lower thirds. Line two half-sheet pans with parchment.
- Portion dough using a 2.5-oz scoop (¼-cup) into 12–14 mounds per pan, spaced 3″ apart. Press 2–3 extra dark chocolate chunks onto each.
- Bake 11–13 minutes, rotating pans top-to-bottom and front-to-back at 7 minutes, until edges are golden and centers look soft and puffed.
- Cool on pans for exactly 8 minutes, then transfer to wire racks. Cool completely (25–30 min) before serving.
FAQ
- Can I use chocolate chips instead of chopping chocolate?
- No — chips contain stabilizers (soy lecithin, cocoa butter substitutes) that prevent proper melting and pooling. Chopped couverture or baking chocolate delivers authentic texture, flavor, and visual appeal.
- Why does the dough need to chill for 24 hours?
- Extended chilling hydrates flour and cocoa, firms butter for controlled spread, concentrates flavor via Maillard reactions, and prevents greasiness. Skipping it yields flat, oily, bland cookies.
- My cookies spread too much — what went wrong?
- Likely causes: butter too warm (>70°F), insufficient chilling, too much sugar, expired baking soda, or inaccurate flour measurement (too little). Also check oven temperature — a hot oven causes rapid initial spread before set.
- Can I make these gluten-free?
- Yes — substitute 2¼ cups certified gluten-free 1:1 baking flour (with xanthan gum) and add ¼ tsp extra xanthan gum. Chill dough 48 hours and bake on parchment — GF dough spreads more readily.
- How do I store baked cookies?
- In an airtight container at room temperature for up to 7 days. For longer storage, freeze cooled cookies in a single layer in freezer bags for up to 3 months. Thaw at room temperature or warm in a 300°F oven for 3 minutes.
- Can I double this recipe?
- Yes — but chill dough in smaller logs (no thicker than 2″) for even cooling. Mix in two batches if your mixer bowl is under 5 quarts to ensure proper creaming and folding.
- Why do my white chocolate chunks look greasy or discolored?
- This is likely “fat bloom” — harmless cocoa butter rising to the surface due to temperature fluctuations. It doesn’t affect taste or safety. To minimize, keep white chocolate cold before folding and avoid overheating dough.
- Can I add nuts without changing texture?
- Absolutely — fold in 1 cup toasted, chopped nuts with the chocolate. Toasting removes moisture and enhances flavor. Walnuts and pecans pair especially well with dark and milk chocolate.
- What makes these cookies “chewy” vs. “cakey”?
- Chewiness comes from brown sugar’s molasses, proper butter temperature, underbaking slightly, and adequate chilling. Cakey texture results from too much flour, overmixing, room-temperature eggs that are too warm, or overbaking.
- Is there a way to reduce sweetness without ruining texture?
- Reduce granulated sugar to ½ cup and add 2 tbsp pure maple syrup (reduce one egg by 1 tbsp). The syrup adds moisture and complexity while lowering refined sugar content by ~30%.
Summary
Triple Chocolate Chunk Cookies are a masterclass in chocolate layering — marrying bold dark, creamy milk, and buttery white chocolate into a supremely chewy, golden-crusted, deeply flavorful cookie that rewards patience, precision, and passion.
From its roots in mid-century American ingenuity to today’s global bakery staple, this recipe honors tradition while inviting endless creativity — whether you’re adding sea salt, espresso, nuts, or dietary adaptations, the soul of the cookie remains gloriously, unapologetically, triple-chocolate.