Introduction
Chocolate Chip Cookie Bars are the ultimate fusion of classic cookie nostalgia and effortless, slice-and-serve convenience. Unlike traditional drop cookies that require scooping, spacing, and careful timing, these bars deliver the same rich, buttery, chewy–crispy texture and unmistakable melty-chocolate satisfaction—baked uniformly in a single pan and cut into perfect, portion-controlled squares. Whether you’re prepping for a school bake sale, hosting a casual gathering, meal-prepping sweet snacks for the week, or simply craving a no-fuss dessert that feels indulgent yet approachable, Chocolate Chip Cookie Bars rise to the occasion—literally and figuratively. Their dense-yet-tender crumb, golden-brown edges, gooey centers, and generous pockets of semi-sweet chocolate chips make them universally beloved across generations—and their adaptability means they’re equally at home on a holiday dessert table or tucked into a child’s lunchbox.
The History
The origin of Chocolate Chip Cookie Bars traces back to the mid-20th century, emerging as a natural evolution of Ruth Wakefield’s iconic 1938 invention—the chocolate chip cookie. As home baking surged in popularity during the postwar era—fueled by widespread access to electric ovens, standardized measuring tools, and mass-produced ingredients like brown sugar and semi-sweet chocolate chips—home cooks began experimenting with simplifying labor-intensive techniques. Baking cookies as bars was a practical innovation: it eliminated the need for portioning dough, reduced active prep time, minimized cleanup, and ensured consistent doneness throughout. Early versions appeared in community cookbooks, women’s magazines like Good Housekeeping and Ladies’ Home Journal, and Betty Crocker’s mid-century recipe leaflets—often labeled “Cookie Squares,” “Bar Cookies,” or “One-Pan Cookies.” The format gained further traction in the 1970s and ’80s with the rise of sheet cake pans, nonstick bakeware, and the growing cultural emphasis on efficient, family-friendly entertaining. Today, Chocolate Chip Cookie Bars hold a cherished place in American baking canon—not as a lesser cousin to the drop cookie, but as its own celebrated category: a testament to how ingenuity, accessibility, and deep-rooted comfort can transform a simple idea into a timeless tradition.
Ingredients Breakdown
Every exceptional batch of Chocolate Chip Cookie Bars begins with intentionality—even in simplicity. Below is a detailed, function-driven analysis of each core ingredient, explaining not just *what* goes in, but *why* it matters:
- All-Purpose Flour (2 ¼ cups): Provides essential gluten structure. Too little yields fragile, crumbly bars; too much creates toughness. Spoon-and-level measurement is non-negotiable—never scoop directly from the bag. For subtle nuance, a small portion (¼ cup) can be substituted with oat flour or toasted almond flour for added depth and tenderness.
- Baking Soda (½ teaspoon): Acts as the primary leavening agent—reacting with the brown sugar’s acidity to create lift, spread control, and that signature crisp edge. It also promotes browning via the Maillard reaction. Note: Baking powder is omitted intentionally; its double-acting nature can cause uneven rise and cakey texture.
- Unsalted Butter (1 cup / 2 sticks, room temperature): The flavor and textural backbone. Room temperature (65–68°F) ensures optimal creaming—trapping air for lightness without melting the fat. Salted butter can be used, but requires omitting added salt to avoid oversalting. European-style butter (higher fat, lower water) yields richer flavor and slightly denser, fudgier bars.
- Brown Sugar (1 cup, packed): Moisture-rich and acidic, dark brown sugar (or a blend of light and dark) contributes deep molasses notes, chewiness, and tenderness. Its acidity activates the baking soda, while its hygroscopic nature retains moisture for days.
- Granulated Sugar (½ cup): Adds sweetness, aids in caramelization, and promotes spreading and crispness—especially at the edges. Reducing it slightly increases chew; increasing it enhances crunch and golden color.
- Large Eggs (2, room temperature): Bind the batter, add moisture, and contribute to structure and richness. Cold eggs can cause the creamed butter-sugar mixture to seize—so always bring them to room temp (about 15–20 minutes out of the fridge).
- Pure Vanilla Extract (2 teaspoons): Not optional. High-quality, alcohol-based vanilla adds aromatic complexity that elevates the entire bar. Imitation extract lacks nuance and can taste artificial when baked at length. For luxury, add ½ tsp vanilla bean paste or scraped seeds from ½ a pod.
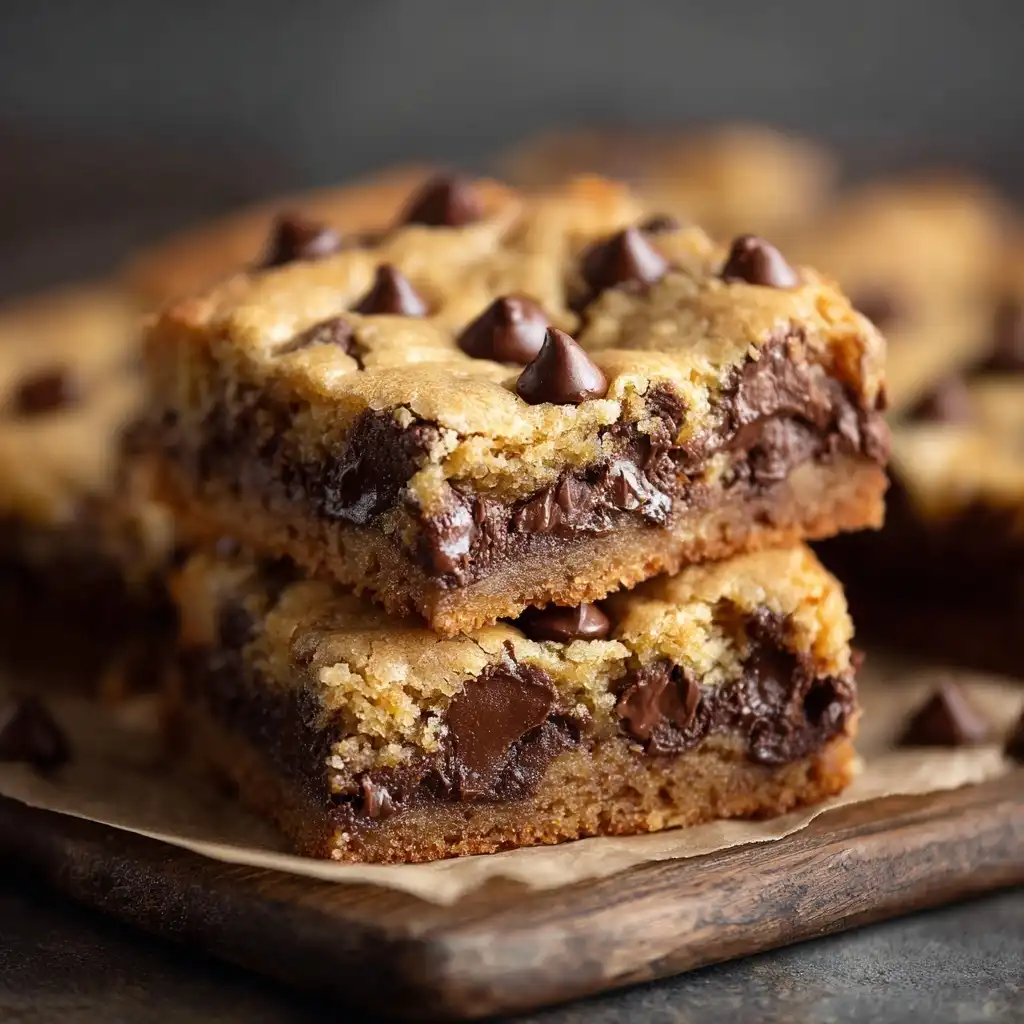
- Semi-Sweet Chocolate Chips (2 cups): The star. Use high-cacao (52–60%) chips with real cocoa butter for optimal melt and flavor. Avoid “chocolatey chips” or chips with palm oil—they resist melting and dull the taste. A 70/30 blend of chips and chopped chocolate chunks provides varied texture and visual appeal.
- Flaky Sea Salt (½ teaspoon, plus extra for finishing): Enhances sweetness, balances richness, and highlights chocolate’s bitterness. Maldon or Jacobsen are ideal—its delicate crystals dissolve slowly, delivering bursts of salinity with each bite.
Step-by-Step Recipe
- Preheat & Prep: Position oven rack in the center position. Preheat oven to 350°F (175°C). Generously grease a 9×13-inch metal baking pan (not glass or ceramic—metal conducts heat more evenly for proper edge development), then line with parchment paper, leaving a 2-inch overhang on two opposite sides for easy removal. Lightly grease the parchment.
- Cream Butter & Sugars: In a large bowl using a stand mixer fitted with the paddle attachment (or hand mixer on medium speed), beat room-temperature butter, brown sugar, and granulated sugar together for 2–3 minutes until light, fluffy, and pale in color. Scrape down the bowl halfway through. This step incorporates vital air—don’t rush it.
- Add Eggs & Vanilla: Add eggs one at a time, beating on medium speed for 45 seconds after each addition until fully incorporated and glossy. Beat in vanilla extract until combined. Batter will be thick and slightly ribbony.
- Combine Dry Ingredients: In a separate medium bowl, whisk together flour, baking soda, and flaky sea salt until fully homogenized—no streaks of white or clumps.
- Incorporate Dry Mixture: Reduce mixer speed to low. Gradually add dry ingredients in three additions, mixing just until no dry flour remains after each addition—about 15–20 seconds per addition. Do NOT overmix. Overmixing develops excess gluten, resulting in tough, dense, or rubbery bars. Batter will be thick, sticky, and shaggy.
- Fold in Chocolate: Using a silicone spatula, gently fold in chocolate chips (and any optional add-ins) until evenly distributed—no streaks of batter visible. Avoid vigorous stirring; fold with a gentle “cut-and-fold” motion.
- Spread & Smooth: Transfer batter to prepared pan. Use an offset spatula or the back of a greased spoon to spread evenly into corners. Smooth the top—press down lightly to eliminate air pockets and ensure uniform thickness. Sprinkle remaining flaky salt evenly over the surface.
- Bake with Precision: Bake for 28–33 minutes—timing is critical. Bars are done when the edges are deeply golden brown and slightly puffed, the center appears set (no wet sheen), and a toothpick inserted 1 inch from the edge comes out with moist crumbs—not wet batter—but clean near the center. Rotate pan front-to-back at 20 minutes for even baking.
- Cool Completely (Non-Negotiable Step): Remove pan from oven and place on a wire rack. Let cool *in the pan* for a full 2 hours—do not cut early. This allows residual heat to finish cooking the center, sets the structure, and prevents crumbling. For best texture and clean cuts, refrigerate for an additional 30–60 minutes before slicing.
- Cut & Serve: Using the parchment overhang, lift bars gently from pan onto a cutting board. With a sharp, heavy knife wiped clean between cuts, slice into 12–16 rectangles (depending on desired size). Wipe blade frequently for clean edges.
Tips
- Room Temperature Is Real: Butter must be cool to the touch but indents easily with light pressure—like softened cream cheese. Eggs should feel neutral—not cold. If rushed, submerge eggs in warm (not hot) water for 5 minutes.
- Measure Flour Correctly: Use the “spoon-and-level” method: fluff flour in bag, spoon into measuring cup until heaping, then level off with straight edge. Never pack or scoop directly.
- Chill the Batter (Optional but Recommended): For thicker, less spread-prone bars with enhanced flavor development, cover batter and chill for 30–60 minutes before spreading. This solidifies the butter, slows initial spread, and deepens caramel notes.
- Know Your Oven: Use an independent oven thermometer—many ovens run hot or cold. Even a 25°F variance impacts spread, browning, and doneness.
- Don’t Skip the Parchment: Greasing alone invites sticking and uneven release. Parchment ensures flawless lift, clean edges, and zero waste.
- Underbake Slightly: Err on the side of 28 minutes rather than 33—if edges are golden and center looks set, pull them out. Carryover heat will finish cooking. Overbaking dries them out irreversibly.
- Cooling Is Part of Baking: Cutting warm bars = crumbles, tears, and loss of structural integrity. Patience yields clean slices and optimal chew.
- Store Smart: Keep in an airtight container at room temperature for up to 5 days. For longer storage, freeze uncut bars (wrapped tightly in plastic + foil) for up to 3 months. Thaw at room temp for 1 hour before slicing.
Variations and Customizations
These bars are a masterclass in versatility—easily adapted to dietary needs, seasonal flavors, or creative cravings—without compromising texture or integrity:
- Gluten-Free: Substitute 2 ¼ cups certified gluten-free all-purpose flour blend (like King Arthur or Bob’s Red Mill 1-to-1) + ½ tsp xanthan gum (if not included in blend). Add 1 tbsp ground psyllium husk for improved binding and chew.
- Vegan: Replace butter with vegan butter (Miyoko’s or Earth Balance), eggs with 2 flax eggs (2 tbsp ground flax + 6 tbsp warm water, rested 10 min), and use dairy-free chocolate chips. Add 1 tsp apple cider vinegar to batter to react with baking soda.
- Whole Grain Boost: Replace ¾ cup all-purpose flour with white whole wheat flour or oat flour. Add 1 tbsp molasses and 1 extra tbsp milk (dairy or plant-based) to compensate for added absorption.
- Seasonal Twists: Stir in ½ cup dried cranberries + 1 tsp orange zest (fall/winter); ½ cup chopped fresh strawberries + 1 tsp lemon zest (spring); or ½ cup toasted pecans + 1 tsp cinnamon + pinch of cardamom (holiday).
- Gourmet Upgrades: Swap half the chips for 70% dark chocolate chunks, add ¼ cup toasted coconut flakes, or swirl in ⅓ cup salted caramel sauce before baking. Top with flaky salt + espresso-dusted chocolate drizzle post-bake.
- Mini Bar Version: Press batter into a lined 8×8-inch pan and bake 22–26 minutes. Or use a mini muffin tin (lined with paper cups)—fill ¾ full, bake 11–14 minutes for bite-sized treats.
- Stuffed Center: After spreading batter, press ½-inch balls of peanut butter, Nutella, or marshmallow fluff into the center—then cover lightly with remaining batter before baking for surprise fillings.
Health Considerations and Nutritional Value
While undeniably indulgent, mindful tweaks and informed context help position Chocolate Chip Cookie Bars within a balanced lifestyle:
- Caloric Density: A standard 2×2-inch bar contains approximately 220–260 calories—moderate for a dessert, especially when compared to layered cakes or fried pastries. Portion awareness is key: pre-slicing helps prevent mindless overconsumption.
- Sugar Profile: Contains ~22–26g total sugar per bar—primarily from added sugars (brown and granulated). Substituting ¼ cup of brown sugar with date paste or coconut sugar lowers glycemic impact slightly but does not reduce total sugar content significantly.
- Fat Composition: Primarily unsaturated fats from butter (including beneficial short- and medium-chain fatty acids) and cocoa butter from chocolate. Saturated fat (~10–12g per bar) is present but not inherently harmful in moderation as part of a varied diet rich in fiber and plants.
- Protein & Fiber: Naturally low in protein (<2g/bar) and fiber (<1g). Boost both by adding ¼ cup almond flour, 2 tbsp ground flaxseed, or 3 tbsp rolled oats to dry ingredients.
- No Artificial Additives: Homemade versions avoid preservatives, emulsifiers, hydrogenated oils, and artificial colors common in store-bought bars—making them a cleaner choice for those monitoring ingredient quality.
- Dietary Accommodations: Easily adapted for nut-free (omit nuts, verify chocolate chip facility), soy-free (use soy-free chocolate), and lower-sugar options (with erythritol-based brown sugar blends—though texture may vary).
- Mindful Enjoyment: Research shows that savoring a small, high-quality treat mindfully supports long-term dietary adherence better than restrictive deprivation. These bars, made with real ingredients and intention, align well with intuitive eating principles.
Ingredients
- 2 ¼ cups (280g) all-purpose flour, spooned and leveled
- ½ teaspoon baking soda
- ½ teaspoon flaky sea salt (plus extra for finishing)
- 1 cup (227g / 2 sticks) unsalted butter, room temperature
- 1 cup (200g) packed dark brown sugar
- ½ cup (100g) granulated sugar
- 2 large eggs, room temperature
- 2 teaspoons pure vanilla extract
- 2 cups (340g) semi-sweet chocolate chips (high-quality, real cocoa butter)
Directions
- Preheat oven to 350°F (175°C). Grease a 9×13-inch metal baking pan, then line with parchment paper with overhang on two sides. Grease parchment.
- In a medium bowl, whisk together flour, baking soda, and ½ tsp flaky salt. Set aside.
- In a large bowl, beat butter, brown sugar, and granulated sugar with a mixer on medium-high for 2–3 minutes until light and fluffy. Scrape bowl.
- Add eggs one at a time, beating 45 seconds after each. Beat in vanilla until combined.
- Reduce speed to low. Add dry ingredients in three parts, mixing just until no flour streaks remain—about 15 seconds per addition. Do not overmix.
- Fold in chocolate chips with a spatula until evenly distributed.
- Spread batter into prepared pan. Smooth top. Sprinkle with additional flaky salt.
- Bake 28–33 minutes, rotating pan at 20 minutes, until edges are deep golden and center is set (toothpick near edge has moist crumbs; near center is clean).
- Cool completely in pan on wire rack—minimum 2 hours. For cleanest cuts, refrigerate 30–60 minutes.
- Lift bars using parchment. Cut into 12–16 rectangles with sharp knife. Wipe blade between cuts.
FAQ
- Can I use a glass or ceramic pan?
- Not recommended. Glass and ceramic retain and radiate heat differently, often causing over-browning on edges and undercooking in the center. Metal ensures even conduction and predictable results. If you must use glass, reduce oven temperature to 325°F and extend bake time by 3–5 minutes—monitor closely.
- Why did my bars turn out cakey?
- Most commonly due to overmixing after adding flour (which develops gluten), using too much baking soda, substituting baking powder, or adding an extra egg. Also check if your flour was measured too heavily—or if you used self-rising flour by mistake.
- Can I freeze the batter?
- Absolutely. Scoop chilled batter into pan, cover tightly with plastic wrap and foil, and freeze up to 3 months. Thaw overnight in fridge, then bake as directed—add 2–4 minutes to bake time.
- My bars are too crumbly—what went wrong?
- Overbaking is the #1 culprit. Also check if butter was too warm (causing excess spread and dryness), or if eggs were cold (causing curdling and poor emulsion). Undercooling before cutting is another frequent cause.
- Can I make these dairy-free?
- Yes—with careful substitutions: vegan butter, flax or chia eggs, and dairy-free chocolate. Ensure vegan butter has similar fat content (80%+). Some brands yield softer bars—adding 1 tbsp tapioca starch helps firm texture.
- How do I get ultra-chewy bars?
- Use all brown sugar (eliminate granulated), add 2 tbsp corn syrup or honey, chill batter 1 hour before baking, and reduce bake time by 2 minutes. A splash of brewed espresso (1 tsp) also enhances chew and depth.
- What’s the best way to store leftovers?
- At room temperature in an airtight container with parchment between layers—up to 5 days. For longer freshness, refrigerate (up to 10 days) or freeze (up to 3 months). Bring to room temp before serving for ideal texture.
- Can I add nuts? Which ones work best?
- Yes—½ to ¾ cup toasted walnuts, pecans, or almonds add crunch and richness. Toast them first (350°F for 8–10 min) to deepen flavor and prevent bitterness. Chop coarsely so they distribute evenly without weighing down batter.
Summary
Chocolate Chip Cookie Bars are the brilliantly uncomplicated, endlessly adaptable, and deeply satisfying evolution of America’s favorite cookie—transformed into a perfectly portioned, golden-edged, chewy-centered, chocolate-studded delight that bakes uniformly and stores beautifully. With precise technique, thoughtful ingredient choices, and room for creativity, they deliver nostalgic comfort, modern flexibility, and bakery-quality results—every single time.