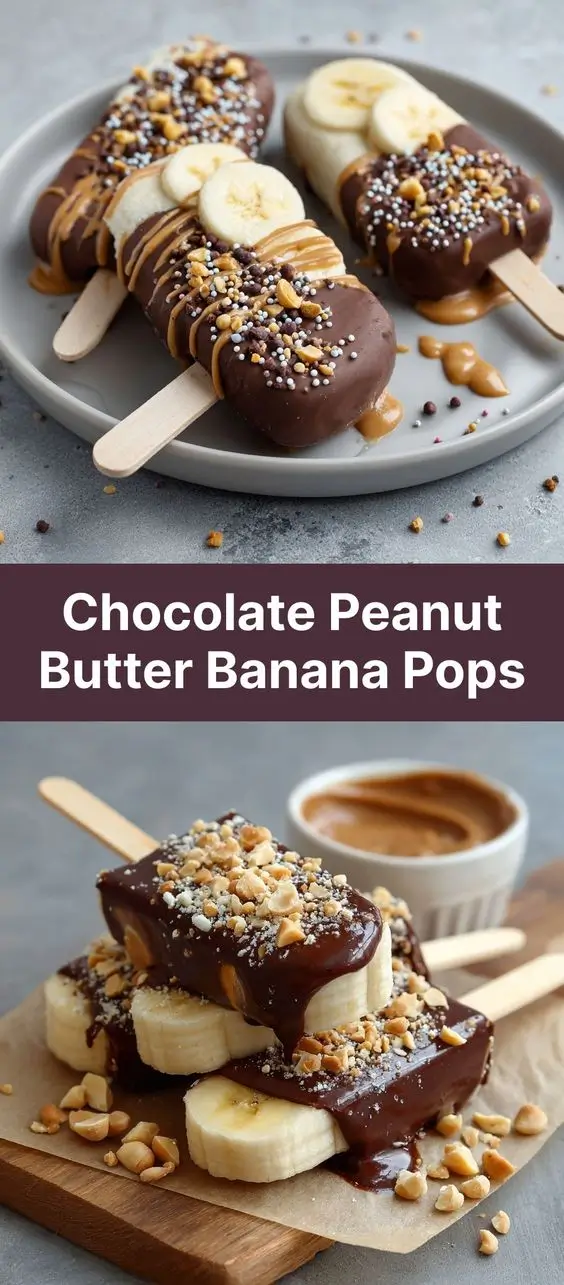
Chocolate Peanut Butter Banana Pops: A Decadent Frozen Treat
The History of Chocolate Peanut Butter Banana Pops
While the exact origin of chocolate peanut butter banana pops is difficult to trace, this frozen delight is a modern twist on classic comfort foods that have delighted taste buds for generations. Bananas dipped in chocolate have long been a staple dessert at fairs and restaurants, famously popularized by the “Banana Splits” of the mid-20th century. Peanut butter, a nutritious and creamy favorite since its rise in popularity during the early 1900s, naturally found its way into dessert pairings due to its rich, nutty flavor and smooth texture.
The fusion of banana, peanut butter, and chocolate likely emerged from the growing trend of healthy-ish indulgences in the late 20th and early 21st centuries. As consumers sought convenient, satisfying treats that still offered some nutritional benefits, recipes combining fruit, nut butters, and dark chocolate began gaining traction. These pops represent the perfect marriage of convenience, nutrition, and decadence — ideal for meal prep, kids’ snacks, or post-dinner desserts. With the surge in home food blogging and social media recipe sharing around the 2010s, chocolate peanut butter banana pops quickly became viral favorites, praised for their simplicity, visual appeal, and irresistible flavor combination.
Ingredients Breakdown
Every ingredient in this recipe plays a crucial role in delivering both flavor and texture. Let’s break them down:
- Ripe Bananas: The star of the show. Ripe bananas (with speckled or slightly brown skin) are sweeter, creamier, and easier to freeze without becoming icy. They provide natural sugars, potassium, and fiber, making them a wholesome base.
- Peanut Butter: Use natural, unsweetened peanut butter for the healthiest option, or go for creamy conventional brands if you prefer a sweeter, smoother texture. Peanut butter adds protein, healthy fats, and a rich mouthfeel that complements the banana perfectly.
- Dark Chocolate: Ideally, use high-quality dark chocolate with at least 60–70% cocoa content. It offers antioxidants like flavonoids, less sugar than milk chocolate, and a sophisticated bitterness that balances the sweetness of the banana. You can substitute with semi-sweet or even milk chocolate if preferred.
- Coconut Oil (optional): A small amount helps thin the melted chocolate, giving it a silky consistency that’s easy to dip and sets into a snappy shell when frozen. It also adds a subtle tropical note and promotes faster hardening.
- Toppings (optional): Crushed peanuts, chopped nuts, shredded coconut, chia seeds, cacao nibs, mini chocolate chips, or sea salt can elevate both the appearance and taste. These add crunch, visual interest, and additional nutrients.
- Popsicle Sticks or Skewers: Essential for handling. Wooden craft sticks work best; make sure they’re food-safe and sturdy enough to support the weight of the frozen banana.
Step-by-Step Recipe
- Prepare the Bananas: Peel 3–4 ripe bananas and slice each one into thirds (or halves if using smaller bananas). You’ll want uniform pieces so they freeze evenly and look consistent. Pat them dry with a paper towel to remove excess moisture, which can cause ice crystals.
- Insert the Sticks: Carefully insert a popsicle stick into the cut end of each banana piece, pushing about halfway through. Be gentle to avoid splitting the banana.
- Freeze the Banana Bases: Place the banana pieces on a parchment-lined baking sheet, ensuring they don’t touch. Freeze for at least 1 hour, or until solid. This pre-freezing step prevents the chocolate from melting upon contact and ensures a clean coating.
- Prepare the Peanut Butter Layer (Optional but Recommended): Once bananas are frozen, spread a thin, even layer of peanut butter over each piece using a butter knife or offset spatula. Work quickly to prevent melting. Return to the freezer for another 20–30 minutes to set the peanut butter.
- Melt the Chocolate: In a double boiler or microwave-safe bowl, melt 1 cup of chopped dark chocolate with 1 tablespoon of coconut oil. If using a microwave, heat in 30-second intervals, stirring between each, until smooth and glossy.
- Dip the Bananas: Remove banana pieces from the freezer. Holding by the stick, dip each one into the melted chocolate, rotating to coat completely. Allow excess chocolate to drip off.
- Add Toppings: Immediately sprinkle your desired toppings while the chocolate is still wet. Press gently if needed to help them adhere.
- Final Freeze: Place coated pops back on the parchment paper and return to the freezer for at least 1–2 hours, or until fully firm.
- Store or Serve: Once hardened, remove from the tray and store in an airtight container or wrap individually in parchment and place in a freezer bag. Can be kept for up to 3 months.
Tips for Perfect Chocolate Peanut Butter Banana Pops
- Use Firm but Ripe Bananas: Overripe bananas may become too mushy when frozen. Look for bananas with a few brown spots but still firm flesh.
- Pre-Freeze Thoroughly: Skipping the initial freeze leads to chocolate sliding right off. Make sure bananas are rock-solid before dipping.
- Work Quickly: Have all your tools ready — sticks inserted, toppings measured, chocolate melted — before removing bananas from the freezer.
- Thin Chocolate Properly: Too thick? Add a bit more coconut oil (½ tsp at a time). Too runny? Let it cool slightly before dipping.
- Avoid Condensation: When serving, let pops sit at room temperature for 5–10 minutes to reduce the risk of tooth sensitivity. However, don’t leave out too long or they’ll start to melt.
- Label and Date: If storing for weeks, label your container with the date to enjoy at peak freshness.
- Double-Dip for Extra Crunch: For a thicker chocolate shell, dip once, freeze for 15 minutes, then dip again.
Variations and Customizations
These pops are incredibly versatile. Here are some creative twists to try:
- Nut-Free Version: Replace peanut butter with sunflower seed butter or soy nut butter. Still creamy, still delicious.
- White or Milk Chocolate Coating: Swap dark chocolate for white or milk chocolate for a sweeter, milder flavor. Pair with sprinkles for a funfetti effect.
- Protein Boost: Mix a scoop of vanilla or chocolate protein powder into the peanut butter before spreading. Or roll the chocolate-coated pop in crushed protein cereal.
- Trail Mix Style: Roll in a mixture of chopped almonds, dried cranberries, pumpkin seeds, and mini M&Ms for a snackable adventure.
- S’mores Version: After applying peanut butter, drizzle with melted marshmallow fluff before chocolate dipping. Roll in graham cracker crumbs.
- Drizzle Design: After the main chocolate layer sets, drizzle with contrasting chocolate (e.g., white over dark) for a bakery-style finish.
- Layered Fillings: Cut a small slit in the banana and pipe in peanut butter instead of spreading externally. Creates a surprise center.
- Yogurt Swirl: Mix Greek yogurt with honey and a dash of cinnamon, then swirl into the peanut butter layer before freezing.
- Vegan Option: Ensure chocolate is dairy-free and use plant-based butter alternatives. Most dark chocolate and natural peanut butters are already vegan-friendly.
- Kid-Friendly Themes: Use cookie cutters to shape bananas, or decorate with edible glitter, colorful sprinkles, and fun stick flags for parties.
Health Considerations and Nutritional Value
Despite their dessert-like indulgence, chocolate peanut butter banana pops offer several nutritional benefits when made with wholesome ingredients:
- Bananas: Rich in potassium, vitamin B6, vitamin C, and dietary fiber. Support heart health, digestion, and energy metabolism.
- Peanut Butter: Contains monounsaturated and polyunsaturated fats (the “good” fats), protein, niacin, and magnesium. Helps promote satiety and stabilize blood sugar when paired with fruit.
- Dark Chocolate: Loaded with antioxidants, particularly flavonoids, which may help reduce inflammation and improve vascular function. Choose minimally processed chocolate with low added sugar for maximum benefit.
- Portion Control: Each pop is a single-serving treat, helping manage calorie intake compared to large desserts. One average-sized pop contains approximately 180–220 calories, depending on size and ingredients.
Considerations:
- Allergies: Peanuts and tree nuts are common allergens. Always label clearly if serving to others. Coconut is technically a fruit but classified as a tree nut by the FDA.
- Sugar Content: While bananas and dark chocolate contain natural sugars, additional sweeteners in flavored peanut butters or milk chocolate can increase glycemic load. Opt for no-sugar-added versions when possible.
- Calorie Density: Healthy fats are calorie-rich. Enjoy in moderation, especially if managing weight.
- Digestive Sensitivity: Some people may experience bloating from bananas or difficulty digesting raw nuts. Fermented nut butters or ripe bananas may help.
Ingredients
- 3–4 medium ripe bananas
- ½ cup natural creamy peanut butter (unsweetened preferred)
- 1 cup dark chocolate (chopped or chips)
- 1 tablespoon coconut oil
- 6–8 popsicle sticks or wooden skewers
- Parchment paper
- Optional toppings: crushed peanuts, shredded coconut, chia seeds, cacao nibs, sea salt, mini chocolate chips, sprinkles
Directions
- Peel bananas and cut each into three equal pieces. Pat dry with a paper towel.
- Insert a popsicle stick into the flat end of each banana piece.
- Arrange on a parchment-lined baking sheet, leaving space between each. Freeze for 1 hour or until solid.
- Remove from freezer. Spread a thin, even layer of peanut butter over each banana piece using a knife. Return to freezer for 20–30 minutes.
- In a heat-safe bowl, combine chopped dark chocolate and coconut oil. Melt using a double boiler or microwave (30-second bursts, stirring between).
- Once smooth, dip each frozen banana into the chocolate, coating completely. Let excess drip off.
- Immediately sprinkle with toppings while chocolate is wet.
- Place back on parchment and freeze for 1–2 hours until firm.
- Transfer to an airtight container, separating layers with parchment. Store in the freezer for up to 3 months.
- Let sit at room temperature for 5–10 minutes before serving for optimal texture.
FAQ
Can I make these without peanut butter?
Yes! Skip the peanut butter layer or replace it with almond butter, Nutella, cookie butter, or even jam for variety.
Why did my chocolate crack?
Chocolate cracking usually occurs due to temperature shock. Ensure bananas are thoroughly frozen and not warmed before dipping. Also, avoid drastic temperature changes after coating.
Can I use frozen bananas?
Yes, but only if they were peeled and sliced before freezing. Thaw slightly before inserting sticks, but refreeze completely before coating.
Are these suitable for weight loss diets?
In moderation, yes — especially when made with minimal added sugar and healthy fats. They’re more nutritious than typical ice cream bars and can satisfy sweet cravings healthily.
How do I prevent the bananas from browning?
The chocolate coating acts as a barrier. As long as they’re well-sealed and stored airtight, oxidation is minimal. Pre-treating with lemon juice is unnecessary and may alter flavor.
Can I make these ahead of time?
Absolutely! These are ideal for meal prep. Make a batch on Sunday and enjoy all week.
What if I don’t have coconut oil?
You can omit it, but the chocolate will be thicker and harder to dip. Alternatives include refined avocado oil or a teaspoon of vegetable shortening.
Can kids help make these?
Yes! This is a fantastic family-friendly recipe. Kids can insert sticks, spread peanut butter (with supervision), add toppings, and name their creations.
Summary
Chocolate Peanut Butter Banana Pops are a simple, healthy, and utterly delicious frozen treat that combines the natural sweetness of bananas with rich peanut butter and antioxidant-packed dark chocolate. Perfect for meal prep, kids’ snacks, or guilt-free dessert lovers, these pops deliver big flavor in a nutritious, handheld package.