Introduction
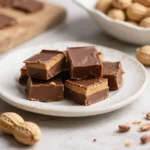
Welcome to a delightful journey into the world of homemade confections, where rich chocolate meets creamy peanut butter in perfect harmony. Peanut Butter Chocolate Fudge is more than just a sweet treat—it’s a nostalgic indulgence that brings back memories of holidays, family gatherings, and cozy evenings by the fire. This decadent dessert combines the smoothness of melted chocolate with the nutty richness of peanut butter, resulting in a fudgy, melt-in-your-mouth delight that’s impossible to resist. Whether you’re making it for a special occasion, as a gift, or simply to satisfy your own sweet tooth, this recipe promises satisfaction with every bite. Simple to prepare and requiring no special equipment, it’s an ideal project for both beginner bakers and seasoned dessert enthusiasts alike.
The History
Fudge has a charming history that dates back to the late 19th century in the United States. The earliest known mention of fudge was at Vassar College in Poughkeepsie, New York, around 1886, where students were experimenting with candies and reportedly “fudged” a batch of caramels—hence the name “fudge.” From college dorm rooms, the confection quickly gained popularity across women’s colleges and eventually spread throughout American households. By the early 20th century, fudge had become a staple at bake sales, holiday events, and seaside boardwalks, particularly in places like Mackinac Island in Michigan, which became famous for its fudge shops.
Peanut butter, on the other hand, emerged around the same time, gaining traction as a nutritious and affordable food. Its widespread availability in the early 1900s made it a natural pairing with chocolate—a flavor combination already beloved in candies like Reese’s Peanut Butter Cups. The fusion of peanut butter and chocolate in fudge form likely evolved from home cooks seeking richer, more complex flavors. Over time, the Peanut Butter Chocolate Fudge became a classic variation, combining two all-American tastes into one irresistible treat. Today, it remains a favorite in cookbooks, holiday gift baskets, and dessert tables across the country.
Ingredients Breakdown
To create the perfect batch of Peanut Butter Chocolate Fudge, understanding each ingredient’s role is key to achieving that ideal texture and depth of flavor. Here’s a detailed breakdown:
- Semi-sweet chocolate chips: These provide the deep, rich chocolate base. Opt for high-quality chips with real cocoa content for a smoother melt and superior taste.
- Butter: Adds creaminess and helps emulsify the mixture, giving the fudge a velvety texture. Unsalted butter is preferred so you can control the salt level.
- Sweetened condensed milk: Acts as both a sweetener and a thickening agent. It contributes to the fudge’s dense, chewy consistency without the need for cooking sugar to the soft-ball stage.
- Peanut butter: Choose creamy, natural, or traditional peanut butter (not oily or separated). This ingredient gives the fudge its signature nutty flavor and smooth mouthfeel.
- Vanilla extract: Enhances overall flavor complexity and balances sweetness with a warm, aromatic note.
- Salt: A pinch enhances all the flavors, especially important when balancing sweet and rich components.
- Optional add-ins: Chopped peanuts for crunch, mini marshmallows for gooey pockets, or a swirl of extra peanut butter for visual appeal and intensified flavor.
Each ingredient plays a vital role, and using fresh, quality components ensures a professional-quality result every time.
Step-by-Step Recipe
- Prepare the pan: Line an 8×8-inch baking dish with parchment paper, leaving overhang on two sides for easy removal. Lightly grease the paper with butter or non-stick spray.
- Melt the chocolate base: In a large microwave-safe bowl, combine 2 cups of semi-sweet chocolate chips and 1/4 cup (4 tablespoons) of unsalted butter. Microwave in 30-second intervals, stirring between each, until fully melted and smooth (about 2–3 minutes total).
- Add sweetened condensed milk: Stir in 1 can (14 oz) of sweetened condensed milk until thoroughly combined. The mixture should be glossy and uniform.
- Incorporate peanut butter: Add 1 cup of creamy peanut butter and mix until completely blended. You may need to return the bowl to the microwave for 15 seconds if the mixture stiffens too quickly.
- Enhance flavor: Stir in 1 teaspoon of pure vanilla extract and a pinch (1/8 tsp) of sea salt. Taste and adjust salt if needed.
- Optional mix-ins: Fold in 1/2 cup of chopped roasted peanuts or 1/3 cup of mini marshmallows for added texture.
- Pour into pan: Transfer the mixture to the prepared baking dish. Use a spatula to spread evenly, ensuring consistent thickness.
- Create a marbled effect (optional): Drizzle 2 tablespoons of extra peanut butter over the surface and use a knife to gently swirl it in for a decorative touch.
- Chill to set: Refrigerate for at least 3 hours, or until firm. For best results, cover with plastic wrap once chilled for 1 hour to prevent condensation.
- Cut into squares: Lift the fudge out using the parchment overhang. Place on a cutting board and slice into 1-inch squares using a sharp knife dipped in hot water for clean cuts.
- Store: Keep in an airtight container in the refrigerator for up to 2 weeks or freeze for longer storage.
Tips
- Use room temperature ingredients: Especially the peanut butter and condensed milk, to ensure smooth blending without lumps.
- Avoid overheating: When microwaving, stop before everything is fully melted and stir—the residual heat will finish the job, preventing scorching.
- Stir constantly: During melting, frequent stirring prevents hot spots and ensures even consistency.
- Don’t skip the parchment paper: It makes removal effortless and keeps the fudge from sticking.
- Chill thoroughly: Rushing the setting process leads to soft, sticky fudge. Patience is essential for clean slicing.
- Wipe the knife: Between cuts, clean the blade with a damp cloth to maintain neat edges.
- Work quickly: The mixture begins to set at room temperature, so have your pan ready before mixing begins.
- Double-check peanut butter type: Avoid natural varieties with oil separation unless stirred very well—otherwise, they can make the fudge greasy.
Variations and Customizations
Peanut Butter Chocolate Fudge is wonderfully versatile. Once you’ve mastered the classic version, feel free to experiment:
- Dark chocolate fudge: Substitute semi-sweet chips with dark chocolate (60–70% cacao) for a more sophisticated, less sweet profile.
- White chocolate layer: Make a second batch with white chocolate chips and layer it beneath or on top for a tricolor effect.
- Nutella swirl: Swirl in spoonfuls of Nutella for a hazelnut-chocolate twist.
- Crunchy texture: Add crushed pretzels, rice cereal, or toffee bits for a salty-sweet crunch.
- Almond or cashew butter: Replace peanut butter with another nut butter for a different flavor and allergen-friendly option.
- Gluten-free & dairy-free: Use dairy-free chocolate chips, vegan butter, and coconut milk-based condensed milk to make it suitable for dietary restrictions.
- Spiced fudge: Add a dash of cinnamon or cayenne for a warm, unexpected kick.
- Holiday themes: Mix in festive sprinkles, crushed peppermint, or orange zest depending on the season.
- Mini fudge bites: Roll the mixture into balls and coat with crushed nuts or cocoa powder for a no-cut alternative.
- Layered fudge: Create a checkerboard or layered effect by alternating peanut butter and chocolate mixtures in the pan.
Health Considerations and Nutritional Value
While Peanut Butter Chocolate Fudge is undeniably delicious, it’s important to enjoy it in moderation due to its high calorie, sugar, and fat content. Here’s a general nutritional estimate per 1-inch square (based on 64 pieces per batch):
- Calories: ~120–140
- Total Fat: 8–10g (mostly from chocolate, butter, and peanut butter)
- Saturated Fat: 4–5g
- Carbohydrates: 12–15g (primarily from sugar in chocolate and condensed milk)
- Sugars: 10–12g
- Protein: 2–3g (from peanut butter)
- Sodium: 50–70mg
On the positive side, peanut butter provides healthy monounsaturated fats, protein, and essential vitamins like B3 and E. Dark chocolate contains antioxidants such as flavonoids, which may support heart health in moderate amounts. However, due to its high sugar content, individuals managing diabetes or watching their weight should consume this treat sparingly. For a lighter version, consider using reduced-sugar chocolate, sugar-free condensed milk, or natural nut butters with no added oils or sugars. Always consult a healthcare provider for personalized dietary advice.
Ingredients
- 2 cups semi-sweet chocolate chips
- 1/4 cup (4 tablespoons) unsalted butter
- 1 (14 oz) can sweetened condensed milk
- 1 cup creamy peanut butter (no-stir preferred)
- 1 teaspoon pure vanilla extract
- 1/8 teaspoon sea salt (plus extra for topping, optional)
- 1/2 cup chopped roasted peanuts (optional)
- 2 tablespoons additional peanut butter (for swirling, optional)
Directions
- Line an 8×8-inch baking pan with parchment paper and lightly grease it.
- In a large microwave-safe bowl, combine chocolate chips and butter. Microwave in 30-second bursts, stirring between each, until smooth.
- Stir in sweetened condensed milk until fully incorporated.
- Add peanut butter, vanilla extract, and salt. Mix until creamy and uniform.
- Fold in chopped peanuts if using.
- Pour mixture into the prepared pan and spread evenly.
- Drizzle with extra peanut butter and swirl with a knife for a marbled effect (optional).
- Refrigerate for at least 3 hours or until firm.
- Using the parchment overhang, lift fudge out of the pan.
- Cut into 1-inch squares with a hot, clean knife.
- Store in an airtight container in the refrigerator for up to 2 weeks.
FAQ
Can I make this fudge without a microwave?
Yes! Use a double boiler: Place a heatproof bowl over a pot of simmering water (ensure the bottom doesn’t touch the water), and melt the chocolate and butter slowly, stirring frequently.
Why did my fudge turn out grainy?
Graininess usually occurs from overheating or uneven melting. Always melt in short intervals and stir well. Also, ensure all ingredients are at room temperature.
Can I freeze peanut butter chocolate fudge?
Absolutely. Wrap individual layers in parchment paper and store in an airtight container or freezer bag for up to 3 months. Thaw in the fridge before serving.
Is this recipe gluten-free?
Yes, provided all ingredients used are certified gluten-free. Check labels on chocolate chips and peanut butter to be safe.
Can I use natural peanut butter?
You can, but be sure to stir it very well first. Natural peanut butter with oil separation may alter the texture, making the fudge softer or greasier.
How do I make this recipe vegan?
Use dairy-free chocolate chips, plant-based butter, and a vegan substitute for sweetened condensed milk (such as homemade coconut milk condensed milk).
Can I double the recipe?
Yes, but use a 9×13-inch pan and increase chilling time slightly. Avoid tripling, as larger batches may not cool evenly.
Why didn’t my fudge set?
Possible causes include insufficient chilling time, too much peanut butter, or using low-fat substitutes. Stick to full-fat ingredients and allow proper refrigeration.
Can I add espresso powder?
Yes—1/2 teaspoon of instant espresso powder enhances chocolate flavor without making it taste like coffee.
How many servings does this make?
Approximately 64 small squares (1-inch), depending on how finely you cut them.
Summary
Peanut Butter Chocolate Fudge is a rich, creamy, and easy-to-make dessert that combines the best of chocolate and peanut butter in a decadent, melt-in-your-mouth treat. Perfect for gifting, holidays, or satisfying your sweet cravings, this no-bake recipe delivers gourmet results with minimal effort.