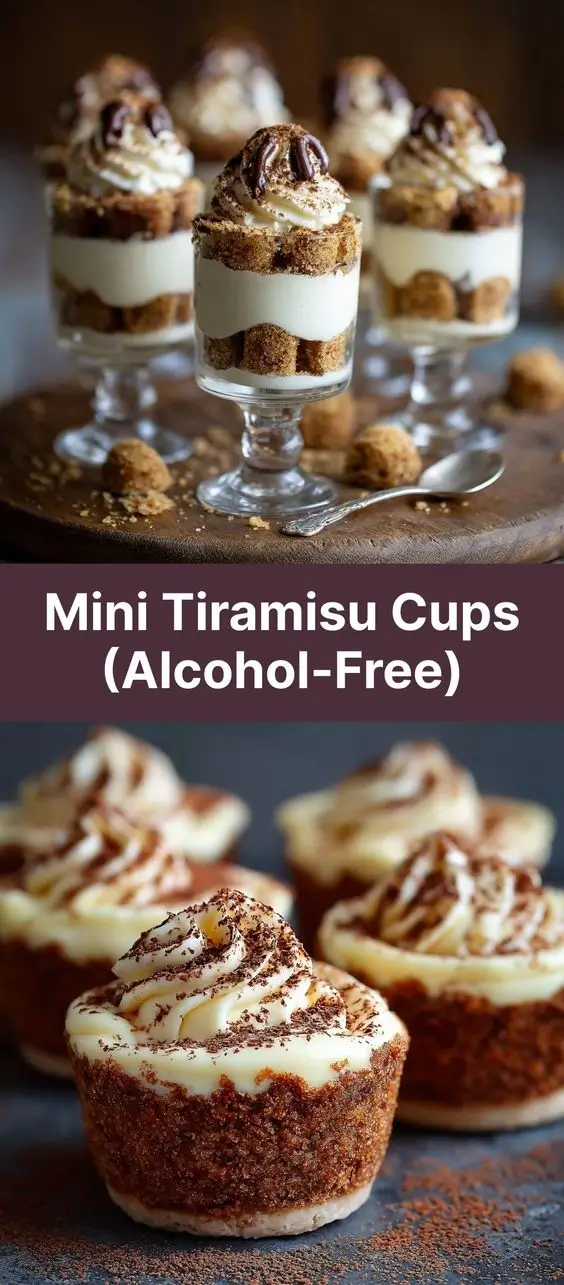
Mini Tiramisu Cups (Alcohol-Free)
Indulge in the elegant simplicity of Mini Tiramisu Cups, a no-bake dessert that captures all the rich, creamy essence of traditional tiramisu without a drop of alcohol. These individual servings are perfect for dinner parties, baby showers, holiday gatherings, or as an impressive yet effortless treat you can prepare ahead of time. With layers of coffee-soaked ladyfingers, velvety mascarpone filling, and a dusting of cocoa, each bite delivers the beloved Italian flavor profile in a convenient, cup-sized format. Best of all, this version is entirely alcohol-free, making it suitable for children, pregnant women, or anyone avoiding spirits—without sacrificing depth or sophistication.
The History
Tiramisu, which translates to “pick me up” in Italian, originated in the Veneto region of Italy during the 1960s, though its exact birthplace remains a topic of culinary debate between restaurants in Treviso and Venice. Traditionally made with layers of ladyfingers dipped in espresso spiked with Marsala wine or other spirits like rum or brandy, the dessert quickly gained international acclaim for its luxurious texture and balanced bitterness-sweetness contrast. Over time, variations emerged to suit different dietary needs and cultural preferences. The alcohol-free adaptation of tiramisu has become increasingly popular, especially in family-friendly settings and regions where alcohol consumption is restricted. Mini tiramisu cups, while not part of the original concept, evolved as a modern twist to accommodate portion control, ease of serving, and visual appeal at events. Today, these dainty desserts represent both tradition and innovation—a harmonious blend of classic flavors presented in a contemporary, accessible way.
Ingredients Breakdown
Understanding the role of each ingredient helps elevate your mini tiramisu from good to extraordinary. Here’s a detailed look at what goes into each component:
- Ladyfingers (Savoiardi): These light, dry sponge biscuits form the base layer and absorb liquid beautifully. They provide structure while softening into a cake-like texture when soaked. For gluten-free options, almond flour-based alternatives work well, though they may alter absorption rates.
- Strong Brewed Coffee (cooled): Espresso or dark roast coffee gives tiramisu its signature bold flavor. Since we’re omitting alcohol, using high-quality, freshly brewed coffee intensifies the depth. Instant espresso granules dissolved in hot water also work in a pinch.
- Mascarpone Cheese: This rich, creamy Italian cheese is the heart of any authentic tiramisu. It’s mild, slightly sweet, and incredibly smooth—perfect for creating a luscious filling. Ensure it’s at room temperature before mixing to avoid lumps.
- Heavy Cream (cold): Whipped into stiff peaks, heavy cream adds airiness and volume to the mascarpone mixture, preventing the dessert from feeling overly dense.
- Sugar: Granulated sugar sweetens the mascarpone-cream blend. Adjust based on personal preference or if using flavored coffee. Powdered sugar can be used for quicker dissolution but may make the mixture too soft.
- Vanilla Extract: A touch enhances warmth and complexity, rounding out the sharpness of coffee and richness of cheese.
- Cocoa Powder (unsweetened): Sifted over the top before serving, it adds a bittersweet finish and classic visual flair. Dutch-processed cocoa offers deeper flavor; natural unsweetened works too.
- Optional Add-ins: Chocolate shavings, grated dark chocolate, cinnamon, orange zest, or edible gold dust can customize appearance and taste.
Step-by-Step Recipe
- Brew and Cool the Coffee: Prepare 1½ cups of strong coffee using espresso or a French press. Allow it to cool completely at room temperature, then refrigerate until cold. Warm coffee will melt the cream and soften the ladyfingers too quickly, leading to soggy cups.
- Prepare the Mascarpone Mixture: In a large bowl, beat 16 oz (450g) of softened mascarpone cheese with ⅓ cup granulated sugar and 1 tsp vanilla extract until smooth and creamy. Scrape down the sides with a spatula to ensure even mixing.
- Whip the Cream: In a separate chilled bowl, whip 1 cup of cold heavy cream to stiff peaks. Use a hand mixer or stand mixer for best results. Be careful not to over-whip, or the cream may turn grainy.
- Combine the Fillings: Gently fold the whipped cream into the mascarpone mixture in two additions. Use a gentle folding motion with a rubber spatula to maintain volume and create a light, cloud-like texture.
- Assemble the Cups: Select clear plastic cups, mason jars, or glass dessert glasses (4–6 oz capacity). Cut store-bought ladyfingers into halves or quarters to fit the bottom of each container. Quickly dip each piece into the cooled coffee—just 1–2 seconds per side—to prevent oversaturation.
- Layer the Base: Arrange one layer of dipped ladyfingers at the bottom of each cup. They should cover the base evenly but not overlap excessively.
- Add the First Cream Layer: Pipe or spoon about 2 tablespoons of the mascarpone mixture over the soaked ladyfingers, spreading gently to cover completely.
- Repeat Layers: Add another layer of briefly dipped ladyfingers, followed by another scoop of cream. Most cups will comfortably hold two layers of each.
- Chill Thoroughly: Cover the assembled cups with plastic wrap and refrigerate for at least 6 hours, preferably overnight. This allows the flavors to meld and the textures to set properly.
- Finish Before Serving: Just before serving, sift a generous layer of unsweetened cocoa powder over the top of each cup using a fine-mesh sieve. For extra elegance, add chocolate curls, berries, or mint leaves.
Tips
- Dipping Time Matters: Never soak the ladyfingers—just a quick dip on each side is enough. Over-soaking leads to disintegration and mushy texture.
- Use Room-Temperature Mascarpone: Cold cheese creates lumps. Let it sit out for 30–60 minutes before use.
- Chill Bowls for Whipping Cream: Place mixing bowl and beaters in the freezer for 10–15 minutes before whipping for faster, fluffier results.
- Fold, Don’t Stir: When combining whipped cream and mascarpone, use a folding technique to preserve air and keep the filling light.
- Make Ahead Friendly: These cups taste better after chilling overnight. Prepare them a day in advance for stress-free entertaining.
- Keep Them Covered: Store in the refrigerator under airtight lids or wrapped tightly with plastic to prevent drying and odor absorption.
- Sift Cocoa Right Before Serving: If applied too early, cocoa can absorb moisture and lose its powdery texture. Dust just before presenting.
- Serve Chilled: Always serve straight from the fridge for optimal freshness and firmness.
Variations and Customizations
The beauty of mini tiramisu cups lies in their versatility. Once you master the classic version, feel free to experiment:
- Fruit-Infused Tiramisu: Replace coffee with puréed strawberries, raspberries, or passionfruit for a fruity spin. Layer fresh fruit between the cream for added juiciness.
- Matcha Tiramisu: Swap coffee for strong matcha green tea and use matcha-flavored ladyfingers if available. Top with matcha powder instead of cocoa.
- Chocolate Lover’s Version: Mix melted dark chocolate into the mascarpone filling or add chocolate chips. Use chocolate-dipped ladyfingers for crunch.
- Pumpkin Spice Tiramisu (Seasonal): Blend pumpkin puree and warm spices into the cream layer and use spiced coffee for dipping.
- Coconut Tiramisu: Use coconut milk in place of some cream and sprinkle toasted coconut flakes between layers.
- Kid-Friendly “Tiramisu”: Use chocolate milk or cold brew with caramel syrup for dipping, and top with sprinkles or mini marshmallows.
- Gluten-Free Option: Substitute gluten-free ladyfingers or almond sponge cookies. Test small batches first to check texture compatibility.
- Vegan Adaptation: Use plant-based mascarpone (cashew or soy-based), coconut cream, and vegan ladyfingers. Sweeten with maple syrup or agave.
Health Considerations and Nutritional Value
While undeniably decadent, being mindful of ingredients can help balance indulgence with nutrition:
- High in Fat and Calories: Due to mascarpone and heavy cream, each serving contains significant saturated fat. One standard cup (approx. 150g) ranges from 300–400 calories depending on size and sweetness.
- Low in Protein: Despite dairy content, protein levels are modest (~4–6g per cup).
- Calcium Source: Dairy components contribute to daily calcium intake, supporting bone health.
- Caffeine Content: Contains moderate caffeine from coffee. Suitable for most adults but limit servings for children or caffeine-sensitive individuals.
- Sugar Levels: Can be reduced by decreasing added sugar or using low-sugar alternatives. Natural sweeteners like stevia or erythritol may alter texture slightly.
- Portion Control: Individual cups naturally encourage moderation—ideal for managing intake compared to large desserts.
- Allergens: Contains dairy, eggs (in mascarpone and ladyfingers), and wheat (unless substituted). Always read labels when buying pre-made ingredients.
To make a lighter version: replace half the mascarpone with Greek yogurt, reduce sugar, and use low-fat cream (though texture will be less rich). Note that substitutions may affect authenticity and mouthfeel.
Ingredients
- 16 oz (450g) mascarpone cheese, softened
- 1 cup heavy whipping cream, cold
- ⅓ cup granulated sugar (adjust to taste)
- 1 teaspoon pure vanilla extract
- 1½ cups strong brewed coffee, cooled and refrigerated
- 24–30 ladyfinger cookies (about 1 box)
- ¼ cup unsweetened cocoa powder, for dusting
- Optional: chocolate shavings, berries, mint leaves for garnish
Directions
- Brew 1½ cups of strong coffee using your preferred method (espresso recommended). Allow it to cool completely, then chill in the refrigerator.
- In a large mixing bowl, beat the softened mascarpone cheese, sugar, and vanilla extract together on medium speed until smooth and creamy, about 2–3 minutes. Set aside.
- In a separate chilled bowl, whip the cold heavy cream until stiff peaks form. Avoid over-beating.
- Gently fold the whipped cream into the mascarpone mixture in two parts, using a rubber spatula. Fold carefully until fully incorporated and fluffy.
- Set out 8–10 serving cups (4–6 oz size). Cut ladyfingers to fit the bottom of each cup.
- Dip each ladyfinger piece into the chilled coffee for 1–2 seconds per side. Do not oversoak. Place one layer in each cup.
- Spread or pipe approximately 2 tablespoons of the mascarpone-cream mixture over the dipped ladyfingers.
- Repeat the layering: another round of dipped ladyfingers, topped with more cream mixture.
- Cover the cups with plastic wrap and refrigerate for at least 6 hours, or ideally overnight.
- Just before serving, sift a thin, even layer of cocoa powder over the top of each cup. Garnish as desired.
- Serve chilled and enjoy immediately.
FAQ
Can I make mini tiramisu without mascarpone?
Yes, though flavor and texture will differ. Ricotta cheese blended until smooth or cream cheese mixed with heavy cream can substitute, but mascarpone’s unique richness is hard to replicate exactly.
How long do mini tiramisu cups last in the fridge?
They stay fresh and delicious for up to 3 days when stored covered in the refrigerator. After that, the ladyfingers may become too soft or watery.
Can I freeze mini tiramisu cups?
Freezing is not recommended. The texture of the cream may separate upon thawing, and the ladyfingers can become unpleasantly soggy.
Is this recipe safe for pregnant women?
Yes! Since it contains no raw eggs (mascarpone is pasteurized) and no alcohol, it’s generally considered safe during pregnancy. Always confirm ingredient sources if concerned.
Why are my tiramisu cups too runny?
This usually happens due to over-soaking the ladyfingers or under-whipping the cream. Ensure coffee is cold and only lightly dip the biscuits. Whip cream to stiff peaks before folding.
Can I use decaf coffee?
Absolutely. Decaf works perfectly if you’d like to eliminate caffeine while keeping the coffee flavor.
What type of cocoa powder should I use?
Unsweetened natural or Dutch-processed cocoa both work. Dutch-processed is smoother and darker; natural cocoa is more acidic and sharper in taste.
Can I make these nut-free?
Yes, provided the ladyfingers and other ingredients don’t contain nuts. Always check packaging for allergen statements.
Summary
Mini Tiramisu Cups (Alcohol-Free) offer all the luxurious flavor of classic Italian tiramisu in a convenient, family-friendly format—perfectly layered, easy to make, and stunning to serve. With no alcohol, no raw eggs, and endless customization options, they’re a must-have dessert for every occasion.