Introduction
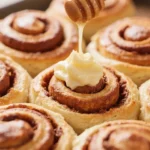
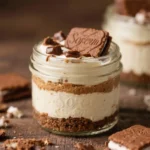
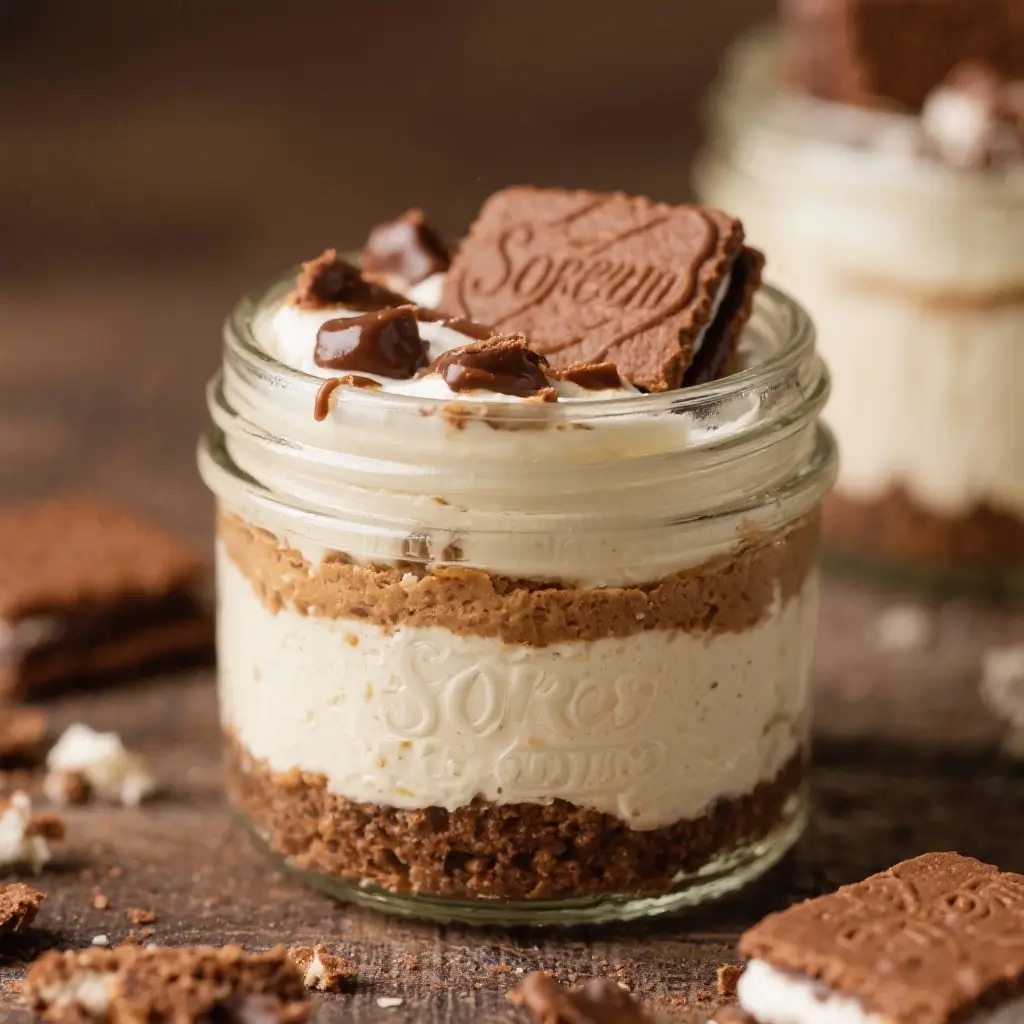
Indulge in the ultimate dessert fusion with these irresistible S’mores Cheesecake Jars—a decadent, portable treat that combines the nostalgic flavors of a campfire classic with the creamy richness of cheesecake. Perfect for parties, picnics, or cozy nights by the fireplace (real or imagined), these layered delights bring together graham cracker crunch, velvety chocolate, fluffy marshmallow fluff, and silky cheesecake in a single spoonful. Whether you’re hosting a summer barbecue, planning a themed dessert bar, or simply craving something sweet and comforting, these S’mores Cheesecake Jars are guaranteed to impress. Easy to make ahead, beautifully layered, and endlessly customizable, they’re the modern twist on two beloved desserts—S’mores and cheesecake—melded into one magical jar.
The History
The origins of the S’more trace back to early 20th-century America, where it quickly became a staple of Girl Scout camping trips. The name “S’more” is a contraction of “some more,” a testament to how addictive this simple combination of graham crackers, chocolate, and toasted marshmallows truly is. First mentioned in a 1927 Girl Scout publication called Tramping and Trailing with the Girl Scouts, the treat gained widespread popularity through its association with outdoor adventures and childhood memories around the campfire.
On the other hand, cheesecake has a much older lineage, dating back to ancient Greece, where it was served to athletes during the first Olympic games. Over centuries, it evolved across cultures, eventually becoming a beloved American dessert with New York-style cheesecake reigning supreme. The idea of combining these two iconic treats—campfire-inspired S’mores and creamy cheesecake—likely emerged in the late 2000s as part of the gourmet dessert jar trend. With social media platforms like Pinterest and Instagram fueling interest in layered, visually appealing desserts, S’mores Cheesecake Jars began appearing at food blogs and bakeries nationwide. These jars represent not just a fusion of flavors but also a celebration of culinary nostalgia, blending tradition with innovation in every bite.
Ingredients Breakdown
The magic of S’mores Cheesecake Jars lies in their carefully balanced layers, each contributing distinct textures and flavors. Here’s a detailed breakdown of what goes into each jar:
- Graham Crackers: The foundation of both S’mores and cheesecake crusts, graham crackers provide a slightly sweet, nutty base with a satisfying crunch. They’re typically crushed into fine crumbs and mixed with butter to create a firm yet crumbly layer.
- Butter (Unsalted): Used to bind the graham cracker crust, melted butter adds richness and helps the crust set when chilled. It enhances flavor without overpowering the delicate sweetness of the other ingredients.
- Cream Cheese (Full-Fat): The star of any cheesecake, full-fat cream cheese delivers that signature dense, creamy texture and tangy flavor. Room temperature cream cheese blends smoothly, ensuring no lumps in your filling.
- Granulated Sugar: Adds sweetness to balance the tanginess of the cream cheese. It dissolves easily into the mixture, contributing to a smooth, luscious consistency.
- Vanilla Extract: A touch of pure vanilla extract deepens the overall flavor profile, adding warmth and complexity to the cheesecake layer.
- Heavy Whipping Cream: When folded into the cheesecake mixture, it lightens the texture, making it airy while maintaining creaminess. It also helps stabilize the filling for clean layering.
- Miniature Marshmallows: These are perfect for melting into a gooey layer or using whole for texture. They mimic the traditional campfire marshmallow experience without requiring an open flame.
- Milk Chocolate Chips or Chopped Chocolate Bars: Provides rich, melty chocolate flavor. Semi-sweet or milk chocolate works best to complement the sweetness of the marshmallows and the tang of the cheesecake.
- Marshmallow Fluff (or Marshmallow Creme): This spreadable version of marshmallows adds a smooth, sticky sweetness and mimics the look and feel of freshly toasted marshmallows. It’s essential for achieving that authentic S’mores aesthetic.
- Whipped Cream (Optional): For extra indulgence, top each jar with a swirl of fresh whipped cream or stabilized whipped topping. It adds a cloud-like finish and balances the richness.
- Garnishes: Additional mini marshmallows, crushed graham crackers, chocolate shavings, or even a drizzle of chocolate syrup can elevate presentation and add textural contrast.
Using high-quality ingredients ensures the best flavor and texture. Opt for real butter, pure vanilla extract, and premium chocolate for a gourmet result.
Step-by-Step Recipe
- Prepare the Graham Cracker Crust: In a food processor or sealed plastic bag, crush about 8–10 graham crackers into fine crumbs. Melt 3 tablespoons of unsalted butter and mix it thoroughly with 1/4 cup granulated sugar and the graham cracker crumbs until the mixture resembles wet sand.
- Layer the Base: Divide the crust mixture evenly among 6 small mason jars or clear dessert glasses (about 8 oz capacity). Press the mixture firmly into the bottom of each jar using the back of a spoon or a small tamper to create a compact, even layer. Place jars in the refrigerator to chill while preparing the next component.
- Melt the Chocolate: In a microwave-safe bowl or over a double boiler, melt 1/2 cup of milk chocolate chips until smooth, stirring every 20 seconds to prevent scorching. Set aside to cool slightly.
- Make the Cheesecake Filling: In a large mixing bowl, beat 16 oz (two 8-oz packages) of softened cream cheese with 1/3 cup granulated sugar using an electric mixer until smooth and creamy. Add 1 teaspoon of pure vanilla extract and beat until fully incorporated. Gradually add 1/2 cup of heavy whipping cream and continue beating on medium speed until the mixture is light, fluffy, and holds soft peaks. Be careful not to overmix, which can introduce air bubbles.
- Assemble the Middle Layers: Remove jars from the fridge. Spoon a thin layer of the melted chocolate over the graham cracker crust in each jar. Immediately sprinkle a few miniature marshmallows on top of the chocolate so they adhere as it sets. Then, pipe or spoon a generous layer of the cheesecake filling over the marshmallows, smoothing the top with a spatula or the back of a spoon.
- Add the Marshmallow Layer: Gently spread a layer of marshmallow fluff over the cheesecake filling. You can warm the fluff slightly to make it easier to spread, but avoid melting it completely. Use a knife or offset spatula to keep the layer even.
- Final Touches: Top each jar with a dollop of whipped cream if desired. Garnish with additional mini marshmallons, a sprinkle of crushed graham crackers, and a few chocolate shavings for visual appeal.
- Chill Before Serving: Cover the jars with lids or plastic wrap and refrigerate for at least 2–3 hours, preferably overnight, to allow all layers to set and flavors to meld.
- Serve: Serve cold straight from the fridge. Include long spoons or mini sporks for easy layer-by-layer enjoyment.
Tips
- Use Room Temperature Cream Cheese: Cold cream cheese leads to lumpy filling. Let it sit out for at least 30 minutes before mixing to ensure a perfectly smooth texture.
- Don’t Skip the Chill Time: Allowing the jars to set in the refrigerator is crucial for structure and flavor development. Rushing this step may result in runny layers.
- Layer Order Matters: Always place the chocolate layer right after the crust while it’s still slightly warm so the marshmallows stick. Then immediately follow with the cheesecake to lock everything in place.
- Prevent Weeping: To avoid liquid pooling on top of the cheesecake layer, make sure your cream cheese is well-blended and that you don’t over-whip the mixture.
- Uniform Jar Size: Use identical jars for consistent layering and professional presentation. Half-pint mason jars work perfectly and are widely available.
- Easy Spreading: If marshmallow fluff is too thick, microwave it for 5–10 seconds to soften it slightly. Do not overheat, as it can become sticky and difficult to control.
- Make Ahead Friendly: These jars can be assembled up to 3 days in advance and stored covered in the fridge. Add final garnishes just before serving for freshness.
- Transport Safely: When taking to gatherings, place jars in a container with dividers or line them in a box with towels to prevent tipping.
- Avoid Watery Toppings: Skip fruit toppings unless stabilized, as excess moisture can ruin the texture of the marshmallow and cheesecake layers.
- Double the Batch: These go fast! Make extra because once people taste them, they’ll want seconds.
Variations and Customizations
The beauty of S’mores Cheesecake Jars lies in their versatility. Once you master the basic recipe, there are countless ways to personalize them for different tastes, occasions, or dietary needs:
- Chocolate Varieties: Swap milk chocolate for dark chocolate, white chocolate, or even peanut butter chips for a unique twist. Try a swirl of Nutella for a European flair.
- Flavored Cheesecake: Infuse the cheesecake layer with espresso powder, cinnamon, orange zest, or cookie butter for added depth.
- Salted Caramel S’mores: Drizzle salted caramel sauce between layers or on top for a sweet-and-salty explosion.
- Smoked Marshmallow Effect: Use a kitchen torch to lightly toast the top layer of marshmallow fluff for a realistic campfire finish. Watch closely to avoid burning.
- Crust Alternatives: Replace graham crackers with digestive biscuits, chocolate cookies, or Oreo crusts for a darker, richer base.
- Dairy-Free Version: Use vegan cream cheese, coconut oil instead of butter, dairy-free chocolate, and coconut cream for a plant-based alternative.
- Gluten-Free Option: Choose certified gluten-free graham crackers or make a crust from almond flour, oats, and butter.
- Kid-Friendly Fun: Let children assemble their own jars with pre-made components—great for birthday parties or school events.
- Boozy Twist: Add a tablespoon of Kahlua, Baileys, or bourbon to the cheesecake mixture for an adult-only version (ensure responsible serving).
- Mini Dessert Shots: Scale down the recipe into shot glasses for cocktail hour treats or wedding favors.
- Frozen Version: Freeze the assembled jars (without whipped cream) for 4+ hours to create a frozen S’mores pie effect. Thaw slightly before eating for optimal texture.
- Theme It Up: Customize colors and toppings for holidays—red and green sprinkles for Christmas, pastel marshmallows for Easter, or spooky shapes for Halloween.
Health Considerations and Nutritional Value
While S’mores Cheesecake Jars are undeniably delicious, they are best enjoyed in moderation due to their high sugar, fat, and calorie content. Here’s a general nutritional estimate per serving (one 8-oz jar):
- Calories: ~450–550 kcal
- Total Fat: 28–35g (including 16–20g saturated fat)
- Carbohydrates: 45–55g (with 30–40g sugars)
- Protein: 5–7g
- Sodium: 300–400mg
- Dietary Fiber: 1–2g
Considerations:
- Sugar Content: High levels of added sugars from graham crackers, chocolate, marshmallows, and sweetened cream cheese can contribute to blood sugar spikes. Diabetics should consume sparingly or explore sugar substitutes.
- Saturated Fat: Found primarily in butter, cream cheese, and heavy cream. Those monitoring cholesterol may want to limit intake or use lower-fat alternatives (though texture will be affected).
- Allergens: Contains dairy, gluten (unless substituted), and potential traces of nuts depending on ingredient brands. Always check labels if serving individuals with allergies.
- Pregnancy & Immune Concerns: Raw eggs are not used in this recipe, making it safer than some cheesecakes, but always ensure all dairy products are pasteurized.
- Balanced Indulgence: Pair with a side of berries or serve in smaller portions to balance sweetness and add nutrients. Consider offering a lighter version with Greek yogurt-based filling for a protein boost.
For a healthier spin, try using low-sugar marshmallow creme, dark chocolate with 70% cocoa or higher, reduced-fat cream cheese, and a crust made from oats and dates. While these swaps alter the original flavor and texture, they can reduce overall calories and sugar significantly.
Ingredients
- 8–10 full-sheet graham crackers, crushed (about 1 1/2 cups crumbs)
- 3 tablespoons unsalted butter, melted
- 1/4 cup granulated sugar (for crust)
- 16 oz (2 x 8-oz packages) full-fat cream cheese, softened
- 1/3 cup granulated sugar (for filling)
- 1 teaspoon pure vanilla extract
- 1/2 cup heavy whipping cream
- 1/2 cup milk chocolate chips
- 1/2 cup miniature marshmallows
- 1 cup marshmallow fluff (marshmallow creme)
- 1 cup whipped cream (optional, for topping)
- Extra crushed graham crackers, chocolate shavings, and mini marshmallows (for garnish)
Directions
- In a food processor or zip-top bag, crush graham crackers into fine crumbs. Transfer to a bowl and mix with melted butter and 1/4 cup sugar until evenly moistened.
- Divide the crust mixture among 6 (8 oz) jars. Press firmly into the bottom using a spoon or small glass. Refrigerate for 20 minutes to set.
- Melt chocolate chips in 20-second intervals in the microwave, stirring between each, until smooth. Allow to cool slightly.
- In a large bowl, beat softened cream cheese with 1/3 cup sugar and vanilla extract until smooth and creamy.
- Add heavy whipping cream gradually, beating on medium speed until light and fluffy with no lumps. Do not overmix.
- Remove jars from the fridge. Spoon a thin layer of melted chocolate over each crust. Immediately scatter a few miniature marshmallows on top so they stick.
- Add a generous layer of cheesecake filling over the marshmallows, smoothing the surface.
- Spread a layer of marshmallow fluff on top of the cheesecake. Warm slightly if too thick.
- Top with whipped cream, if using. Garnish with extra mini marshmallows, crushed graham crackers, and chocolate shavings.
- Cover jars and refrigerate for at least 2–3 hours, or preferably overnight.
- Serve chilled with long spoons. Enjoy layer by layer!
FAQ
Can I make S’mores Cheesecake Jars without marshmallow fluff?
Yes, though fluff gives the best texture. You can melt miniature marshmallows with a splash of water to create a similar consistency, but it may be stickier and less stable.
How long do these jars last in the fridge?
They stay fresh for up to 4 days when tightly covered. However, the texture is best within the first 48 hours.
Can I freeze S’mores Cheesecake Jars?
Yes, but without whipped cream or fresh garnishes. Freeze uncovered until solid, then wrap individually. Thaw in the fridge for 3–4 hours before serving.
Why is my cheesecake layer watery?
This could be due to cold cream cheese, overmixing, or condensation. Always use room-temperature cream cheese and avoid over-beating. Chilling longer helps firm it up.
Can I use store-bought crusts?
Absolutely. Pre-made graham cracker crust mini cups can be crushed and used, or you can buy ready-to-use crust shells if short on time.
Is there a substitute for heavy cream?
Coconut cream works well for a dairy-free option. Regular milk won’t provide the same richness or stability.
Can I make these nut-free?
Yes, just ensure your graham crackers and chocolate are processed in a nut-free facility if allergies are a concern.
How do I prevent the layers from mixing?
Chill each layer briefly (10–15 minutes) before adding the next. This helps maintain clean separation.
Can I prepare the components in advance?
Yes! Make the crust, cheesecake filling, and melted chocolate ahead of time. Assemble the jars a day before serving for convenience.
Are these suitable for kids?
Definitely! Kids love the familiar S’mores taste and fun jar format. Just supervise younger ones with spoons to avoid spills.
Summary
S’mores Cheesecake Jars blend the cozy nostalgia of campfire treats with the luxurious creaminess of homemade cheesecake in a convenient, portable format. Layered to perfection and packed with graham cracker, chocolate, marshmallow, and cheesecake goodness, they’re a show-stopping dessert that’s as delightful to look at as it is to eat.