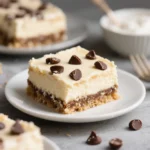
Chocolate Chip Cheesecake Bars: A Decadent Fusion of Flavors
Indulge in the ultimate dessert experience with these luscious Chocolate Chip Cheesecake Bars—a heavenly marriage between creamy cheesecake and rich chocolate chip cookie dough. Whether you’re hosting a dinner party, bringing treats to a potluck, or simply treating yourself on a quiet evening, these bars deliver a perfect balance of buttery crust, velvety cheesecake filling, and melty chocolate chips that melt in your mouth. With their easy-to-serve bar format, they’re more convenient than traditional cheesecakes yet just as luxurious.
The History: From Classic Cheesecake to Modern Bar Form
Cheesecake has roots stretching back thousands of years to ancient Greece, where it was served to athletes during the first Olympic Games as a source of energy. Over centuries, the recipe evolved across Europe and eventually made its way to America, where the modern version—typically made with cream cheese, sugar, eggs, and a graham cracker crust—became a staple of American bakeries and home kitchens alike.
The concept of transforming cheesecake into bar form emerged in the mid-20th century as bakers sought more convenient, portable, and sliceable desserts. The bar format allowed for easier portion control and simplified preparation compared to a full-sized cake. Adding chocolate chips—a beloved ingredient popularized in the 1930s by Ruth Wakefield’s accidental invention of the chocolate chip cookie—was a natural evolution. Combining the two iconic desserts created a new favorite: the chocolate chip cheesecake bar. Today, this hybrid treat is celebrated for its nostalgic charm and crowd-pleasing appeal.
Ingredients Breakdown: What Makes These Bars Irresistible?
The magic of chocolate chip cheesecake bars lies in their layered composition and high-quality ingredients. Each component plays a crucial role:
- Graham Cracker Crumbs: Provide a sweet, slightly nutty base that holds together well and complements the richness of the filling.
- Butter (Unsalted): Binds the crust together and adds a rich, buttery flavor essential for texture and taste.
- Granulated Sugar: Sweetens the crust and enhances browning during baking.
- Cream Cheese (Full-Fat): The star of the filling—creamy, tangy, and smooth when properly softened. Full-fat ensures the richest texture.
- Granulated Sugar (for filling): Balances the tanginess of the cream cheese and contributes to a silky consistency.
- Eggs: Act as a binder and give structure to the cheesecake layer while contributing to its custard-like texture.
- Vanilla Extract: Enhances flavor depth and provides a warm, aromatic note that complements both cheesecake and chocolate.
- Sour Cream or Heavy Cream: Adds moisture, richness, and a slight tang that balances sweetness.
- Flour (All-Purpose): A small amount helps stabilize the filling and prevents cracking.
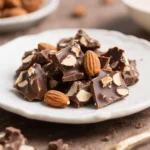
- Semisweet Chocolate Chips: The crowning glory—distributed throughout the batter for gooey pockets of chocolate in every bite.
- Optional Add-ins: Sea salt flakes, espresso powder, or chopped nuts can elevate complexity.
Step-by-Step Recipe: How to Make Perfect Chocolate Chip Cheesecake Bars
Follow these detailed steps to create flawless chocolate chip cheesecake bars at home:
- Preheat Oven & Prepare Pan: Preheat your oven to 325°F (165°C). Line a 9×13-inch baking pan with parchment paper, leaving overhang on two sides for easy removal. Lightly grease any exposed areas.
- Make the Crust: In a medium bowl, combine 1 ½ cups graham cracker crumbs, ⅓ cup granulated sugar, and 6 tablespoons melted unsalted butter. Mix until the crumbs are evenly moistened. Press the mixture firmly into the bottom of the prepared pan using the back of a spoon or flat-bottomed glass. Bake for 10 minutes, then remove and let cool slightly while preparing the filling.
- Prepare Cheesecake Filling: In a large mixing bowl, beat 3 (8 oz) packages of softened cream cheese with an electric mixer on medium speed until smooth and creamy (about 2 minutes). Scrape down the sides as needed.
- Add Sugar and Flavor: Gradually add ¾ cup granulated sugar and continue beating until fully incorporated. Add 1 teaspoon pure vanilla extract and ¼ cup sour cream (or heavy cream), mixing until combined.
- Incorporate Eggs: Add 3 large eggs one at a time, beating on low speed after each addition just until blended. Overmixing can incorporate too much air, leading to cracks.
- Add Thickener: Gently mix in 1 tablespoon all-purpose flour to help stabilize the filling.
- Fold in Chocolate Chips: Stir in 1 cup of semisweet chocolate chips using a spatula. Reserve a few extra chips to sprinkle on top if desired for visual appeal.
- Pour Over Crust: Carefully pour the filling over the pre-baked crust, spreading it evenly with a spatula to ensure consistent thickness.
- Bake: Place the pan in the center of the oven and bake for 35–40 minutes. The edges should be set, but the center should still have a slight jiggle—like gelatin—when gently shaken.
- Cool Gradually: Turn off the oven, crack the door open slightly, and let the bars cool inside for 1 hour. This gradual cooling helps prevent surface cracks.
- Chill: Remove from oven and cool completely at room temperature. Then refrigerate for at least 4 hours—or preferably overnight—for clean slicing and optimal texture.
- Cut and Serve: Use the parchment overhang to lift the slab out of the pan. Trim edges if desired and cut into 12–16 even bars using a sharp knife dipped in hot water and wiped dry between cuts.
Tips for Success: Expert Advice for Flawless Results
- Use Room-Temperature Ingredients: Ensure cream cheese, eggs, and sour cream are at room temperature (about 1–2 hours out of the fridge) to avoid lumps and ensure smooth blending.
- Avoid Overmixing: Once eggs are added, mix only until just combined. Overbeating incorporates air, which can cause puffing and cracking.
- Water Bath Alternative: For extra insurance against cracking, place a shallow pan of water on the rack below the cheesecake bars during baking to maintain humidity.
- No Parchment? No Problem: If you don’t have parchment, generously grease the pan and consider using a silicone baking mat for easier release.
- Sharp Knife Technique: For clean cuts, use a thin, sharp knife dipped in hot water and wiped dry between slices.
- Chill Thoroughly: Never skip the chilling step! Cold bars hold their shape better and offer a richer, denser texture.
- Prevent Browning: If the top browns too quickly, tent loosely with aluminum foil halfway through baking.
Variations and Customizations: Make It Your Own
These chocolate chip cheesecake bars are incredibly versatile. Try these creative twists:
- Cookie Dough Swirl: Drop spoonfuls of edible chocolate chip cookie dough onto the batter before baking and swirl gently with a knife.
- Double Chocolate: Replace graham crackers with chocolate cookie crumbs (like Oreo) and use dark chocolate chips for a deeper cocoa flavor.
- White Chocolate Macadamia: Swap semisweet chips for white chocolate and add ½ cup chopped macadamia nuts.
- Peanut Butter Lover’s: Swirl ⅓ cup warm peanut butter into the batter or add peanut butter chips instead.
- Gluten-Free Version: Use gluten-free graham crackers and certified gluten-free flour to make these safe for sensitive diets.
- Vegan Option: Substitute with dairy-free cream cheese, flax eggs, and plant-based chocolate chips for a vegan-friendly dessert.
- Mini Bars: Bake in a jelly roll pan or muffin tin for bite-sized treats—adjust baking time accordingly.
- Fruity Twist: Add a layer of raspberry jam beneath the cheesecake filling or garnish with fresh berries when serving.
- Espresso Infused: Add 1 teaspoon instant espresso powder to the filling for a mocha variation.
- Salted Caramel Drizzle: Top with homemade or store-bought salted caramel sauce before serving for a gourmet touch.
Health Considerations and Nutritional Value
While undeniably indulgent, understanding the nutritional profile helps you enjoy these bars mindfully:
- Calories: Approximately 300–380 per bar (depending on size and ingredients).
- Fat: High in saturated fat due to cream cheese, butter, and chocolate. Consider using reduced-fat cream cheese for a lighter version (though texture may be slightly less creamy).
- Sugar: Contains significant added sugars. Natural alternatives like coconut sugar or monk fruit sweeteners can be experimented with, though results may vary.
- Protein: Moderate protein content from eggs and dairy helps with satiety.
- Lactose Intolerance: Traditional recipes contain lactose; lactose-free cream cheese and butter options are available.
- Portion Control: Cut smaller bars to manage intake. One small square can satisfy a sweet craving without overindulgence.
- Balanced Pairing: Serve with fresh fruit like strawberries or raspberries to add fiber and brightness.
For those managing diabetes or watching sugar intake, consider sugar substitutes like erythritol or allulose designed for baking. Always consult dietary guidelines based on individual health needs.
Ingredients
- 1 ½ cups graham cracker crumbs (about 10 full sheets)
- ⅓ cup granulated sugar (for crust)
- 6 tablespoons unsalted butter, melted
- 3 (8 oz) packages full-fat cream cheese, softened
- ¾ cup granulated sugar (for filling)
- 1 teaspoon pure vanilla extract
- ¼ cup sour cream or heavy cream
- 3 large eggs
- 1 tablespoon all-purpose flour
- 1 cup semisweet chocolate chips, plus extra for topping (optional)
Directions
- Preheat oven to 325°F (165°C). Line a 9×13-inch baking pan with parchment paper, leaving overhang on two opposite sides for lifting. Lightly grease exposed pan areas.
- In a bowl, mix graham cracker crumbs, ⅓ cup sugar, and melted butter until sandy and well combined. Press firmly into the bottom of the pan. Bake for 10 minutes, then cool.
- In a large bowl, beat cream cheese on medium speed until smooth (~2 minutes). Add ¾ cup sugar and beat until creamy. Mix in vanilla and sour cream.
- Add eggs one at a time, mixing on low after each until just incorporated. Do not overbeat.
- Mix in flour until just combined. Fold in 1 cup chocolate chips with a spatula.
- Pour filling over crust and spread evenly. Sprinkle a few extra chocolate chips on top if desired.
- Bake for 35–40 minutes until edges are set and center jiggles slightly.
- Turn off oven, crack door open, and let cool inside for 1 hour.
- Cool completely at room temperature, then chill in refrigerator for at least 4 hours (preferably overnight).
- Lift bars out using parchment. Cut into squares with a hot, clean knife.
- Serve chilled. Store leftovers covered in the refrigerator for up to 5 days.
FAQ
Can I freeze chocolate chip cheesecake bars?
Yes! Wrap individual bars tightly in plastic wrap and place in an airtight container. Freeze for up to 2 months. Thaw in the refrigerator overnight before serving.
Why did my bars crack?
Cracking is usually caused by overmixing, rapid cooling, or overbaking. To minimize cracks, avoid overbeating after adding eggs, cool gradually in the oven, and don’t overbake.
Can I make them ahead of time?
Absolutely! These bars actually improve in flavor and texture after chilling overnight. Prepare them 1–2 days in advance for stress-free entertaining.
Can I use a different pan size?
An 8×8-inch pan will yield thicker bars with longer baking time (~45–55 minutes). A 9×9-inch pan works too but will result in slightly taller bars. Adjust accordingly.
Are they suitable for kids?
Yes! Kids love the combination of cheesecake and chocolate chips. Just ensure proper supervision when using knives for cutting.
Can I use whipped cream cheese?
No—whipped cream cheese contains air and stabilizers that can alter texture and lead to a runny filling. Stick with block-style, full-fat cream cheese.
How do I store leftovers?
Keep refrigerated in an airtight container with wax paper between layers to prevent sticking. Consume within 5 days for best quality.
Summary
Chocolate Chip Cheesecake Bars blend the creamy elegance of cheesecake with the comforting joy of chocolate chip cookies into one unforgettable dessert. Easy to make, serve, and customize, they’re guaranteed to become a family favorite.