Chicken Pot Pie Skillet: A Hearty, One-Pan Comfort Classic
The Chicken Pot Pie Skillet is a modern twist on a beloved American classic—a dish that warms the soul with its creamy filling, tender vegetables, and flaky topping. Traditionally baked in a pie crust and served in slices, pot pie has long been a staple of home cooking across North America, especially during the colder months. But today’s fast-paced lifestyle calls for quicker, simpler meals without sacrificing flavor or comfort. Enter the skillet version: a one-pan wonder that captures all the essence of the original but cooks faster, cleans up easier, and brings everyone to the table in under an hour.
The History of Chicken Pot Pie and Its Evolution
Chicken pot pie has roots that stretch back centuries, with early versions appearing in England as early as the 13th century. These medieval “coffins” were not sweet desserts but savory pies made with thick, inedible crusts designed to preserve and cook meats and vegetables inside. As culinary techniques evolved, so did the pot pie—eventually making its way across the Atlantic with English settlers.
In America, pot pie became a symbol of frugality and resourcefulness. Leftover chicken, root vegetables, and simple seasonings were combined and baked into a hearty meal, often using homemade pastry. By the 20th century, convenience foods brought frozen pot pies to supermarket shelves, popularized by brands like Marie Callender’s and Stouffer’s. However, nothing compares to the homemade version.
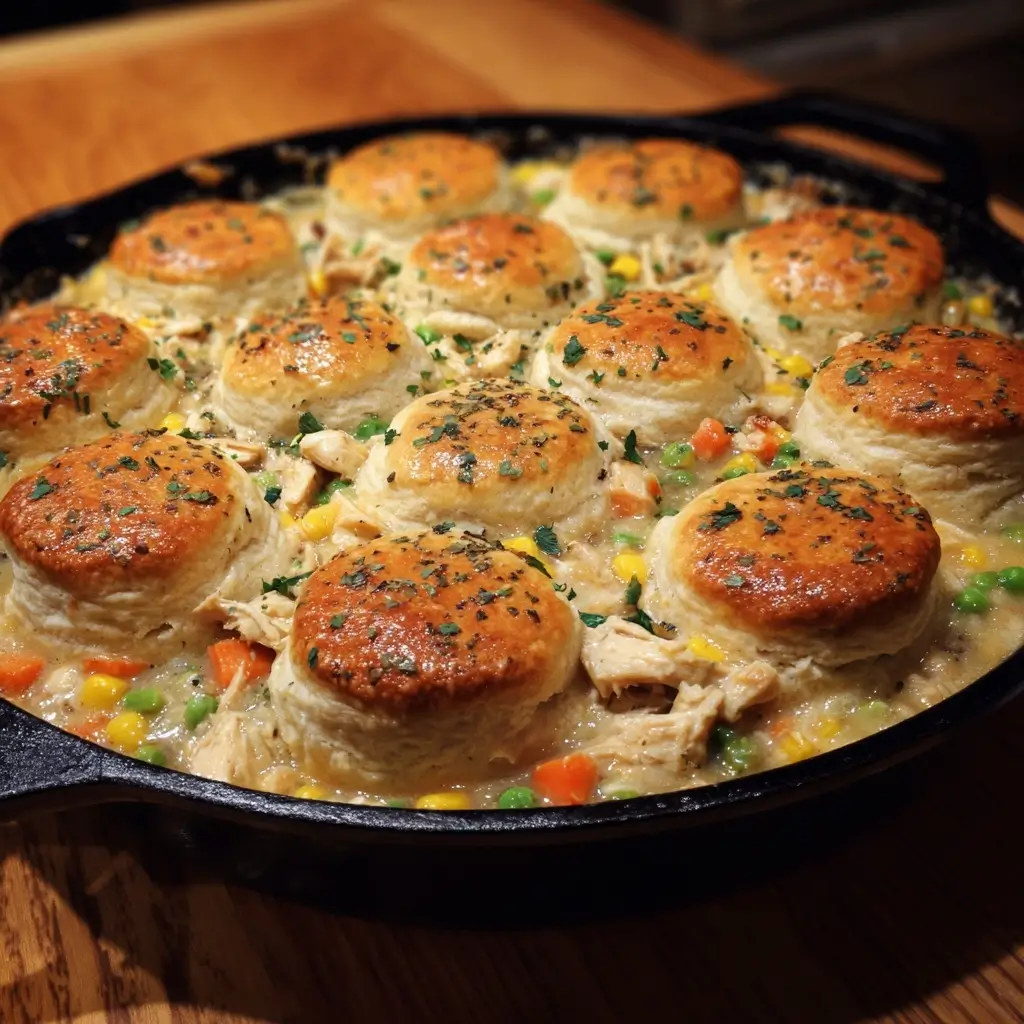
The skillet adaptation emerged as a response to modern kitchens favoring speed and simplicity. Cast iron skillets, known for their even heat distribution and ability to go from stovetop to oven, became the perfect vessel. This hybrid method preserves the rich, creamy texture of the filling while allowing a golden, biscuit-like topping to bake directly on top—no separate pie crust required. The result? A rustic, satisfying dish that feels both nostalgic and refreshingly convenient.
Ingredients Breakdown: What Makes This Skillet Special?
The magic of a Chicken Pot Pie Skillet lies in its balance of ingredients—creamy, savory, hearty, and just a little buttery. Here’s a detailed breakdown of each component and why it matters:
- Cooked Chicken: Shredded or diced cooked chicken breast or thigh provides the protein base. Rotisserie chicken works wonderfully here, adding depth of flavor and saving time.
- Butter: Used to create the roux, butter adds richness and helps bind the sauce. Unsalted butter is preferred for better control over seasoning.
- All-Purpose Flour: Acts as a thickening agent when combined with butter and milk, forming the base of the creamy sauce.
- Garlic: Fresh minced garlic adds aromatic depth and enhances the overall savoriness of the filling.
- Vegetables: A mix of diced carrots, celery, peas, and onions (the classic mirepoix) delivers color, texture, and nutrition. Some variations include potatoes or corn for added heartiness.
- Chicken Broth: Adds savory umami notes and helps build the liquid base of the filling.
- Milk or Half-and-Half: Gives the sauce its creaminess. Whole milk or half-and-half yields a richer consistency than skim milk.
- Seasonings: Thyme, rosemary, sage, salt, and black pepper are essential for capturing the classic pot pie flavor profile. A pinch of nutmeg can add warmth and complexity.
- Biscuit Topping: Made from scratch or using store-bought dough, the topping bakes into a golden, fluffy crown. Some versions use puff pastry or crescent roll dough for a flakier finish.
- Egg Wash (optional): Brushing the topping with beaten egg before baking gives it a glossy, golden-brown finish.
Each ingredient plays a role in building layers of flavor and texture, ensuring every bite is satisfying and comforting.
Step-by-Step Recipe: How to Make Chicken Pot Pie Skillet
Follow this detailed guide to create a delicious, restaurant-quality Chicken Pot Pie Skillet right in your own kitchen.
Ingredients
For the Filling:
- 2 tablespoons unsalted butter
- 1 medium yellow onion, finely diced
- 2 medium carrots, peeled and diced
- 2 celery stalks, diced
- 3 cloves garlic, minced
- 1/3 cup all-purpose flour
- 2 cups low-sodium chicken broth
- 1 cup whole milk or half-and-half
- 3 cups cooked chicken, shredded or diced (rotisserie works well)
- 1 cup frozen peas (do not thaw)
- 1 teaspoon dried thyme
- 1/2 teaspoon dried rosemary
- 1/2 teaspoon dried sage
- Salt and freshly ground black pepper, to taste
For the Biscuit Topping:
- 1 1/2 cups all-purpose flour
- 1 tablespoon baking powder
- 1/2 teaspoon salt
- 1/2 teaspoon garlic powder (optional, for extra flavor)
- 1/2 cup cold unsalted butter, cubed
- 2/3 cup buttermilk (or regular milk with 1 tsp vinegar)
- 1 large egg (for egg wash, optional)
Directions
- Preheat Oven: Preheat your oven to 400°F (200°C). Ensure your oven-safe skillet (preferably cast iron or heavy-duty non-stick) is ready.
- Sauté Vegetables: In the skillet over medium heat, melt the butter. Add onion, carrots, and celery. Cook for 6–8 minutes until softened. Stir in garlic and cook for 30 seconds until fragrant.
- Make the Roux: Sprinkle flour over the vegetables and stir constantly for 1–2 minutes to cook out the raw flour taste and form a paste.
- Add Liquids: Gradually whisk in chicken broth, followed by milk. Continue stirring until the mixture thickens and comes to a gentle simmer, about 5–7 minutes. It should coat the back of a spoon.
- Combine Filling: Stir in cooked chicken, peas, thyme, rosemary, sage, salt, and pepper. Mix well and remove from heat. Taste and adjust seasoning if needed.
- Prepare Biscuit Dough: In a mixing bowl, combine flour, baking powder, salt, and garlic powder. Cut in cold butter using a pastry cutter or fork until mixture resembles coarse crumbs. Stir in buttermilk just until a soft dough forms. Do not overmix.
- Top the Skillet: Drop spoonfuls of biscuit dough evenly over the hot filling. Try to cover as much surface as possible for even baking.
- Bake: Place the skillet in the preheated oven. Bake for 20–25 minutes, or until the biscuits are golden brown and a toothpick inserted in the center comes out clean.
- Optional Egg Wash: For a shiny, golden crust, beat an egg with 1 tablespoon water and brush over the biscuits during the last 5 minutes of baking.
- Cool Slightly & Serve: Let the skillet rest for 5–10 minutes before serving. This allows the filling to set slightly and prevents burns from overheated sauce.
Tips for the Perfect Chicken Pot Pie Skillet
- Use an Oven-Safe Skillet: Only use skillets labeled as oven-safe. Avoid non-stick pans with plastic handles unless you know they can withstand 400°F.
- Don’t Rush the Roux: Cooking the flour-butter mixture ensures no raw flour taste and proper thickening. Stir continuously to avoid burning.
- Thicken Properly: If the filling seems too thin after adding liquids, simmer longer. If too thick, add a splash more broth.
- Keep Biscuit Dough Cold: Cold butter creates flaky, light biscuits. Handle the dough as little as possible to prevent toughness.
- Don’t Overfill: Leave about 1 inch of space at the top of the skillet to prevent bubbling over during baking.
- Let it Rest: Allowing the dish to sit after baking helps the sauce settle and makes serving easier.
- Customize Veggies: Feel free to add diced potatoes, mushrooms, or corn for variety.
Variations and Customizations
The beauty of the Chicken Pot Pie Skillet lies in its versatility. Here are several ways to personalize it to suit your taste, dietary needs, or what’s in your pantry:
- Creamier Filling: Use heavy cream instead of milk, or add a spoonful of cream cheese or sour cream for extra richness.
- Gluten-Free Version: Substitute all-purpose flour with a gluten-free flour blend for the roux and biscuit topping. Use gluten-free baking powder.
- Dairy-Free Option: Replace butter with vegan butter, milk with unsweetened almond or oat milk, and use dairy-free cheese in the biscuits if desired.
- Puff Pastry Topping: Instead of biscuits, drape a sheet of puff pastry over the filling, crimp edges, and cut slits for steam. Bake until puffed and golden.
- Crescent Roll Crust: Unroll canned crescent dough and lay over the filling. Bake according to package directions for a flaky, buttery top.
- Vegetarian Twist: Omit chicken and use mushrooms, lentils, or chickpeas as a protein substitute. Use vegetable broth instead of chicken broth.
- Spicy Kick: Add a dash of cayenne, smoked paprika, or diced jalapeños to the filling for heat.
- Herb Variations: Swap dried herbs for fresh (triple the amount), or try tarragon for a more sophisticated flavor.
- Individual Servings: Divide the filling among small oven-safe ramekins and top each with a biscuit or puff pastry square for personal pot pies.
Health Considerations and Nutritional Value
While Chicken Pot Pie Skillet is undeniably comforting, it can be adapted to align with various health goals. Here’s a general nutritional overview per serving (assuming 6 servings):
- Calories: ~450–550 kcal
- Protein: 25–30g (from chicken and milk)
- Fat: 20–25g (mostly from butter and milk; varies with ingredients)
- Carbohydrates: 40–50g (primarily from flour, vegetables, and biscuits)
- Fiber: 3–5g (from vegetables and whole grains if used)
- Sodium: 600–900mg (can be reduced using low-sodium broth and limiting added salt)
Health Tips:
- Lower Fat: Use skinless chicken breast, reduce butter, and substitute milk with low-fat or plant-based alternatives.
- Boost Fiber: Add more vegetables like kale, spinach, or sweet potatoes.
- Portion Control: Serve with a side salad to increase volume without excess calories.
- Heart-Healthy Swaps: Use olive oil instead of butter where possible, and opt for whole wheat flour in the biscuits.
- Avoid Overprocessing: Stick to whole ingredients rather than canned sauces or premade doughs high in preservatives.
This dish provides a balanced mix of protein, complex carbs, and healthy fats when prepared thoughtfully. It’s suitable for active individuals and families seeking nourishing, satisfying meals.
Frequently Asked Questions (FAQ)
Can I make this ahead of time?
Yes! Assemble the skillet up to the biscuit step, cover, and refrigerate for up to 24 hours. Add biscuits just before baking, though you may need to add 5–10 minutes to the baking time.
Can I freeze Chicken Pot Pie Skillet?
Absolutely. Cool completely, then wrap tightly in foil or transfer to a freezer-safe container. Freeze for up to 3 months. Reheat in the oven at 350°F until heated through (about 45–60 minutes).
What can I use instead of biscuits?
Try mashed potatoes (shepherd’s pie style), puff pastry, crescent rolls, or even cornbread batter for different textures and flavors.
Why is my filling runny?
This usually happens if the roux wasn’t cooked long enough or the filling didn’t simmer sufficiently. Next time, cook the flour mixture for 2 full minutes and simmer until thickened before adding chicken and peas.
Can I use canned chicken?
Yes, though fresh or rotisserie chicken tastes better. Drain canned chicken well to avoid watery filling.
Is this recipe kid-friendly?
Definitely! Kids love the creamy texture and mild flavors. You can puree the vegetables slightly if serving picky eaters.
Can I cook this entirely on the stovetop?
Not recommended. The biscuit topping requires oven baking to rise and brown properly. However, you can cover the skillet with a lid after adding raw biscuits and use a heat diffuser—but results may vary.
Summary
The Chicken Pot Pie Skillet is a comforting, one-pan meal that combines a creamy chicken and vegetable filling with a fluffy biscuit topping, baked to golden perfection. Easy to customize and perfect for weeknights or Sunday dinners, it brings the nostalgia of homemade pie with the convenience of modern cooking.