Chocolate Peanut Butter Icebox Cake: A Decadent No-Bake Delight
The History of the Icebox Cake
The concept of the icebox cake dates back to the early 20th century when refrigerators, then known as “iceboxes,” became a household staple in American kitchens. Before the widespread availability of frozen desserts and modern baking techniques, home cooks had to get creative with no-bake recipes that could chill and set in the cool confines of an icebox. The original icebox cakes were often made by layering whipped cream and graham crackers, allowing the moisture from the cream to soften the crackers over time, creating a cake-like texture without any baking.
Over the decades, the icebox cake evolved with the times. As new ingredients like chocolate wafers, cream cheese, and flavored spreads became accessible, bakers began experimenting with richer, more decadent versions. The chocolate peanut butter icebox cake emerged as a favorite twist, combining two of America’s most beloved flavors—creamy peanut butter and rich chocolate—in a luscious, easy-to-make dessert perfect for summer gatherings, potlucks, or late-night cravings. Its popularity soared due to its simplicity, minimal ingredient list, and impressive taste, making it a staple in cookbooks and family recipe collections.
Ingredients Breakdown
The magic of a great chocolate peanut butter icebox cake lies in the harmony of its components. Each ingredient plays a crucial role in building flavor, texture, and structure. Here’s a detailed look at what goes into this indulgent treat:
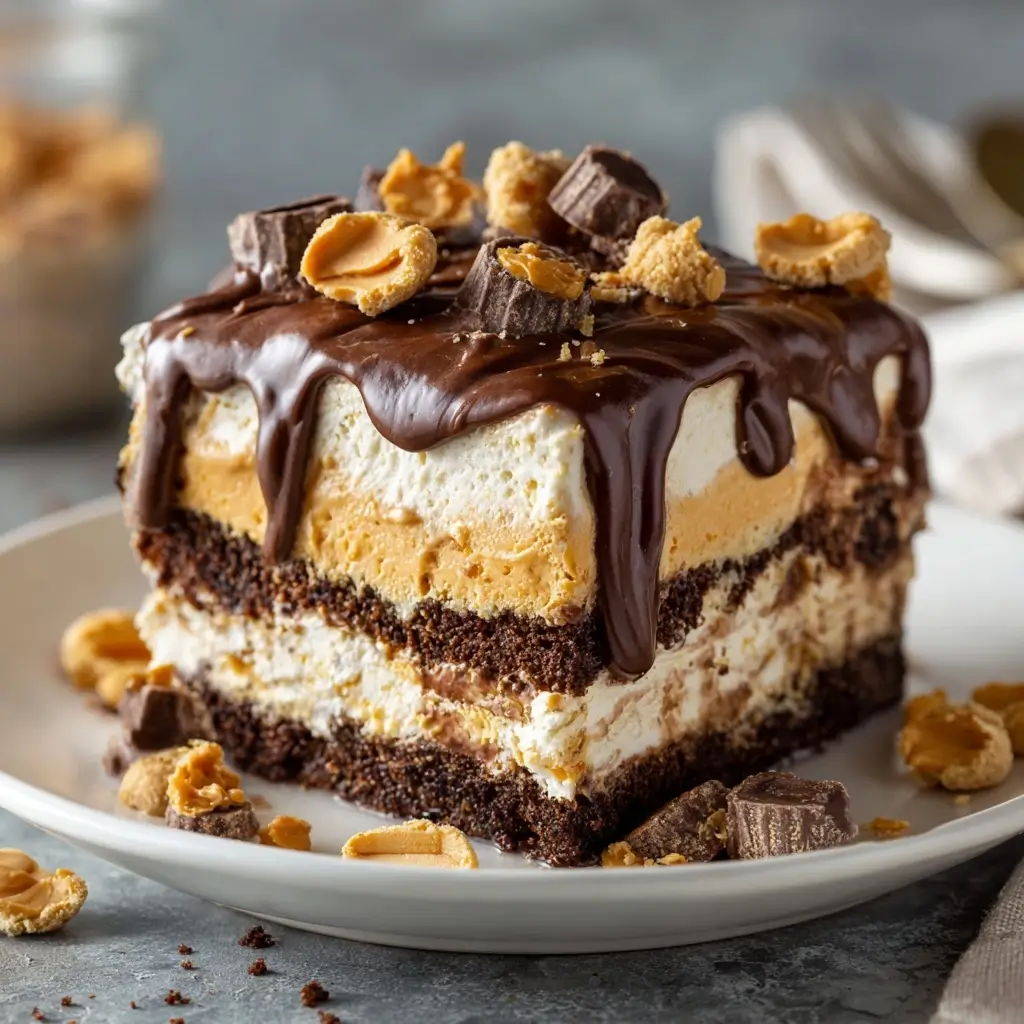
- Chocolate Wafer Cookies: These are the foundation of the cake, providing a crisp yet tender base that softens beautifully as it absorbs the creamy filling. Their cocoa-rich flavor enhances the overall chocolate profile without overpowering the peanut butter.
- Peanut Butter: Use smooth, natural peanut butter for a rich, authentic taste. Avoid extra-oily varieties unless you drain some of the oil first. For a sweeter, more familiar flavor, conventional brands like Jif or Skippy work perfectly.
- Cream Cheese: Adds tanginess and body to the filling, helping it hold its shape while contributing to a luxuriously creamy texture.
- Heavy Whipping Cream: When whipped, it gives the filling lightness and airiness, balancing the density of the peanut butter and cream cheese.
- Powdered Sugar: Sweetens the mixture gently without adding graininess, dissolving seamlessly into the creamy blend.
- Vanilla Extract: Enhances the overall flavor profile, rounding out the sweetness and bringing warmth to the dessert.
- Salted Butter (optional): Sometimes added to the filling for extra richness and depth, though not always necessary.
- Chocolate Shavings or Mini Chocolate Chips (for garnish): Optional but recommended for added visual appeal and bursts of chocolate in every bite.
- Crushed Peanuts (for garnish): Add crunch and reinforce the peanut flavor on top.
Step-by-Step Recipe
Creating a chocolate peanut butter icebox cake is surprisingly simple—no oven required! Just follow these steps for a show-stopping dessert that tastes even better the next day.
- Prepare the Pan: Line a 9×5-inch loaf pan or a 7×11-inch rectangular dish with plastic wrap, leaving overhang on the long sides. This will make it easier to lift the cake out once set.
- Make the Filling: In a large mixing bowl, beat together 8 oz of softened cream cheese, 1 cup of creamy peanut butter, ½ cup of powdered sugar, 1 teaspoon of vanilla extract, and a pinch of salt until smooth and fully combined.
- Whip the Cream: In a separate bowl, whip 2 cups of cold heavy cream until stiff peaks form. Be careful not to over-whip, or the cream may turn grainy.
- Combine Mixtures: Gently fold the whipped cream into the peanut butter mixture in two additions, using a spatula. Fold just until uniform and fluffy—do not overmix.
- Layer the Cake: Place a single layer of chocolate wafer cookies in the bottom of the prepared pan, breaking some to fit gaps if needed. Spread about one-third of the filling evenly over the cookies. Repeat the layers—cookies, then filling—two more times, finishing with a final layer of the peanut butter cream on top.
- Smooth the Top: Use a spatula dipped in warm water to smooth the surface neatly.
- Garnish (Optional): Sprinkle mini chocolate chips, chocolate shavings, or chopped peanuts over the top for decoration and texture.
- Chill: Cover with plastic wrap and refrigerate for at least 6 hours, preferably overnight. This allows the cookies to soften and absorb the creamy layers, transforming into a cohesive, cake-like dessert.
- Serve: Lift the cake out using the plastic wrap overhang. Slice with a sharp knife dipped in hot water for clean cuts. Serve chilled.
Tips for the Perfect Chocolate Peanut Butter Icebox Cake
- Use Cold Ingredients: Ensure your heavy cream and cream cheese are at the right temperature—cream should be cold for optimal whipping, while cream cheese should be softened to room temperature to avoid lumps.
- Don’t Skip the Chill Time: Patience is key. Letting the cake set for at least 6–8 hours (or overnight) ensures the layers meld together and achieve the ideal texture.
- Line the Pan Properly: The plastic wrap should cover the entire interior with enough excess on the sides to act as handles when removing the cake.
- Prevent Sogginess: If storing leftovers, place parchment paper between slices or wrap tightly to prevent condensation from making the top soggy.
- Uniform Layers: Try to spread each layer evenly so every slice has balanced proportions of cookie and cream.
- Customize Thickness: For a taller cake, use a smaller pan. For a wider, shallower version, use a larger dish.
Variations and Customizations
One of the best things about this dessert is how easily it can be adapted to suit different tastes, dietary needs, or seasonal themes. Here are some delicious variations:
- Nut-Free Version: Substitute peanut butter with sunflower seed butter or soy nut butter for those with allergies.
- Gluten-Free: Use gluten-free chocolate sandwich cookies or certified gluten-free wafers to make this dessert safe for gluten-sensitive individuals.
- Extra Chocolate: Add a layer of melted dark chocolate between the filling layers or drizzle it on top before chilling.
- Banana Twist: Add thin banana slices between layers for a “peanut butter banana” flavor reminiscent of a classic sandwich.
- Reese’s Style: Use Reese’s Peanut Butter Cups instead of plain wafers, or chop them up and mix into the filling.
- Cookie Swap: Replace chocolate wafers with Oreo cookies (classic or peanut butter-flavored), chocolate graham crackers, or even Biscoff for a spiced caramel note.
- Boozy Kick: Add 1–2 tablespoons of bourbon, rum, or Baileys Irish Cream to the filling for an adult-friendly version.
- Frozen Version: For an ice cream-like texture, freeze the assembled cake for 4+ hours. Let it sit at room temperature for 5–10 minutes before slicing.
- Mini Mason Jar Cakes: Layer ingredients in individual jars for portable, party-ready desserts.
Health Considerations and Nutritional Value
While undeniably delicious, the chocolate peanut butter icebox cake is a rich dessert best enjoyed in moderation. Here’s a general nutritional overview per serving (based on 8 servings):
- Calories: Approximately 380–450 kcal
- Fat: 28–35g (including saturated fat from cream and butter)
- Carbohydrates: 30–35g (mainly from cookies and sugar)
- Protein: 8–10g (thanks to peanut butter and dairy)
- Sugar: 20–25g
- Sodium: Varies depending on peanut butter and cookie choice; can range from 200–400mg per serving
Health Notes:
- The peanut butter provides healthy monounsaturated fats, protein, and essential vitamins like niacin and vitamin E.
- Cream cheese and heavy cream contribute calcium and fat-soluble vitamins but are high in saturated fat.
- To reduce sugar, use reduced-sugar cookies and cut back on powdered sugar slightly—though this may affect texture.
- For a lighter version, substitute part of the heavy cream with whipped Greek yogurt, though this may yield a tangier, less airy result.
- This dessert is not suitable for vegan diets unless all dairy and egg-containing ingredients are replaced (e.g., vegan cream cheese, plant-based whipped topping, and dairy-free cookies).
Ingredients
- 1 package (about 40–45) chocolate wafer cookies (or 24–30 Oreos, wafers only)
- 8 oz full-fat cream cheese, softened
- 1 cup creamy peanut butter (preferably unsweetened or lightly salted)
- ½ cup powdered sugar
- 1 teaspoon pure vanilla extract
- Pinch of salt
- 2 cups cold heavy whipping cream
- Optional: ¼ cup mini chocolate chips, crushed peanuts, or chocolate shavings for topping
Directions
- Line a 9×5-inch loaf pan or similar-sized dish with plastic wrap, ensuring there’s enough overhang on the sides to lift the cake out later.
- In a large bowl, beat cream cheese, peanut butter, powdered sugar, vanilla, and salt on medium speed until smooth and creamy, about 2–3 minutes.
- In another bowl, using a hand mixer or stand mixer, whip the heavy cream until stiff peaks form.
- Gently fold the whipped cream into the peanut butter mixture in two batches, stirring just until fully incorporated and fluffy.
- Begin layering: Place a snug layer of chocolate wafers in the bottom of the pan. Spread approximately one-third of the filling over the cookies.
- Repeat the layers—cookies, then filling—two more times, ending with a smooth layer of the peanut butter cream on top.
- Use a spatula to smooth the top. Sprinkle with mini chocolate chips, chocolate shavings, or chopped peanuts if desired.
- Cover with plastic wrap and refrigerate for at least 6 hours, or preferably overnight.
- When ready to serve, lift the cake out using the plastic wrap. Remove the wrap and slice with a sharp knife (dipped in hot water for cleaner cuts).
- Store leftovers covered in the refrigerator for up to 5 days.
FAQ
Q: Can I make this cake ahead of time?
A: Absolutely! This cake actually tastes better after chilling overnight, as the flavors deepen and the texture becomes more cake-like.
Q: Can I freeze the icebox cake?
A: Yes. Wrap it tightly in plastic and foil and freeze for up to 2 months. Thaw in the refrigerator for several hours before serving.
Q: Why is my filling too runny?
A: This usually happens if the cream wasn’t whipped to stiff peaks or if the cream cheese was too soft. Make sure all ingredients are at the correct temperature and fold gently to maintain volume.
Q: Can I use low-fat ingredients?
A: While possible, substituting low-fat cream cheese or milk for heavy cream will significantly alter the texture, likely resulting in a softer, less stable cake. Full-fat ingredients are recommended for best results.
Q: How do I keep the layers from sliding?
A: Press the cookies down slightly when layering and ensure the filling is thick enough. Chilling between layers (15–20 minutes) can help stabilize each level.
Q: Can I make this in a springform pan?
A: Yes, a 7-inch springform pan works well and makes removal easier. Just line the bottom with parchment and wrap the outside in plastic to prevent leaks.
Summary
The chocolate peanut butter icebox cake is a no-bake masterpiece that combines rich chocolate wafers with a velvety peanut butter cream filling, requiring no oven and minimal effort. After a long chill, it transforms into a sliceable, decadent dessert that delights crowds and satisfies sweet cravings year-round.