Introduction
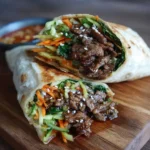
Welcome to the ultimate guide to the Beef Taco Wrap — a vibrant, handheld fusion of Tex-Mex tradition and modern meal-prep convenience. Unlike traditional hard-shell tacos or standalone burritos, the Beef Taco Wrap marries bold Southwestern flavors with the portability and textural satisfaction of a soft, pliable tortilla. It’s more than just dinner: it’s a customizable canvas for creativity, a crowd-pleasing centerpiece for weeknight meals, game-day spreads, potlucks, or healthy lunchbox solutions. Whether you’re a seasoned home cook or a beginner eager to build confidence in the kitchen, this recipe delivers restaurant-quality taste with pantry-friendly ingredients and flexible techniques. From sizzling seasoned ground beef to crisp fresh toppings and creamy drizzles, every bite balances heat, tang, richness, and crunch — all wrapped snugly for mess-free enjoyment.
The History
The Beef Taco Wrap is a delicious example of culinary evolution rooted in cultural exchange and American innovation. While tacos themselves trace back over 1,000 years to pre-Columbian Mesoamerica — where indigenous peoples used handmade corn tortillas to hold fish, beans, insects, and roasted meats — the modern taco as known globally was shaped by Mexican street vendors, U.S.-Mexico border trade, and mid-20th-century adaptations. The “taco wrap” concept emerged later, gaining traction in the 1980s–1990s alongside the rise of fast-casual chains and health-conscious dining trends. Chefs and home cooks alike began reimagining classic taco fillings inside larger, softer flour tortillas (often whole wheat or spinach-infused), eliminating the need for rigid shells while enabling generous layering and structural integrity. This shift aligned with growing demand for portable, nutrient-dense meals — especially among students, professionals, and families seeking flavorful yet functional food. Today’s Beef Taco Wrap reflects decades of cross-cultural influence: Mexican seasoning traditions, Texan ranch-style boldness, Californian fresh-ingredient ethos, and Midwestern practicality — all rolled into one satisfying, globally inspired handheld dish.
Ingredients Breakdown
Understanding each ingredient’s role elevates your Beef Taco Wrap from good to extraordinary. Here’s a detailed breakdown of purpose, substitutions, and pro insights:
- Ground Beef (80/20 lean-to-fat ratio): Provides rich umami depth and moisture. The 20% fat ensures flavor and prevents dryness during browning. Opt for grass-fed for nuanced taste or ground chuck for ideal balance. Leaner options (90/10) work but require added moisture (e.g., splash of broth or tomato paste).
- Taco Seasoning (homemade preferred): A blend of chili powder, cumin, smoked paprika, garlic powder, onion powder, oregano, brown sugar, and cayenne. Homemade avoids excess sodium, anti-caking agents, and artificial additives found in many store-bought packets — and lets you control heat and smokiness.
- Yellow or White Onion (diced fine): Adds aromatic sweetness and textural contrast when sautéed until translucent. Red onion offers sharper bite if used raw as a garnish.
- Garlic (minced): Delivers pungent, savory complexity that blooms when cooked in oil before adding beef.
- Tomato Paste (1–2 tbsp): Deepens color, adds concentrated sweetness and acidity, and helps bind spices to meat. Briefly “cooking out” the raw taste (1–2 min over medium heat) unlocks its full potential.
- Worcestershire Sauce (1 tsp): An umami powerhouse — fermented anchovies, tamarind, molasses, and vinegar lend subtle funk and depth that complements beef beautifully.
- Low-Sodium Beef Broth (¼ cup): Introduces savory liquid to steam and tenderize the meat while deglazing the pan. Enhances mouthfeel without oversalting.
- Flour Tortillas (10–12 inch, burrito-size): Must be pliable — warm them gently (dry skillet, microwave with damp paper towel, or steamer) to prevent tearing. Look for brands with minimal ingredients (flour, water, fat, salt); whole wheat, spinach, or sun-dried tomato varieties add visual appeal and nutrition.
- Shredded Lettuce (Romaine or iceberg): Offers cool crunch and neutral base. Butter lettuce adds delicate tenderness; cabbage slaw brings tang and fiber.
- Diced Tomatoes (Roma or vine-ripened): Juicy acidity and freshness. Seed and drain excess liquid to avoid soggy wraps.
- Grated Cheddar or Monterey Jack Cheese: Melts smoothly and adds salty, creamy richness. Pepper Jack introduces gentle heat; cotija offers authentic crumbled saltiness.
- Avocado or Guacamole: Essential for creaminess and heart-healthy monounsaturated fats. Lime juice prevents browning and brightens the entire wrap.
- Plain Greek Yogurt or Sour Cream: Tangy, cooling counterpoint to spice. Greek yogurt adds protein and lower fat; sour cream delivers classic richness.
- Fresh Cilantro (chopped): Bright, citrusy herbaceousness — non-negotiable for authenticity. Substitute parsley only if cilantro aversion is genetic (i.e., OR7D4 gene variant).
- Lime Wedges (for serving): Acid is the final lift — a squeeze right before eating balances fat, salt, and spice.
- Optional Enhancers: Pickled red onions (for brightness), jalapeños (fresh or pickled), black beans (fiber + plant protein), corn kernels (roasted for sweetness), salsa verde (herb-forward tang), crumbled bacon (smoky crunch), or chipotle mayo (smoky heat).
Step-by-Step Recipe
- Prep All Ingredients: Dice onion, mince garlic, shred cheese, chop cilantro, dice tomatoes, slice avocado, and measure spices and liquids. Having everything “mise en place” ensures seamless cooking and prevents scorching or overcooking.
- Warm Tortillas: Heat a dry stainless steel or cast-iron skillet over medium heat. One at a time, warm each tortilla for ~15 seconds per side until soft and pliable with light golden spots. Stack in a clean kitchen towel or tortilla warmer to retain steam and flexibility.
- Sauté Aromatics: In a large nonstick or well-seasoned cast-iron skillet, heat 1 tbsp olive oil or avocado oil over medium heat. Add diced onion and sauté 3–4 minutes until softened and fragrant. Stir in minced garlic and cook 30 seconds until aromatic — do not brown.
- Brown the Beef: Increase heat to medium-high. Add ground beef, breaking it apart with a wooden spoon or spatula. Cook 5–6 minutes, stirring frequently, until no pink remains and edges begin to crisp slightly. Drain excess grease if desired (reserve 1 tsp for flavor if using lean beef).
- Bloom the Spices: Push beef to the sides. In the center, add tomato paste and stir 1–2 minutes until brick-red and fragrant. Sprinkle in homemade taco seasoning and Worcestershire sauce. Stir constantly for 1 minute to toast spices and coat meat evenly.
- Simmer & Infuse: Pour in low-sodium beef broth and stir well, scraping up any browned bits (fond). Reduce heat to low, cover, and simmer gently for 8–10 minutes. Stir occasionally. This step melds flavors, tenderizes meat, and develops a cohesive, saucy texture — not soupy, not dry.
- Adjust & Rest: Taste and adjust: add lime juice for brightness, pinch of salt if needed, or touch of honey if too acidic. Remove from heat and let rest 3 minutes — allows juices to reabsorb.
- Assemble Thoughtfully: Lay a warm tortilla flat. Spread 2 tbsp Greek yogurt or sour cream in a horizontal stripe across the center third. Top with ¾ cup warm beef mixture, leaving 2-inch borders on left/right and 1-inch top/bottom margins. Evenly layer lettuce, tomatoes, cheese, avocado, and cilantro. Avoid overfilling — 1 cup total filling is ideal for roll integrity.
- Wrap Like a Pro: Fold bottom edge up over filling. Fold left and right flaps inward (like an envelope). Roll tightly forward, applying gentle pressure to compact layers. Tuck as you go. Optional: lightly grill seam-side down for 30 seconds to seal.
- Serve Immediately: Slice diagonally for presentation or serve whole. Accompany with lime wedges, extra salsa, and chilled beverage. Best enjoyed within 20 minutes for optimal texture — though meal-prep versions hold well refrigerated (see Tips section).
Tips
- Never Skip the Toasting Step: Blooming spices in oil or tomato paste before adding liquid unlocks volatile aromatic compounds — transforming flat seasoning into multidimensional flavor.
- Rest Your Meat: Letting the beef mixture sit off-heat for 3–5 minutes allows residual heat to finish cooking and redistributes juices — yielding moister, more cohesive filling.
- Tortilla Temperature Is Critical: Cold or room-temp tortillas crack. Warm them just enough to be pliable — overheating makes them gummy or brittle. Test with a gentle bend: it should yield without tearing.
- Drain Wet Toppings: Excess moisture from tomatoes, salsa, or shredded lettuce is the #1 cause of soggy wraps. Pat dry with paper towels or use a fine-mesh strainer.
- Layer Strategically: Start with a moisture barrier (yogurt/sour cream), then warm filling, then dry toppings (cheese, lettuce), then wetter ones (avocado, salsa) on top — this prevents downward seepage.
- Roll Tight, But Not Crushing: Apply firm, even pressure as you roll — compressing too hard squeezes out fillings; too loose invites unraveling. Practice makes perfect — your second wrap will always be better than your first.
- Meal-Prep Friendly: Cook beef mixture up to 4 days ahead and store airtight in fridge. Assemble wraps the morning of or up to 2 hours before serving. Wrap tightly in parchment + foil or beeswax wrap for eco-friendly portability.
- Freeze for Later: Fully assembled (un-cut) wraps freeze beautifully for up to 3 months. Wrap individually in plastic wrap, then place in freezer bag. Thaw overnight in fridge or reheat sealed in oven at 325°F for 20–25 minutes.
- Use a Large Skillet: Crowding the pan steams instead of browns the beef. Use at least a 12-inch skillet for even heat distribution and proper Maillard reaction.
- Acid Is Your Ally: A final squeeze of lime or splash of apple cider vinegar brightens richness and cuts through fat — never skip this finishing touch.
Variations and Customizations
The Beef Taco Wrap thrives on personalization. Below are thoughtfully curated variations — from dietary adaptations to global twists — all tested for flavor harmony and structural success:
- Vegetarian Swap: Replace beef with 1½ cups cooked lentils + ½ cup crumbled tempeh or textured vegetable protein (TVP), hydrated in broth. Boost umami with soy sauce, nutritional yeast, and smoked paprika.
- Low-Carb/Keto Version: Use large butter lettuce leaves (romaine hearts or iceberg cups) as “wraps.” Increase healthy fats: guac, crumbled bacon, sliced olives, and full-fat cheese. Skip beans and starchy toppings.
- Gluten-Free Adaptation: Choose certified GF tortillas (corn, cassava, or almond-flour based). Verify taco seasoning and broth are GF — many commercial blends contain wheat-based fillers.
- Spice-Lover’s Fire Wrap: Add 1 minced chipotle in adobo + ½ tsp ancho chile powder to seasoning. Top with pickled jalapeños, habanero salsa, and crumbled queso fresco.
- Mediterranean Fusion: Swap taco seasoning for za’atar + cumin + lemon zest. Use spiced lamb or ground turkey. Top with tzatziki, cucumber ribbons, kalamata olives, and crumbled feta.
- Breakfast Taco Wrap: Scramble eggs with chorizo or breakfast sausage. Add roasted potatoes, pepper jack, and chipotle ketchup. Serve with hot sauce and avocado.
- Smoky BBQ Twist: Replace taco seasoning with dry rub (brown sugar, smoked paprika, mustard powder). Finish beef with 2 tbsp Kansas City–style BBQ sauce. Top with crispy onion strings and coleslaw.
- Paleo-Friendly: Use coconut or cassava flour tortillas (or collard green wraps). Season with AIP-compliant spices (no nightshades — use turmeric, ginger, garlic, onion). Top with mango-jalapeño salsa and cashew cream.
- Kid-Friendly Mild Version: Omit cayenne and black pepper from seasoning. Use mild cheddar, omit raw onion/jalapeños, add sweet corn and shredded carrots. Serve with ketchup or honey-lime dip.
- Gourmet Gourmet Upgrade: Use house-made chorizo, heirloom tomatoes, microgreens, aged manchego, and roasted garlic aioli. Garnish with edible flowers and flaky sea salt.
Health Considerations and Nutritional Value
A single standard Beef Taco Wrap (made with 1 10-inch whole wheat tortilla, 4 oz 80/20 ground beef, ¼ cup Greek yogurt, ½ cup lettuce, ¼ cup tomatoes, ¼ cup cheddar, ½ small avocado, and seasonings) provides approximately:
- Calories: 520–580 kcal
- Protein: 32–36g (excellent source — supports muscle maintenance, satiety, and metabolic health)
- Fat: 28–32g (mostly unsaturated from avocado and olive oil; ~10g saturated — well within daily limits for most adults)
- Carbohydrates: 36–42g (including 6–8g dietary fiber from whole grains, veggies, and avocado — promotes gut health and stable blood sugar)
- Sodium: 580–720mg (significantly lower than fast-food equivalents — control with low-sodium broth and no-added-salt seasoning)
- Vitamins & Minerals: Rich in iron (heme iron from beef — highly bioavailable), vitamin C (from tomatoes, lime, peppers), potassium (avocado, tomatoes), calcium (cheese, yogurt), folate (spinach tortillas, black beans), and antioxidants (lutein in greens, lycopene in tomatoes, beta-carotene in carrots).
Key Health Notes:
- Sodium Management: Store-bought taco kits often exceed 1,200mg sodium per serving. Homemade seasoning slashes intake by 40–60%, supporting cardiovascular and kidney health.
- Healthy Fats Focus: Avocado and olive oil contribute monounsaturated fats linked to reduced LDL cholesterol and improved endothelial function.
- Portion Awareness: Using 90/10 beef reduces saturated fat by ~25%; increasing veggie volume (e.g., spinach, bell peppers, zucchini ribbons) boosts fiber and phytonutrients without adding calories.
- Digestive Support: Fermented toppings like plain yogurt and naturally cultured sour cream provide probiotics — beneficial for microbiome diversity.
- Anti-Inflammatory Potential: Turmeric (in some taco blends), garlic, onions, tomatoes, and cilantro contain compounds shown to modulate inflammatory pathways.
- Notable Considerations: Those managing hypertension should monitor added salt; individuals with IBS may wish to limit high-FODMAP additions (onions, garlic, beans) or use infused oils and garlic-infused salt alternatives; people with celiac disease must verify all packaged ingredients are certified gluten-free.
Ingredients
- 1 tablespoon olive oil or avocado oil
- 1 medium yellow onion, finely diced (about 1 cup)
- 3 cloves garlic, minced
- 1 pound (450g) ground beef (80% lean / 20% fat recommended)
- 2 tablespoons tomato paste
- 2 tablespoons homemade taco seasoning (see note below)
- 1 teaspoon Worcestershire sauce
- ¼ cup low-sodium beef broth
- 8–10 (10-inch) whole wheat or plain flour tortillas (burrito size)
- ½ cup plain nonfat or 2% Greek yogurt (or sour cream)
- 4 cups shredded romaine or iceberg lettuce
- 1½ cups diced ripe tomatoes (seeds and excess juice removed)
- 1½ cups shredded sharp cheddar or Monterey Jack cheese
- 2 ripe medium avocados, sliced or mashed with lime juice
- ⅓ cup fresh cilantro leaves, roughly chopped
- Lime wedges, for serving
- Optional: pickled red onions, jalapeño slices, black beans, corn kernels, salsa, hot sauce
Homemade Taco Seasoning (makes ~¼ cup): 2 tbsp chili powder, 1½ tsp ground cumin, 1 tsp smoked paprika, 1 tsp garlic powder, 1 tsp onion powder, ½ tsp dried oregano, ½ tsp brown sugar, ¼ tsp cayenne pepper (adjust to taste), ½ tsp fine sea salt.
Directions
- Heat oil in a large skillet over medium heat. Add onion and sauté until soft and translucent, about 4 minutes. Stir in garlic and cook 30 seconds until fragrant.
- Increase heat to medium-high. Add ground beef, breaking it apart with a wooden spoon. Cook 5–6 minutes, stirring frequently, until fully browned with no pink remaining. Drain excess fat if desired, reserving 1 tsp for flavor.
- Push beef to the edges of the pan. Add tomato paste to center and stir 1–2 minutes until darkened and fragrant. Sprinkle in taco seasoning and Worcestershire sauce; stir 1 minute to toast spices.
- Pour in beef broth, stirring to combine and scrape up browned bits. Reduce heat to low, cover, and simmer gently for 8–10 minutes, stirring occasionally, until thickened and flavorful.
- Taste and adjust seasoning: add lime juice for brightness, extra salt if needed, or pinch of brown sugar if overly acidic. Remove from heat and let rest 3 minutes.
- Warm tortillas one at a time in a dry skillet over medium heat for 15 seconds per side, or wrap in a damp paper towel and microwave for 20–30 seconds. Keep covered in a clean kitchen towel.
- To assemble: Lay a warm tortilla flat. Spread 2 tablespoons yogurt horizontally across center third. Top with ¾ cup warm beef mixture, then layer evenly with lettuce, tomatoes, cheese, avocado, and cilantro.
- Fold bottom edge up over filling. Fold left and right sides inward. Roll tightly forward, tucking as you go. For best results, press gently to seal.
- Slice in half diagonally (optional) and serve immediately with lime wedges and desired extras.
FAQ
- Can I make these ahead of time?
- Absolutely! Prepare the seasoned beef mixture up to 4 days in advance and refrigerate in an airtight container. Assemble wraps up to 2 hours before serving — or wrap tightly (parchment + foil) for grab-and-go lunches. Avoid assembling more than 2 hours ahead if using watery toppings.
- Why does my wrap fall apart?
- Most commonly due to cold/stiff tortillas, overfilling, uneven layering, or skipping the yogurt/sour cream moisture barrier. Ensure tortillas are properly warmed and pliable, use measured portions, and roll with confident, even pressure.
- What’s the best tortilla to use?
- 10- to 12-inch burrito-sized flour tortillas offer ideal flexibility and strength. Look for brands with simple ingredients and no preservatives. Whole wheat adds fiber; spinach or tomato varieties add nutrients and color. Corn tortillas work for authenticity but require stacking (2–3) for durability.
- Can I air-fry or bake these?
- Yes! For crisp-tender texture, brush assembled (un-cut) wraps lightly with oil and air-fry at 375°F for 6–8 minutes, flipping halfway. Or bake at 375°F on parchment-lined sheet for 12–15 minutes, turning once. Avoid overcooking — they’ll dry out.
- How do I keep them from getting soggy?
- Drain tomatoes and wet toppings thoroughly. Layer yogurt first as a barrier. Use warm (not hot) beef — extreme heat steams the tortilla. Let beef rest before assembling. If packing for lunch, include a small paper towel inside the wrap container to absorb condensation.
- Is ground turkey or chicken a good substitute?
- Yes — but adjust technique. Lean poultry dries out faster. Add 1 tbsp olive oil or 2 tbsp broth during simmering, and consider boosting umami with mushrooms, soy sauce, or miso paste. Increase seasoning slightly — poultry is milder than beef.
- Can I freeze Beef Taco Wraps?
- Yes — fully assembled wraps freeze exceptionally well for up to 3 months. Wrap individually in plastic wrap, then place in a labeled freezer bag. Thaw overnight in fridge or reheat from frozen in a 325°F oven for 25–30 minutes, wrapped in foil.
- What sides pair well?
- Classic pairings include Mexican rice, refried beans, elote (Mexican street corn), jicama slaw, or a simple black bean and corn salad. For lighter options: cucumber-lime salad, roasted sweet potato wedges, or grilled zucchini ribbons.
- How spicy is this recipe?
- As written, it’s mild-to-medium (1/10 on heat scale). The cayenne in seasoning is adjustable — start with ⅛ tsp and increase next time. Control heat with toppings: mild cheddar vs. pepper jack, raw jalapeños vs. pickled, or cooling yogurt vs. spicy chipotle crema.
- Can I make it dairy-free?
- Easily. Skip cheese and use dairy-free yogurt or cashew cream. Nutritional yeast adds cheesy depth. Ensure tortillas are dairy-free (some contain whey or casein — check labels).
Summary
The Beef Taco Wrap is a dynamic, nutritious, and endlessly adaptable handheld meal that honors Mexican culinary roots while embracing modern tastes, dietary needs, and lifestyle demands — delivering bold flavor, balanced macros, and joyful customization in every bite.
With smart prep, thoughtful layering, and respect for quality ingredients, it transforms humble pantry staples into a restaurant-worthy, family-approved, and health-conscious triumph — ready to roll, savor, and share.