Introduction
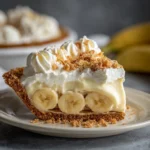
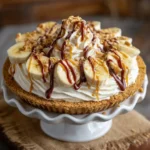
Indulge in the ultimate marriage of rich, velvety chocolate and creamy, salty-sweet peanut butter with Chocolate Peanut Butter Pie — a decadent, no-bake (or lightly baked) dessert that has captured hearts across generations. Whether served at holiday gatherings, summer potlucks, birthday celebrations, or simply as a well-deserved treat after a long day, this pie delivers an unforgettable symphony of textures and flavors: a crisp, buttery crust; a lusciously smooth, dense chocolate layer; a cloud-like, tangy-sweet peanut butter filling; and often crowned with whipped cream, chopped peanuts, or a glossy chocolate drizzle. More than just a dessert, it’s a nostalgic comfort food — evoking childhood memories of lunchbox sandwiches reimagined as something impossibly elegant and deeply satisfying. Its popularity endures not only because of its irresistible taste but also due to its remarkable versatility, forgiving preparation method, and ability to be made ahead — making it a cornerstone of modern American pie culture and a beloved staple in Southern, Midwestern, and coastal bakeries alike.
The History
The origins of Chocolate Peanut Butter Pie are rooted in mid-20th-century American home baking, emerging alongside the postwar boom in convenience foods and refrigerated desserts. While peanut butter itself was patented by Marcellus Gilmore Edson in 1884 and popularized by Dr. John Harvey Kellogg in the 1890s for health-focused sanatorium diets, its pairing with chocolate didn’t gain widespread culinary traction until the 1920s–30s — famously immortalized in the iconic Reese’s Peanut Butter Cup, launched in 1928. The pie format likely evolved from earlier “icebox pies” — no-bake confections that relied on gelatin, condensed milk, or whipped cream to set without oven heat — which surged in popularity during the 1940s and 50s with the advent of affordable household refrigerators. Early versions appeared in community cookbooks like those published by church groups and women’s auxiliaries across the Midwest and South, where pantry staples (oreo crusts, Cool Whip, instant pudding, and Jif-style peanut butter) were celebrated for their ease and reliability. By the 1970s, recipes began appearing in national publications such as Woman’s Day, Betty Crocker’s Picture Cook Book, and Good Housekeeping, often featuring graham cracker or chocolate wafer crusts and stabilized fillings using cream cheese or powdered sugar. Over time, artisanal adaptations emerged — incorporating bittersweet chocolate ganache, house-roasted peanut butter, sea salt infusions, and even bourbon or espresso undertones — reflecting broader gourmet trends while preserving the dessert’s soul: simplicity, balance, and profound deliciousness.
Ingredients Breakdown
Understanding each ingredient’s role is key to mastering this pie — not just for flavor, but for structure, texture, and stability:
- Graham Cracker or Chocolate Cookie Crust: Provides structural integrity and a contrasting crunch. Graham crackers lend subtle honeyed warmth and neutral sweetness; chocolate wafers (like Oreos) deepen the cocoa notes and add richness. Butter binds the crumbs and adds flavor and flakiness when pre-baked; melted coconut oil is a dairy-free alternative.
- Unsweetened Cocoa Powder (Dutch-processed preferred): Delivers intense, nuanced chocolate flavor without acidity. Dutch-processed cocoa is alkalized, yielding smoother, darker, less bitter notes — ideal for balancing peanut butter’s natural saltiness. Natural cocoa works but may require slight acid adjustment (e.g., extra pinch of salt or touch of vinegar).
- Granulated Sugar & Powdered Sugar: Granulated sugar dissolves into the warm chocolate base for sweetness and shine; powdered sugar is essential in the peanut butter layer for ultra-smooth consistency, stability, and lightness — its cornstarch content also helps prevent weeping and enhances creaminess.
- Cream Cheese (full-fat, room temperature): Acts as the foundational emulsifier and stabilizer in the peanut butter filling. It adds tang, body, and richness while preventing separation — crucial for holding shape when sliced. Low-fat versions compromise texture and increase risk of cracking or graininess.
- Natural or Creamy Peanut Butter: Choose a high-quality, homogenous variety with minimal ingredients (peanuts + salt, ideally). Avoid “no-stir” types with added hydrogenated oils, which can cause greasiness or graininess when chilled. Natural peanut butter (with oil separation) must be thoroughly stirred — or gently warmed and re-emulsified — before use to ensure seamless incorporation.
- Heavy Whipping Cream (cold): Used both for whipping into the filling (for airy lift) and as a finishing garnish. Its high fat content (36–40%) ensures stable, luxurious peaks and contributes to mouthfeel. Substitutes like half-and-half or coconut cream yield softer, less stable results.
- Vanilla Extract (pure, not imitation): Enhances depth and rounds out sharp edges — especially important for bridging chocolate’s bitterness and peanut butter’s earthiness. A splash of almond extract (⅛ tsp) can add intriguing nuance.
- Salt (fine sea salt or kosher): Not merely for seasoning — it’s a critical flavor amplifier. Salt heightens sweetness, tames bitterness, and intensifies roasted peanut notes. A small amount in both layers creates harmony and complexity.
- Optional Enhancements: Espresso powder (½ tsp) deepens chocolate without adding coffee flavor; melted dark chocolate (2 oz, 60–70%) enriches the ganache layer; flaky sea salt for finishing; toasted peanuts for crunch; bourbon (1 tsp) for warmth; or a swirl of raspberry coulis for bright contrast.
Step-by-Step Recipe
- Prepare the Crust (15 minutes + chilling): In a food processor, pulse 1 ½ cups (150g) finely crushed chocolate sandwich cookies (filling included) with 6 tbsp (85g) unsalted butter, melted and slightly cooled, and ¼ tsp fine sea salt until evenly moistened and clumping. Press firmly and evenly into a 9-inch deep-dish pie plate, covering the bottom and up the sides with steady pressure using the back of a measuring cup or flat-bottomed glass. Refrigerate for at least 30 minutes (or freeze for 15) to firm. For enhanced flavor and texture, bake at 350°F (175°C) for 8–10 minutes until fragrant and set; cool completely on a wire rack before filling.
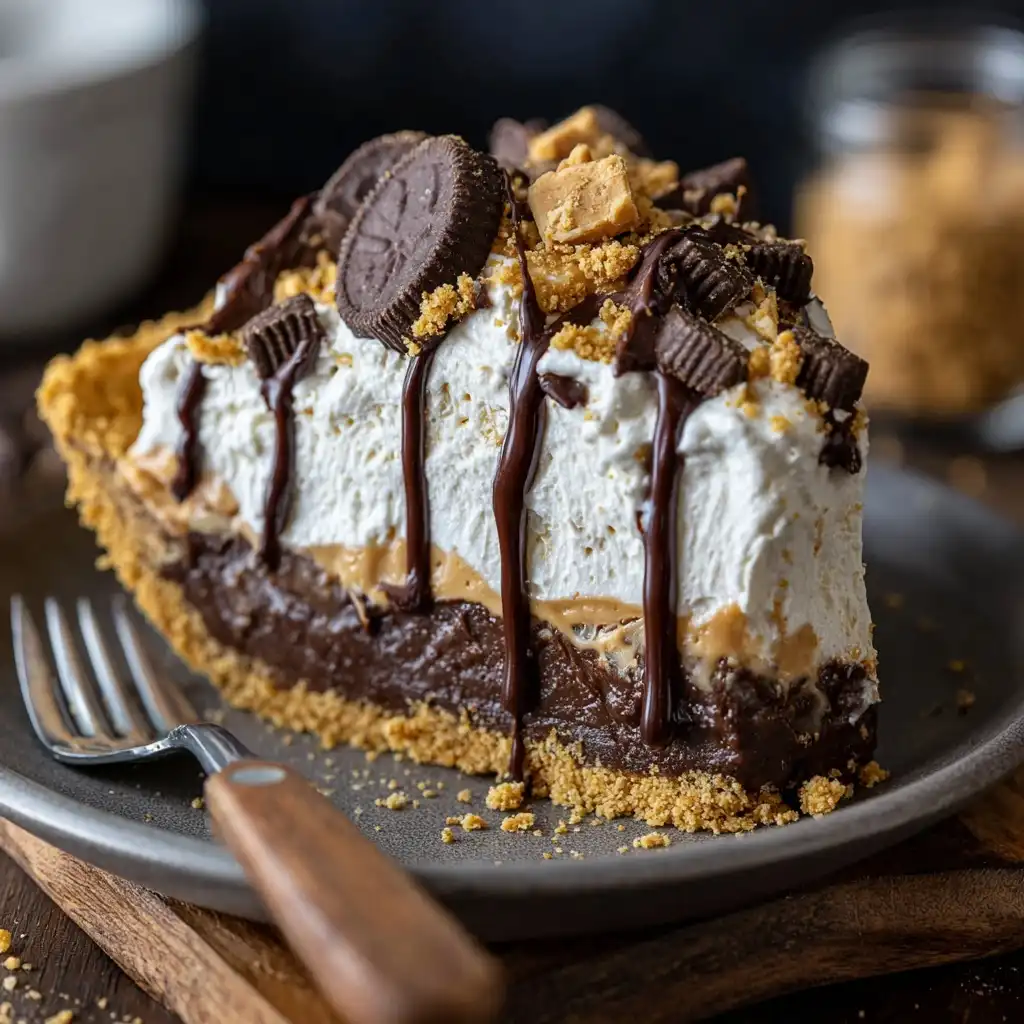
- Make the Chocolate Ganache Layer (10 minutes + cooling): Heat ½ cup (120ml) heavy cream in a small saucepan over medium-low heat until steaming and tiny bubbles form at the edges — do not boil. Meanwhile, place 6 oz (170g) finely chopped semi-sweet or bittersweet chocolate (60–70% cacao) and 1 tbsp (5g) unsweetened Dutch-process cocoa powder in a heatproof bowl. Pour hot cream over chocolate mixture, cover with a plate, and let sit undisturbed for 3 minutes. Gently whisk from center outward until smooth, glossy, and fully emulsified. Stir in 1 tbsp (14g) granulated sugar, ¼ tsp pure vanilla extract, and a pinch of salt. Pour into chilled crust and spread evenly. Refrigerate uncovered for 45–60 minutes, until surface is matte and just set to the touch — not hard or cold.
- Prepare the Peanut Butter Filling (12 minutes): In the bowl of a stand mixer fitted with the paddle attachment (or large bowl with hand mixer), beat 8 oz (225g) full-fat brick cream cheese, softened to true room temperature (68–72°F), on medium speed for 2 minutes until creamy and lump-free. Scrape down bowl. Add ¾ cup (190g) well-stirred creamy peanut butter and ¼ tsp salt; beat 2 more minutes until homogeneous and silky. Gradually add 1 ¼ cups (150g) sifted powdered sugar in three additions, beating on low until incorporated before increasing to medium for 30 seconds after each — avoid overbeating, which incorporates air bubbles. In a separate chilled bowl, whip 1 cup (240ml) very cold heavy cream with 1 tbsp (12g) powdered sugar and ½ tsp vanilla until stiff peaks form. Using a silicone spatula, gently fold one-third of the whipped cream into peanut butter mixture to lighten, then carefully fold in remaining cream in two additions until just combined — no streaks, but do not deflate. Mixture should be thick, glossy, and hold soft peaks.
- Assemble & Chill (5 minutes + minimum 6 hours): Spoon peanut butter filling over the set chocolate layer. Smooth top with an offset spatula dipped in hot water and dried. Optional: create decorative swirls with the back of a spoon or piping tip. Cover loosely with plastic wrap (touching surface to prevent condensation) and refrigerate for at least 6 hours — preferably overnight (12+ hours) — to allow full setting, flavor melding, and clean slicing.
- Finish & Serve (5 minutes): Remove pie from fridge 15 minutes before serving for easier slicing. Run a long, thin knife under hot water, wipe dry, and slice cleanly. Garnish each slice with freshly whipped cream, a drizzle of melted chocolate or warm peanut butter, flaky sea salt, and/or coarsely chopped toasted peanuts. Store leftovers covered in refrigerator for up to 5 days.
Tips
- Temperature is Everything: Ensure cream cheese is truly at room temperature — not just “softened.” Cold cream cheese causes lumps that won’t fully incorporate, even with prolonged mixing. Place unwrapped brick on counter 2–3 hours ahead, or submerge sealed package in warm (not hot) water for 10 minutes.
- Crumb Crush Consistency: Use a food processor for uniform, fine crumbs — coarse pieces won’t bind well. If grinding by hand, place cookies in a zip-top bag and roll firmly with a rolling pin. Avoid over-processing into paste.
- Chill Every Component: Cold bowls, cold beaters, and cold cream yield maximum volume and stability when whipping. Place mixing bowl and whisk/beaters in freezer for 10 minutes before starting.
- Whip Cream Wisely: Whip cream only to stiff peaks — overwhipping leads to buttery curds and grainy filling. Stop as soon as peaks hold upright without drooping.
- Fold, Don’t Stir: When combining whipped cream into peanut butter mixture, use gentle, sweeping motions from bottom to top. Rotate bowl frequently. Over-folding deflates air and yields a dense, heavy filling.
- Prevent Crust Sogging: Always chill crust before adding ganache. For extra insurance, brush cooled, pre-baked crust with a thin layer of melted white or milk chocolate and chill 10 minutes to seal.
- Smooth Surface Secret: After spreading filling, tap pie plate firmly on counter 3–4 times to release air bubbles. For glassy finish, dip offset spatula in hot water, dry thoroughly, and glide smoothly over surface.
- Slicing Success: Use a sharp, non-serrated knife. Wipe and reheat between every slice. For ultra-clean cuts, dip knife in hot water, dry, then slice with gentle sawing motion — don’t press down.
- Taste & Adjust: Before chilling, taste a tiny bit of filling. Adjust salt or vanilla if needed — remember flavors mellow slightly when chilled.
- Patience Pays Off: Do not rush the chilling. Under-chilled pie will slump, ooze, or lack defined layers. Overnight chilling transforms texture and elevates flavor complexity dramatically.
Variations and Customizations
This pie is gloriously adaptable — whether accommodating dietary needs, seasonal ingredients, or personal whims. Here are thoughtfully tested variations:
- No-Bake Vegan Version: Use dairy-free chocolate cookie crust (vegan butter or coconut oil), refined coconut oil-based chocolate ganache (coconut cream + vegan chocolate), and a cashew-peanut butter filling (soaked raw cashews blended with peanut butter, maple syrup, lemon juice, and coconut cream).
- Gluten-Free Adaptation: Substitute certified GF graham crackers or gluten-free chocolate wafers. Ensure all other ingredients (cocoa, powdered sugar, peanut butter) are certified GF — many natural peanut butters contain GF oats or are processed in dedicated facilities.
- Protein-Packed Fitness Pie: Add 1–2 scoops unflavored or chocolate whey/collagen protein powder to peanut butter filling (reduce powdered sugar by 2 tbsp). Boost with chia seeds in crust or top with hemp hearts and cacao nibs.
- Decadent Gourmet Upgrade: Replace standard peanut butter with small-batch roasted peanut butter infused with smoked sea salt or cinnamon. Use single-origin 72% dark chocolate ganache layered with espresso-infused white chocolate ribbon. Finish with gold leaf and candied peanuts.
- Seasonal Twists: Fall: Add 1 tsp pumpkin pie spice and 2 tbsp maple syrup to filling; top with spiced pecans. Winter: Infuse ganache with orange zest and brandy; garnish with candied orange peel. Spring: Swirl in 3 tbsp fresh strawberry purée (strained) into peanut butter layer; top with edible violets. Summer: Add 1 tbsp bourbon and ½ tsp smoked paprika to filling; serve with grilled pineapple compote.
- Mini Individual Pies: Press crust into 4–6 lightly greased muffin tin cups (lined with parchment paper tabs for easy removal). Fill and chill as directed. Perfect for parties, portion control, or gifting.
- Crustless “Pie” Parfait: Layer chocolate ganache, peanut butter mousse, and crumbled crust in clear glasses. Top with berries and mint — ideal for gluten-free or low-carb guests.
- Grain-Free/Keto Option: Almond flour + coconut flour crust bound with grass-fed butter and egg white; sugar-free chocolate ganache (unsweetened chocolate + erythritol-sweetened heavy cream); filling with powdered erythritol, full-fat cream cheese, and natural peanut butter (check for hidden sugars).
- Boozy Adult Version: Add 1½ tbsp bourbon, rum, or dark chocolate liqueur to ganache. Fold 1 tbsp Kahlúa or peanut butter whiskey into filling. Garnish with chocolate-covered espresso beans.
- Extra-Crunchy Texture Lover’s Edition: Fold ½ cup finely chopped toasted peanuts and ¼ cup crushed pretzels into peanut butter filling. Sprinkle extra toasted peanuts and flaky salt on top.
Health Considerations and Nutritional Value
While Chocolate Peanut Butter Pie is inherently indulgent, understanding its nutritional profile empowers mindful enjoyment. A standard slice (1/12 of a 9-inch pie, approx. 220g) contains roughly 480–520 calories, with variations depending on crust type, sweeteners, and fat sources. Macronutrient breakdown typically includes 32–38g total fat (18–22g saturated, primarily from butter, cream cheese, and heavy cream), 42–48g carbohydrates (34–38g sugars), and 7–9g protein. Key nutrients include calcium (from dairy), magnesium and iron (from cocoa), vitamin E and niacin (from peanuts), and healthy monounsaturated fats (from peanut butter and dark chocolate).
Positive Aspects: High-quality dark chocolate (>70% cacao) contributes flavonoids linked to improved endothelial function and antioxidant activity. Peanut butter provides plant-based protein, heart-healthy fats, and resveratrol. The absence of refined flour in most versions makes it naturally gluten-free (when using appropriate crusts). No-bake methods preserve heat-sensitive nutrients.
Considerations: High saturated fat and added sugar content warrants moderation — especially for those managing cardiovascular health, diabetes, or weight. Sodium levels can rise significantly with salted peanut butter and added salt; opt for unsalted peanut butter and reduce added salt by 50% if concerned. Lactose-intolerant individuals may tolerate small amounts of aged cheeses or fermented dairy, but full-fat cream cheese and heavy cream contain notable lactose — consider lactase enzyme supplements or dairy-free alternatives.
Mindful Modifications: Reduce sugar by 25% in both layers without sacrificing structure. Swap half the butter in crust for avocado oil or walnut oil. Use reduced-fat cream cheese (though texture suffers slightly) and light coconut milk in ganache. Boost fiber with ground flax or psyllium husk in crust (1 tbsp). Increase protein with collagen peptides (1 scoop) in filling. Always prioritize whole-food, minimally processed ingredients — e.g., organic cocoa, stone-ground peanut butter, pasture-raised eggs (if used), and grass-fed butter — to maximize phytonutrient density and minimize additives.
Ultimately, this pie fits beautifully within a balanced, joyful eating pattern — not as daily fare, but as a meaningful celebration of skill, seasonality, and shared pleasure. Nutrition is not just chemistry; it’s context, culture, and care.
Ingredients
- For the Crust: 1 ½ cups (150g) finely crushed chocolate sandwich cookies (e.g., Oreos), 6 tablespoons (85g) unsalted butter, melted, ¼ teaspoon fine sea salt
- For the Chocolate Ganache Layer: ½ cup (120ml) heavy whipping cream, 6 ounces (170g) semi-sweet or bittersweet chocolate (60–70% cacao), finely chopped, 1 tablespoon (5g) unsweetened Dutch-process cocoa powder, 1 tablespoon (14g) granulated sugar, ¼ teaspoon pure vanilla extract, Pinch of fine sea salt
- For the Peanut Butter Filling: 8 ounces (225g) full-fat brick cream cheese, at room temperature (68–72°F), ¾ cup (190g) well-stirred creamy peanut butter (no added sugars/oils), 1 ¼ cups (150g) powdered sugar, sifted, ¼ teaspoon fine sea salt, 1 cup (240ml) cold heavy whipping cream, 1 tablespoon (12g) powdered sugar, ½ teaspoon pure vanilla extract
- For Garnish (optional but recommended): Freshly whipped cream, melted chocolate or warm peanut butter for drizzling, flaky sea salt (e.g., Maldon), coarsely chopped toasted peanuts
Directions
- Prepare the crust: In a food processor, pulse cookies until fine crumbs form. Add melted butter and salt; pulse until mixture resembles wet sand and holds together when squeezed. Press firmly into bottom and up sides of a 9-inch deep-dish pie plate. Chill for 30 minutes (or freeze 15 minutes). Optional: Pre-bake at 350°F (175°C) for 8–10 minutes until fragrant; cool completely.
- Make the ganache: Heat cream in a small saucepan over medium-low heat until steaming with small bubbles at edges (do not boil). Place chocolate and cocoa in heatproof bowl. Pour hot cream over, cover, and let sit 3 minutes. Whisk gently until smooth. Stir in sugar, vanilla, and salt. Pour into chilled crust and spread evenly. Refrigerate uncovered 45–60 minutes until set.
- Prepare filling: Beat cream cheese with paddle attachment until smooth (~2 min). Add peanut butter and salt; beat 2 more minutes. Gradually add powdered sugar in 3 batches, beating on low then medium. In separate chilled bowl, whip cream, 1 tbsp sugar, and vanilla to stiff peaks. Fold one-third into peanut butter mixture to lighten, then gently fold in remaining cream until just combined.
- Assemble: Spoon filling over set chocolate layer. Smooth top. Cover loosely with plastic wrap (touching surface). Refrigerate minimum 6 hours, preferably overnight (12+ hours).
- Before serving, let pie sit at room temperature 15 minutes. Slice with hot, dry knife. Garnish each slice with whipped cream, chocolate or peanut butter drizzle, flaky salt, and toasted peanuts.
FAQ
- Can I make this pie ahead of time?
- Absolutely — and it’s highly recommended! This pie improves with time. It can be fully assembled and refrigerated for up to 5 days. For best texture and flavor, prepare it 1–2 days before serving. Freeze unfrosted (without whipped cream garnish) for up to 3 months — thaw overnight in refrigerator before serving.
- Why did my peanut butter layer crack or separate?
- Most commonly caused by temperature mismatch: cold cream cheese mixed with room-temp peanut butter, or warm ganache base. Also occurs if cream cheese wasn’t fully softened or if filling was overmixed or folded too vigorously. Always ensure all components are at correct temps and fold gently.
- Can I use natural peanut butter with oil separation?
- Yes — but it must be thoroughly stirred until completely homogenous before measuring. Better yet, gently warm jar in hot water bath for 5 minutes, then stir vigorously to re-emulsify. Unstirred natural PB introduces excess oil that pools and destabilizes filling.
- My crust is crumbly and falls apart when slicing — what went wrong?
- Inadequate binding (too little butter), uneven pressing (especially up the sides), or insufficient chilling time. Press firmly using flat-bottomed tool. Chill at least 30 minutes before filling — longer if room is warm.
- Can I substitute Cool Whip or whipped topping?
- We strongly advise against it. Artificial toppings lack fat and structure, resulting in a watery, unstable, chemically tasting filling that weeps and collapses. Real heavy cream is irreplaceable for authentic texture and flavor.
- Is there a way to make this pie lighter or lower-calorie?
- You can reduce calories by ~15–20% using Neufchâtel cheese (⅓ less fat than cream cheese), substituting half the heavy cream with cold whole milk (though texture becomes softer), and reducing sugar by 20%. However, significant reductions compromise the signature richness and stability — embrace moderation instead of sacrifice.
- Can I use a store-bought pie crust?
- Yes — a pre-baked chocolate cookie crust (found in grocery freezer sections) works in a pinch. Avoid plain pastry crusts; they clash texturally and flavor-wise. Always check ingredient labels for hidden dairy, gluten, or palm oil if dietary restrictions apply.
- How do I prevent the chocolate layer from becoming dull or gray?
- “Bloom” (grayish streaks) occurs from temperature shock or improper tempering. To prevent: never refrigerate warm ganache — always cool to room temp first. Avoid freezing unless properly wrapped. Use high-cocoa chocolate with stable fat profile.
- What’s the best peanut butter brand to use?
- Look for simple ingredient lists: peanuts + salt only. Recommended brands include Smucker’s Natural, Teddie, Once Again, or homemade roasted peanut butter. Avoid “no-stir” varieties containing palm oil or hydrogenated fats — they destabilize the filling and impart waxy mouthfeel.
- Can I add fruit to this pie?
- Yes — but strategically. Acidic fruits (raspberries, strawberries) work best as a thin, strained coulis swirled *on top* of the peanut butter layer before chilling, or as fresh garnish. Avoid mixing raw fruit directly into filling — moisture causes weeping and texture breakdown.
Summary
Chocolate Peanut Butter Pie is a timeless, crowd-pleasing dessert that masterfully balances deep, bittersweet chocolate with creamy, savory-sweet peanut butter — all anchored by a crisp, buttery crust and crowned with luxurious texture contrasts.
With its flexible recipe, forgiving technique, make-ahead convenience, and endless customization potential — from vegan and keto adaptations to gourmet upgrades and seasonal riffs — it remains not just a pie, but a canvas for creativity, comfort, and connection.