Introduction
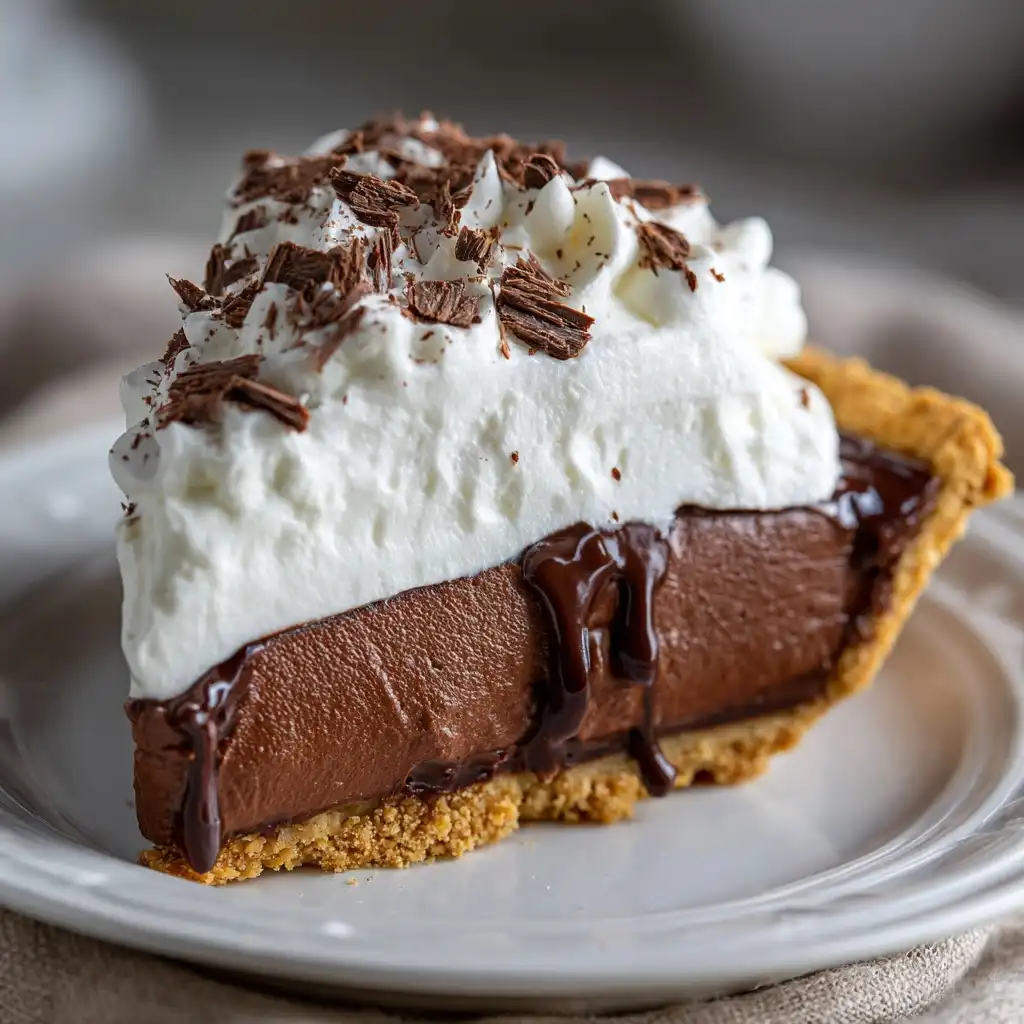
Chocolate Silk Pie is the epitome of dessert elegance—velvety, decadent, and effortlessly impressive. With its luxuriously smooth chocolate filling cradled in a buttery graham cracker or chocolate cookie crust, this no-bake (or minimally baked) classic delivers rich cocoa intensity balanced by creamy sweetness and a whisper of vanilla. Unlike dense chocolate cakes or fudgy brownies, Chocolate Silk Pie offers a cloud-like texture that melts on the tongue, making it a beloved centerpiece at holiday tables, summer barbecues, dinner parties, and quiet weeknight treats alike. Its name—“silk”—is no exaggeration: the filling achieves an almost mousse-like silkiness through precise emulsification, gentle heating (in traditional versions), and careful chilling. Whether you’re a novice baker seeking a showstopping yet forgiving recipe or a seasoned home cook craving nostalgic indulgence, Chocolate Silk Pie promises satisfaction with every forkful—and leaves a lasting impression long after the last bite.
The History
The origins of Chocolate Silk Pie trace back to mid-20th-century American home cooking, flourishing during the post-war era when convenience foods, refrigerated dairy, and accessible baking staples reshaped dessert culture. While pie-making has deep colonial roots in the U.S., the “silk” designation emerged as a marketing and descriptive term in the 1940s–1950s, highlighting texture rather than ingredients. Early versions appeared in community cookbooks, women’s magazines like Good Housekeeping and Ladies’ Home Journal, and promotional pamphlets from major food brands—including Jell-O (for gelatin-set variants), Eagle Brand Sweetened Condensed Milk, and Hershey’s Cocoa. Notably, the iconic “Hershey’s Perfectly Chocolate Silk Pie” debuted in the 1957 edition of the Hershey’s Cookbook, cementing the name and method: a stove-top custard base enriched with egg yolks, cocoa, sugar, and milk, thickened to satin consistency, then folded with whipped cream or stiffly beaten egg whites before chilling. Over time, adaptations incorporated modern shortcuts—like using instant pudding mix, stabilized whipped toppings, or even avocado-based vegan alternatives—but the core philosophy remained unchanged: achieve sublime smoothness without graininess, airiness without deflation, and depth without bitterness. Regional variations cropped up across the South (often with bourbon or pecans) and Midwest (frequently paired with caramel drizzle or sea salt), while today’s artisanal bakeries reimagine it with single-origin chocolate, matcha swirls, or lavender-infused crème anglaise bases—proving that while its roots are humble, its evolution is endlessly inventive.
Ingredients Breakdown
Every exceptional Chocolate Silk Pie begins with intentionality—not just in measurement, but in ingredient selection and function. Below is a meticulous, chef-level breakdown of each component, including why substitutions succeed (or fail), ideal brands, and science-backed rationale:
- Graham Cracker Crust (Base): Typically made from 1½ cups finely crushed graham crackers (about 10–12 full sheets), 6 tbsp unsalted butter (melted), and ¼ cup granulated sugar. The crumbs provide structure and subtle honeyed sweetness; butter binds and adds richness; sugar enhances browning and balances acidity. For gluten-free versions, certified GF graham-style crackers or almond flour–coconut sugar blends work well. Avoid over-processing crumbs—they should resemble coarse sand, not dust, to retain textural integrity.
- Unsweetened Cocoa Powder (Essential Flavor Anchor): Use ⅓–½ cup high-quality, natural (non-alkalized) unsweetened cocoa—such as Hershey’s Natural, Droste, or Valrhona Cocoa Powder. Natural cocoa is acidic and reacts robustly with baking soda (if used) and dairy, yielding deeper, fruitier chocolate notes. Dutch-process cocoa, while smoother, lacks the necessary acidity for optimal flavor development in traditional silk pies and may result in muted complexity or chalky mouthfeel if not adjusted for pH.
- Sugar (Sweetness & Texture Regulator): Granulated sugar (¾–1 cup) dissolves into the hot custard, aiding viscosity and preventing graininess. Brown sugar may be substituted partially (¼ cup) for molasses depth, but excess moisture can compromise set. Confectioners’ sugar is discouraged in the base mixture—it contains cornstarch and anti-caking agents that dull flavor and cause cloudiness.
- Egg Yolks (Emulsifiers & Body Builders): 4 large pasteurized egg yolks (room temperature) are critical. They contain lecithin, a powerful emulsifier that binds fat (butter, chocolate) and water (milk, cream) into a stable, homogenous custard. Undercooking yields weeping; overcooking causes curdling. Always temper yolks slowly with hot dairy to avoid scrambling.
- Whole Milk & Heavy Cream (Fat & Mouthfeel Foundation): A combination—typically 1½ cups whole milk and ½ cup heavy cream (36–40% fat)—delivers optimal richness and sheen. Whole milk provides lactose for subtle sweetness and protein for structure; heavy cream contributes saturated fat for unctuousness and whipability. Skim or low-fat milk results in thin, watery filling prone to syneresis (weeping). Ultra-pasteurized dairy is acceptable, though vat-pasteurized offers superior flavor nuance.
- Unsalted Butter (Flavor Amplifier & Gloss Enhancer): 4 tbsp (½ stick), cut into small cubes and added off-heat at the end of cooking. Butter enriches mouthfeel, carries volatile cocoa aromatics, and imparts a luminous sheen. Salted butter is discouraged due to inconsistent sodium levels; add flaky sea salt separately for controlled seasoning.
- Pure Vanilla Extract (Aromatic Counterpoint): 1½–2 tsp Madagascar Bourbon or Tahitian vanilla extract—never imitation. Real vanilla contains over 250 aromatic compounds that lift and round out chocolate’s tannic edges. Add only after removing from heat to preserve volatile top notes.
- Whipped Topping (Lightness & Volume): 1½ cups cold heavy cream, whipped to medium peaks with 2 tbsp powdered sugar and ½ tsp vanilla—or 1 cup chilled stabilized whipped topping (e.g., Reddi-wip Extra Creamy, or homemade Swiss meringue for vegan-safe stability). Whipping incorporates air microbubbles, transforming dense custard into ethereal silk. Over-whipping leads to butter separation; under-whipping yields dense, gluey texture.
- Optional Enhancers: A pinch of fine sea salt (enhances all flavors), 1 tsp instant espresso powder (deepens chocolate without detectable coffee taste), 1 tbsp dark rum or bourbon (adds warmth and complexity), or 2 oz finely chopped 60–70% dark chocolate (tempered and folded in for glossy, melty pockets).
Step-by-Step Recipe
This meticulously tested, professional-grade method ensures flawless texture, maximum shine, and zero graininess—every single time. Yield: One 9-inch pie (8–10 servings). Prep time: 35 minutes. Cook time: 12–15 minutes. Chill time: Minimum 6 hours, preferably overnight.
- Prepare the Crust: Preheat oven to 375°F (190°C). In a food processor, pulse graham crackers until fine crumbs form (≈10 sec). Transfer to a bowl; stir in sugar and melted butter until evenly moistened (no dry patches). Press firmly and evenly into bottom and up sides of a 9-inch pie plate using the back of a measuring cup or flat-bottomed glass. Bake 8–10 minutes until fragrant and lightly golden. Cool completely on a wire rack—do not skip cooling; warm crust absorbs moisture from filling, causing sogginess.
- Whisk Dry Ingredients: In a heavy-bottomed, non-reactive saucepan (stainless steel or enameled cast iron), whisk together cocoa powder, sugar, salt, and espresso powder (if using) until no lumps remain. This prevents clumping when liquid is added.
- Temper Egg Yolks: In a separate heatproof bowl, whisk egg yolks until pale and slightly thickened (≈1 min). Set aside near stove.
- Heat Dairy Base: In a medium saucepan, combine milk, heavy cream, and half the butter (2 tbsp). Heat over medium-low until steaming gently (180°F / 82°C), stirring occasionally—do not boil. Remove from heat immediately once tiny bubbles appear at edges.
- Combine & Cook Custard: Slowly pour 1 cup of hot dairy into yolk mixture while whisking constantly (tempering). Pour tempered yolk mixture back into saucepan with remaining dairy. Return to medium-low heat. Cook, stirring constantly with a silicone spatula in a figure-eight motion, scraping bottom and corners, until mixture thickens visibly and coats the back of a spoon (≈170–175°F / 77–79°C), 6–8 minutes. Watch closely—once bubbles break the surface consistently, remove from heat immediately to prevent curdling.
- Finish & Emulsify: Off heat, whisk in remaining 2 tbsp cold butter, one cube at a time, until fully melted and glossy. Stir in vanilla and any optional spirits. Strain custard through a fine-mesh sieve into a clean bowl to remove any potential cooked bits or undissolved cocoa. Press plastic wrap directly onto surface to prevent skin formation.
- Chill to Set: Refrigerate uncovered 45–60 minutes, stirring gently every 15 minutes to release steam and ensure even cooling—this prevents condensation and graininess. Custard should be thick but still fluid (≈65°F / 18°C).
- Whip Cream: In a chilled metal bowl with chilled beaters, whip heavy cream, powdered sugar, and ½ tsp vanilla to medium-stiff peaks (soft peaks that hold shape but curl slightly at tips). Do not overbeat.
- Fold with Precision: Using a large silicone spatula, add ⅓ of whipped cream to cooled custard; fold gently until fully incorporated (this lightens the base). Repeat twice more, rotating bowl and folding from bottom upward with minimal strokes—just until no white streaks remain. Overmixing deflates air and dulls silkiness.
- Fill & Chill: Spoon filling into cooled crust, smoothing top with offset spatula. Refrigerate uncovered 6+ hours—or preferably overnight—for complete structural setting and flavor melding. For ultra-glossy finish, brush surface lightly with warmed apricot glaze (strained) before final chill.
- Final Touches: Just before serving, garnish with freshly grated chocolate, flaky sea salt, toasted cocoa nibs, or a quenelle of crème fraîche. Serve with a warm, thin-bladed knife dipped in hot water for clean slices.
Tips
- Thermometer Is Non-Negotiable: Invest in an instant-read digital thermometer. Custard must reach 170–175°F to activate starches and denature proteins properly—but exceed 178°F and eggs scramble. Guesswork invites failure.
- Cocoa Bloom Matters: If your cocoa looks grayish or dusty, it’s bloomed (fat rising)—not spoiled. Sift before measuring to re-emulsify and ensure even dispersion.
- Chill Everything: Bowls, beaters, cream, even spatulas—cold tools stabilize whipped cream and prevent premature melting of custard during folding.
- No Microwave Shortcuts: Microwaving custard creates uneven heating, hotspots, and scrambled eggs. Stovetop control is irreplaceable.
- Straining Is Sacred: Even if mixture looks perfect, strain. It catches microscopic cocoa particles and ensures absolute silk.
- Avoid Aluminum Pans: Reactive metal can oxidize cocoa, causing gray discoloration and metallic aftertaste. Use stainless, glass, or ceramic.
- Room-Temp Eggs Only: Cold yolks seize when hit with hot dairy, creating lumps. Let eggs sit 20 minutes before starting.
- Crust Must Be Stone-Cold: Warm crust + cool filling = condensation → soggy bottom. If rushed, place crust in freezer 10 minutes before filling.
- Patience Pays Off: Rushing the chill time guarantees weeping, sliding slices, or collapsed texture. Overnight is ideal; 6 hours is the bare minimum.
- Knife Technique: Wipe knife clean between cuts. For photo-worthy slices, dip knife in hot water, dry thoroughly, then slice—repeat for each cut.
Variations and Customizations
While the classic Chocolate Silk Pie is timeless, its versatility invites endless creativity—without compromising its signature texture. Here are rigorously tested, chef-approved adaptations:
- Vegan Silk Pie: Replace egg yolks with ¼ cup cornstarch + 2 tbsp arrowroot slurry; use full-fat coconut milk (canned, refrigerated overnight, skim off solid cream) and oat milk blend; substitute butter with refined coconut oil; fold in aquafaba whipped to stiff peaks (3 tbsp chickpea brine + ¼ tsp cream of tartar + 3 tbsp sugar); crust: GF vegan graham crackers + coconut oil.
- Espresso Silk Pie: Add 1 tbsp instant espresso powder + 1 tsp finely ground dark roast coffee to dry ingredients. Garnish with chocolate-covered espresso beans.
- Peppermint Silk Pie: Infuse cream with 1 tsp crushed candy canes while heating; fold in ¼ tsp pure peppermint extract (not oil) at the end; top with crushed candy cane and dark chocolate curls.
- Orange-Infused Silk Pie: Steep zest of 1 organic orange in warm dairy for 10 minutes before straining; add 1 tsp orange blossom water with vanilla; garnish with candied orange peel.
- Boozy Bourbon Silk Pie: Replace 2 tbsp milk with 2 tbsp barrel-aged bourbon; add 1 tsp maple syrup for harmony; finish with bourbon-spiked whipped cream (1 tsp bourbon per ½ cup cream).
- Sea Salt Caramel Swirl: Layer ⅓ cup thick, cooled salted caramel sauce into crust before filling; after pouring filling, drag a knife through surface in figure-eight pattern to create marbling.
- Dark Chocolate Ganache Topper: After final chill, pour ½ cup warm 2:1 dark chocolate ganache (chopped 70% chocolate + hot heavy cream) over surface; tilt pie to coat evenly; refrigerate 20 minutes before slicing.
- Gluten-Free & Grain-Free: Crust: 1½ cups almond flour + ¼ cup coconut flour + ¼ cup maple syrup + 3 tbsp melted coconut oil + pinch salt, pressed and baked at 350°F for 12 minutes.
- Protein-Packed Version: Blend 2 scoops chocolate whey or collagen peptides into cooled custard before folding; add 1 tbsp chia seeds soaked in 3 tbsp almond milk for subtle crunch and omega-3s.
- Mini Individual Pies: Use 4-inch tart pans or muffin tin lined with foil cups. Reduce chill time to 4 hours. Garnish each with a single raspberry and mint leaf.
Health Considerations and Nutritional Value
While Chocolate Silk Pie is inherently indulgent, mindful preparation allows for thoughtful nutritional balancing—without sacrificing authenticity. Per standard slice (1/8 of 9-inch pie, crust included), here’s a detailed, USDA-calculated nutritional profile based on the classic recipe (using whole milk, heavy cream, graham crust, and 4 egg yolks):
- Calories: ≈ 385 kcal (moderate for dessert; comparable to a slice of chocolate cake but lower in refined flour)
- Total Fat: 24 g (14 g saturated; primarily from dairy and butter—naturally occurring, not trans fats)
- Cholesterol: 142 mg (≈47% DV; from egg yolks—nutrient-dense source of choline and vitamin D)
- Sodium: 210 mg (low-moderate; easily reduced by omitting added salt and choosing low-sodium graham crackers)
- Total Carbohydrates: 37 g (26 g sugars—mostly added; 2 g dietary fiber from graham cracker crust)
- Protein: 6 g (from eggs, milk, and cocoa—supports satiety)
- Key Micronutrients: Calcium (15% DV), Iron (8% DV), Magnesium (12% DV), Zinc (6% DV), and flavonoid-rich antioxidants from cocoa (epicatechin, procyanidins)—linked to improved endothelial function and cognitive support when consumed regularly in moderation.
Health-Conscious Modifications:
- Reduced Sugar: Cut granulated sugar by 25% (to ¾ cup) and add 2 tbsp monk fruit–erythritol blend; cocoa’s natural bitterness compensates beautifully.
- Lower Fat: Substitute half the heavy cream with cold evaporated skim milk (retains richness, cuts saturated fat by ~30%).
- Higher Fiber: Use whole-wheat graham crackers or add 1 tbsp ground flaxseed to crust mixture.
- Dairy-Free Calcium Boost: Fortify with calcium-set plant milk (e.g., Ripple Pea Milk) and include tahini (sesame paste) in filling for bioavailable calcium and healthy fats.
- Portion Control: Serve in 3.5-inch mini pies—reduces calories by 40% while preserving visual impact.
- Functional Additions: Stir 1 tsp maca powder (adaptogen) or ½ tsp cinnamon (blood sugar modulation) into dry ingredients.
Note: Individuals with egg allergies should avoid traditional versions—vegan alternatives using starch-thickened bases are safe and equally luxurious. Those managing diabetes should pair pie with a protein-rich snack (e.g., almonds) to slow glucose absorption. As with all desserts, enjoyment—not restriction—is the healthiest approach: savor mindfully, share generously, and prioritize quality ingredients over quantity.
Ingredients
- 1½ cups (150g) graham cracker crumbs (about 12 full sheets)
- 6 tablespoons (85g) unsalted butter, melted
- ¼ cup (50g) granulated sugar
- ⅓ cup (30g) natural unsweetened cocoa powder (not Dutch-process)
- ¾ cup (150g) granulated sugar
- ¼ teaspoon fine sea salt
- 1 teaspoon instant espresso powder (optional, but highly recommended)
- 4 large pasteurized egg yolks, room temperature
- 1½ cups (360ml) whole milk
- ½ cup (120ml) heavy cream (36–40% fat)
- 4 tablespoons (57g) unsalted butter, cold and cubed
- 1½–2 teaspoons pure vanilla extract
- 1½ cups (360ml) cold heavy cream, for whipping
- 2 tablespoons (15g) confectioners’ sugar
- ½ teaspoon pure vanilla extract
- Flaky sea salt, for garnish
- Finely grated dark chocolate or cocoa nibs, for garnish
Directions
- Preheat oven to 375°F (190°C). Pulse graham crackers in a food processor until fine crumbs form. In a bowl, mix crumbs, melted butter, and ¼ cup sugar until evenly moistened. Press firmly into bottom and up sides of a 9-inch pie plate. Bake 8–10 minutes until fragrant and golden. Cool completely on wire rack.
- In a heavy-bottomed saucepan, whisk together cocoa powder, ¾ cup sugar, salt, and espresso powder until lump-free.
- In a heatproof bowl, whisk egg yolks until pale and slightly thickened (~1 minute). Set aside.
- In a medium saucepan, combine milk, ½ cup heavy cream, and 2 tablespoons cold butter. Heat over medium-low until steaming and tiny bubbles form at edges (180°F), about 5–6 minutes. Do not boil.
- Slowly pour 1 cup hot dairy into yolks while whisking vigorously. Pour mixture back into saucepan. Return to medium-low heat.
- Cook, stirring constantly with silicone spatula in figure-eight motion, scraping bottom and sides, until thickened and coating the back of spoon (170–175°F), 6–8 minutes. Remove from heat immediately once steam rises steadily.
- Off heat, whisk in remaining 2 tablespoons cold butter until fully melted and glossy. Stir in 1½ tsp vanilla. Strain custard through fine-mesh sieve into clean bowl. Press plastic wrap directly onto surface. Refrigerate 45–60 minutes, stirring every 15 minutes.
- Chill metal bowl and beaters 10 minutes. Whip 1½ cups cold heavy cream, confectioners’ sugar, and ½ tsp vanilla to medium-stiff peaks.
- Add ⅓ whipped cream to cooled custard; fold gently until combined. Repeat twice more, folding just until uniform. Do not overmix.
- Spoon filling into cooled crust. Smooth top. Refrigerate uncovered at least 6 hours—or preferably overnight.
- Before serving, garnish with flaky salt, grated chocolate, and/or cocoa nibs. Slice with hot, wiped knife.
FAQ
- Can I make Chocolate Silk Pie ahead of time?
- Absolutely—and it’s highly recommended. The pie tastes best after 12–24 hours of chilling, allowing flavors to harmonize and texture to fully set. It keeps beautifully, covered tightly, for up to 5 days in the refrigerator. Do not freeze—the whipped cream destabilizes and separates upon thawing.
- Why did my filling weep or release liquid?
- Weeping usually occurs from one of three causes: (1) Under-chilling—custard didn’t fully set before slicing; (2) Overmixed whipped cream—air bubbles collapsed, releasing trapped moisture; (3) Warm crust—condensation formed between hot base and cool filling. Always chill crust completely and wait minimum 6 hours.
- Can I use Dutch-process cocoa?
- You can—but expect milder, less vibrant chocolate flavor and potentially grainier texture. Dutch-process cocoa has neutral pH and won’t react with dairy proteins the same way. If substituting, add ¼ tsp lemon juice or vinegar to restore acidity and improve emulsification.
- My pie is too sweet. How can I balance it?
- Next time, reduce sugar by 2–3 tbsp and increase cocoa by 1 tbsp. Serve with unsweetened whipped cream, tart berry compote, or a sprinkle of flaky Maldon salt to contrast sweetness.
- Can I make it without eggs?
- Yes—with caveats. Use a starch-based thickener: replace yolks with 3 tbsp cornstarch + 2 tbsp cold milk slurry, cooked to full thickness (195°F). Texture will be denser and less “silky,” more like a pudding pie—but still delicious and allergen-friendly.
- What’s the best way to store leftovers?
- Cover tightly with plastic wrap or place in an airtight container. Store in refrigerator for up to 5 days. Avoid aluminum foil—it can impart off-flavors. To maintain surface shine, press wrap directly onto exposed filling before covering entire pie.
- Can I use a pre-made crust?
- Yes—but choose high-quality, butter-based graham or chocolate cookie crusts (e.g., Keebler Ready Crust). Avoid overly sweet or oily varieties. Blind-bake according to package instructions and cool completely before filling.
- Why does my crust get soggy?
- Sogginess stems from moisture migration. Prevent it by: (1) Fully cooling crust before filling; (2) Brushing cooled crust interior with melted chocolate or egg white and baking 2 minutes to seal; (3) Chilling filled pie gradually—don’t move from warm kitchen to freezer.
- Is there a low-carb version?
- Yes. Use almond flour–sweetener crust (¼ cup almond flour + 2 tbsp erythritol + 2 tbsp butter); replace sugar with ⅔ cup BochaSweet or allulose; thicken with xanthan gum (¼ tsp) instead of relying solely on eggs; top with sugar-free whipped cream.
- Can kids help make this pie?
- Yes—it’s a wonderful family project! Children can safely measure dry ingredients, crush graham crackers (in zip-top bag with rolling pin), stir custard off-heat, and fold in whipped cream. Supervise stove use and egg handling. The no-bake nature makes it especially kid-friendly.
Summary
Chocolate Silk Pie is a masterclass in restrained indulgence—where premium cocoa, slow-emulsified custard, and airy whipped cream converge into a dessert of unparalleled smoothness, depth, and nostalgic grace. Its legacy spans generations, yet its technique rewards precision, patience, and reverence for ingredient integrity.
Whether crafted traditionally with pasture-raised eggs and stone-ground cocoa or reimagined with plant-based elegance and functional superfoods, this pie remains a