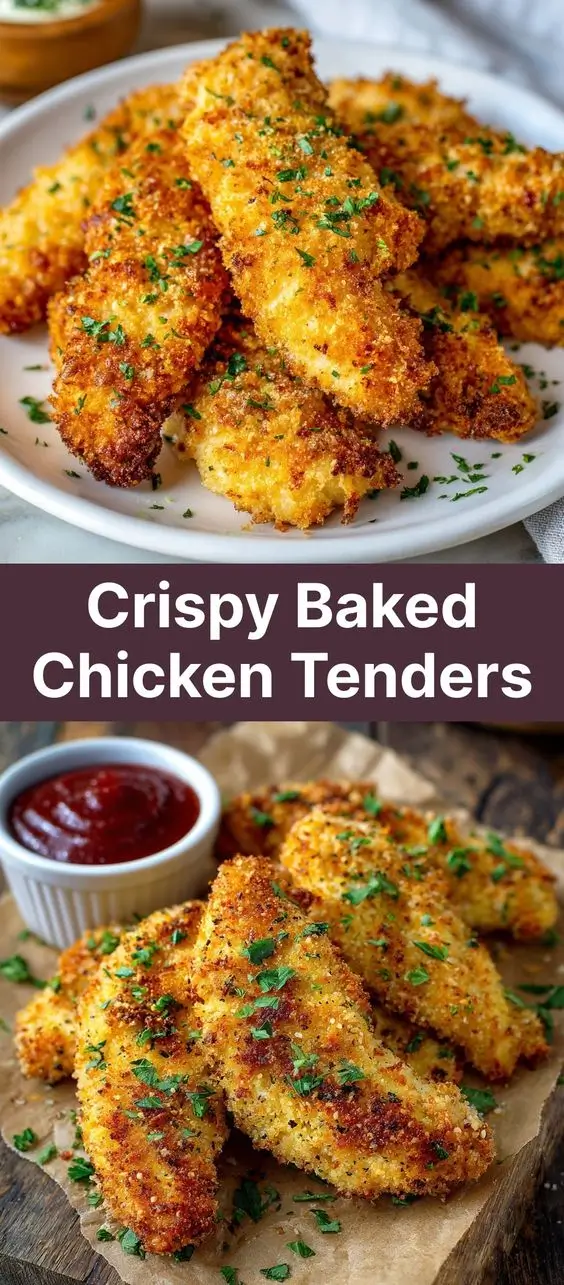
Crispy Baked Chicken Tenders: The Ultimate Healthy Comfort Food
Introduction
If you’re craving the golden, crunchy goodness of fried chicken tenders but want a healthier, guilt-free alternative, look no further than crispy baked chicken tenders. These tender, juicy strips of chicken are coated in a flavorful breading and oven-baked to perfection—offering all the crunch without the deep-frying mess. Whether you’re cooking for your family, meal prepping for the week, or hosting a game-day snack spread, these baked chicken tenders are sure to be a hit. They’re kid-approved, adult-loved, and endlessly customizable with seasonings, dips, and sides.
Beyond being delicious, baked chicken tenders are a fantastic way to enjoy lean protein while keeping fat and calorie counts in check. By swapping out frying oil for smart baking techniques and wholesome ingredients, you can create a dish that’s both satisfying and nutritious. In this comprehensive guide, we’ll walk you through everything you need to know—from the history of chicken tenders to a detailed step-by-step recipe, customization ideas, health insights, and expert tips to ensure perfect results every time.
The History
The origin of chicken tenders—also known as chicken fingers or goujons—traces back to mid-20th century America, where the demand for quick, easy-to-eat proteins surged alongside the rise of fast food culture. While the exact inventor is debated, many credit the Chicken Tender Sandwich to restaurants in New England during the 1970s. Purportedly, the dish gained popularity at a now-legendary eatery called the Puritan Backroom in Manchester, New Hampshire, which claims to have introduced breaded and fried chicken strips served on a bun as early as 1974.
Originally made from the tenderloin (a small strip of muscle beneath the chicken breast), the name “tender” was quite literal—the most tender part of the bird. As their popularity grew, chefs began using sliced chicken breasts to mimic the shape and texture, making them more accessible and affordable. Over time, chicken tenders became a staple on American menus, especially in diners, sports arenas, and children’s menus.
With rising awareness about health and wellness in the 21st century, home cooks and culinary innovators began seeking ways to recreate the crispy, savory appeal of fried tenders without the excess oil. Thus, the **baked chicken tender** emerged as a healthier alternative, using oven roasting, air frying, and creative breading techniques to achieve maximum crispiness with minimal fat. Today, baked versions are celebrated not only for their nutritional benefits but also for their versatility in dietary lifestyles—including gluten-free, low-carb, and high-protein regimens.
Ingredients Breakdown
The secret to achieving truly crispy baked chicken tenders lies in selecting the right combination of ingredients that work together to create a crunchy exterior and moist interior. Here’s a detailed breakdown of each component:
- Chicken Breast Tenderloins (or Sliced Chicken Breasts): The star of the dish. Use fresh, skinless, boneless chicken breast tenderloins for authentic tenderness. If unavailable, slice regular chicken breasts into 1-inch thick strips to ensure even cooking.
- Eggs: Act as a binding agent, helping the breading adhere to the chicken. You can use whole eggs or whisked egg whites for a lighter coating.
- Buttermilk (Optional but Recommended): Adds tanginess and helps tenderize the chicken. Marinating the chicken in buttermilk for 30 minutes to 2 hours enhances juiciness and improves breading adhesion.
- All-Purpose Flour (or Gluten-Free Alternative): Used in the initial dredging step to create a base layer for the breading. It absorbs moisture and provides texture for the egg wash to cling to.
- Panko Breadcrumbs: The key to ultimate crispiness. Panko is lighter and flakier than regular breadcrumbs, resulting in a golden, shaggy crust when baked. For extra crunch, toast the panko lightly in a dry skillet before using.
- Grated Parmesan Cheese (Optional): Adds umami depth and helps form a crispier crust due to its browning properties.
- Seasonings: A blend of garlic powder, onion powder, smoked paprika, salt, black pepper, dried herbs (like oregano or thyme), and a pinch of cayenne for heat elevates flavor. Customize based on preference—Italian herbs, ranch seasoning, or Cajun spice blends work beautifully.
- Olive Oil or Cooking Spray: Lightly coating the breaded tenders with oil before baking promotes browning and crispiness. A fine mist of olive oil spray works best for even coverage without greasiness.
- Parchment Paper or Wire Rack: Essential tools! Baking on a wire rack set over a baking sheet allows hot air to circulate around the chicken, preventing sogginess on the bottom. Parchment paper prevents sticking and simplifies cleanup.
Step-by-Step Recipe
Follow these detailed steps to make perfectly crispy baked chicken tenders at home:
- Prep the Chicken: Start with 1.5 lbs (about 680g) of chicken breast tenderloins or cut boneless, skinless chicken breasts into uniform 1-inch wide strips. Pat them dry thoroughly with paper towels—this is crucial for crispiness.
- Marinate (Optional): Place chicken in a bowl with 1 cup of buttermilk and refrigerate for 30 minutes to 2 hours. This step adds moisture and tenderness.
- Set Up Breading Station: Prepare three shallow bowls:
- Bowl 1: ½ cup all-purpose flour (or gluten-free flour blend).
- Bowl 2: 2 large beaten eggs (or ⅓ cup egg substitute).
- Bowl 3: 1.5 cups panko breadcrumbs mixed with ¼ cup grated Parmesan, 1 tsp garlic powder, 1 tsp onion powder, 1 tsp smoked paprika, ½ tsp salt, ½ tsp black pepper, and optional ¼ tsp cayenne.
- Dredge the Chicken: Working one piece at a time:
- Dip chicken in flour, shaking off excess.
- Transfer to egg wash, allowing excess to drip off.
- Press firmly into breadcrumb mixture, ensuring full coverage. Place on a plate or tray.
- Preheat Oven: Set oven to 425°F (220°C). Line a baking sheet with parchment paper and place a wire rack on top. Lightly spray the rack with cooking oil.
- Arrange Tenders: Place breaded chicken tenders on the wire rack in a single layer, leaving space between each for airflow.
- Spray with Oil: Lightly mist the tops of the tenders with olive oil spray. This encourages browning and crispiness.
- Bake: Bake for 15–18 minutes, flip carefully using tongs, then bake another 5–7 minutes until golden brown and internal temperature reaches 165°F (74°C).
- Rest and Serve: Let rest for 2–3 minutes before serving. This helps the crust firm up and juices redistribute.
Tips for Perfect Crispy Baked Chicken Tenders
- Don’t Skip the Drying Step: Moisture is the enemy of crispiness. Always pat chicken dry before breading.
- Use a Wire Rack: Elevating the chicken ensures even browning and prevents steaming on the bottom.
- Double-Dip for Extra Crunch: For an ultra-thick crust, dip the chicken in egg and breadcrumbs twice.
- Toast the Panko: Sauté panko in a dry pan over medium heat for 2–3 minutes until golden. This enhances flavor and crunch.
- Avoid Overcrowding: Bake in batches if needed. Overlapping causes steam buildup and soggy tenders.
- Check Internal Temperature: Use a meat thermometer to ensure doneness without overcooking.
- Broil Briefly (Optional): For extra browning, broil for the last 1–2 minutes—but watch closely to avoid burning.
- Prep Ahead: Bread the tenders up to 24 hours in advance and refrigerate on a tray (uncovered) to dry the coating slightly, improving crispiness.
Variations and Customizations
One of the greatest advantages of homemade baked chicken tenders is how easily they can be adapted. Here are some popular twists:
- Gluten-Free: Substitute regular flour with rice flour or gluten-free all-purpose blend, and use gluten-free panko breadcrumbs.
- Keto/Low-Carb: Replace breadcrumbs with crushed pork rinds or almond flour mixed with Parmesan and spices.
- Spicy Buffalo Style: Toss baked tenders in a mixture of melted butter and hot sauce (e.g., Frank’s RedHot) for a spicy kick.
- Honey Garlic Glazed: Brush with a warm mix of honey, soy sauce, minced garlic, and sesame oil after baking.
- Ranch Seasoned: Add dried dill, parsley, chives, and garlic to the breading for a cool, herby flavor.
- BBQ Glazed: Coat with your favorite barbecue sauce post-baking and return to oven for 2–3 minutes to caramelize.
- Teriyaki Style: Marinate in teriyaki sauce before breading, or glaze after baking.
- Herb & Lemon Zest: Add fresh lemon zest and chopped rosemary or thyme to the breadcrumbs for a bright, aromatic twist.
- Cheesy Crust: Mix in sharp cheddar or pepper jack cheese into the breadcrumb mixture for melty pockets of flavor.
- Air Fryer Version: Cook at 400°F (200°C) for 10–12 minutes, flipping halfway. Spritz with oil for crispiness.
Health Considerations and Nutritional Value
Baked chicken tenders offer a significantly healthier profile compared to their fried counterparts. Here’s why they’re a smart choice:
- Lower in Fat: Baking eliminates the need for deep-frying oil, reducing total fat by up to 70%. A typical serving has only 3–5g of fat versus 15–20g in fried versions.
- High-Quality Protein: Chicken breast is rich in lean protein—approximately 25g per 3 oz serving—supporting muscle repair, satiety, and metabolism.
- Controlled Sodium: Unlike restaurant or frozen versions packed with sodium, homemade tenders let you regulate salt content. Opt for low-sodium seasonings if needed.
- No Trans Fats: Avoiding frying means no harmful trans fats linked to heart disease.
- Customizable for Diets: Easily adapted for keto, gluten-free, dairy-free, or low-FODMAP diets with ingredient swaps.
- Nutrient-Dense Coatings: Using whole grain breadcrumbs, flaxseed meal, or nut-based coatings adds fiber, omega-3s, and minerals.
Approximate Nutritional Value (per 4 oz serving, about 4 tenders):
| Calories | 220–260 |
| Protein | 28g |
| Total Fat | 7g |
| Saturated Fat | 2g |
| Carbohydrates | 18g |
| Fiber | 1g |
| Sugar | 1g |
| Sodium | 450mg (varies with seasoning) |
Note: Values may vary based on exact ingredients and portion sizes.
Ingredients
- 1.5 lbs (680g) chicken breast tenderloins or boneless, skinless chicken breasts, sliced into 1-inch strips
- 1 cup buttermilk (optional, for marinating)
- ½ cup all-purpose flour (or gluten-free alternative)
- 2 large eggs, beaten
- 1.5 cups panko breadcrumbs (gluten-free if needed)
- ¼ cup grated Parmesan cheese (optional)
- 1 tsp garlic powder
- 1 tsp onion powder
- 1 tsp smoked paprika
- ½ tsp salt
- ½ tsp black pepper
- ¼ tsp cayenne pepper (optional, for heat)
- Olive oil spray or 1 tbsp olive oil
- Parchment paper
- Wire rack (for baking sheet)
Directions
- In a bowl, combine chicken strips with buttermilk. Cover and refrigerate for 30 minutes to 2 hours.
- Prepare three shallow bowls: one with flour, one with beaten eggs, and one with panko mixed with Parmesan, garlic powder, onion powder, smoked paprika, salt, pepper, and cayenne.
- Remove chicken from buttermilk and pat dry. Dredge each piece in flour, shake off excess, dip in egg, then coat thoroughly in breadcrumb mixture. Press gently to adhere.
- Preheat oven to 425°F (220°C). Line a baking sheet with parchment paper and place a wire rack on top. Lightly grease the rack.
- Arrange breaded tenders on the rack in a single layer. Lightly spray the tops with olive oil.
- Bake for 15 minutes, flip using tongs, then bake another 5–7 minutes until golden and internal temperature reaches 165°F (74°C).
- Let rest for 2–3 minutes before serving. Serve with your favorite dipping sauces.
FAQ
Can I freeze baked chicken tenders?
Yes! Once cooled, store in an airtight container or freezer bag for up to 3 months. Reheat in oven at 375°F (190°C) for 10–12 minutes to restore crispiness. Avoid microwaving, as it makes them soggy.
Why are my baked tenders not crispy?
Common causes include excess moisture, skipping the wire rack, overcrowded baking sheets, or not using enough oil spray. Ensure chicken is dry, use a rack, and lightly oil the coating.
Can I make these without eggs?
Yes. Substitute eggs with milk, yogurt, mustard, or a flax egg (1 tbsp ground flax + 3 tbsp water per egg). Note: adhesion may be slightly less effective.
How do I reheat leftover tenders?
For best results, reheat in a toaster oven or conventional oven at 375°F for 8–10 minutes. Air fryer also works well (3–4 minutes at 370°F). Avoid microwave unless absolutely necessary.
Are baked chicken tenders safe for kids?
Absolutely! They’re a great source of protein and can be made mild in flavor. Serve with ketchup, honey mustard, or yogurt-based dips for a balanced meal.
Can I prep the breading ahead of time?
Yes. Mix dry ingredients and store in an airtight container for up to 1 week. Also, bread the tenders up to 24 hours in advance and refrigerate uncovered to dry the coating, enhancing crispiness upon baking.
Summary
Crispy baked chicken tenders deliver all the crunch and flavor of fried chicken without the grease, making them a healthy, family-friendly favorite. With endless variations and simple preparation, they’re perfect for weeknights, meal prep, or entertaining.