Introduction
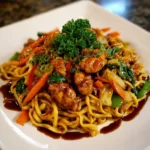
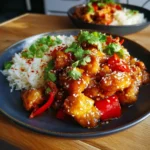
Crispy Chicken Tacos are a beloved fusion of bold Mexican-inspired flavors and satisfying American comfort food textures. These tacos feature golden, shatteringly crisp chicken nestled in warm, pliable tortillas and topped with vibrant, fresh ingredients that balance richness with brightness. Whether served at backyard cookouts, weeknight dinners, or festive taco nights, crispy chicken tacos offer versatility, crowd-pleasing appeal, and endless opportunities for personalization. Their irresistible crunch—achieved through precise breading, optimal frying (or baking) technique, and smart ingredient layering—sets them apart from their softer, grilled counterparts. More than just a meal, they represent culinary adaptability: rooted in tradition yet unafraid to innovate, accessible to home cooks of all skill levels, and endlessly expressive through toppings, sauces, and seasonings.
The History
While tacos themselves trace back centuries to indigenous Mesoamerican civilizations—where corn tortillas served as edible utensils for beans, chilies, and roasted proteins—the concept of “crispy chicken tacos” is a relatively modern evolution born from cross-cultural exchange and mid-20th-century American culinary innovation. The rise of fast-food chains in the 1950s and ’60s played a pivotal role: establishments like Taco Bell introduced breaded, fried chicken fillings in the 1980s as part of menu expansions targeting broader palates, blending Southern-style chicken preparation with Mexican format conventions. Simultaneously, Tex-Mex cuisine—developed along the U.S.–Mexico border—laid foundational groundwork by incorporating ingredients like cumin, chili powder, and shredded cheese into traditionally minimalist preparations. Home cooks soon adopted and elevated these ideas, experimenting with buttermilk brines, panko-crumb crusts, air-fryer techniques, and gourmet garnishes. Today’s crispy chicken taco reflects a globalized food landscape: Japanese panko, Korean gochujang, Indian spices, and Latin American salsas all find harmonious homes inside its crunchy embrace—proving that authenticity isn’t about rigid origin, but about intention, respect for craft, and joyful reinvention.
Ingredients Breakdown
Understanding each component—and why it matters—is essential to mastering crispy chicken tacos. Below is a detailed functional breakdown of every ingredient, including purpose, science-backed insights, and substitution logic:
- Chicken Breast or Thighs (1 lb): Boneless, skinless chicken breasts offer lean protein and clean flavor, while thighs provide superior moisture retention and richer taste due to higher fat content (10–12% vs. ~3% in breasts). For maximum tenderness and juiciness—especially when frying—thighs are highly recommended. Uniform ½-inch strips ensure even cooking and consistent crispness.
- Buttermilk (1 cup): Acts as both tenderizer and flavor carrier. Its lactic acid gently breaks down muscle fibers, preventing toughness; its acidity also helps the breading adhere better. No buttermilk? Make a substitute: stir 1 tbsp white vinegar or lemon juice into 1 cup whole milk and let sit 5–10 minutes until slightly curdled.
- All-Purpose Flour (¾ cup): Provides structure and surface texture for breading. Its gluten network creates a light, cohesive crust when combined with liquid. For gluten-free options, use a 1:1 GF flour blend containing xanthan gum (e.g., Bob’s Red Mill).
- Cornstarch (¼ cup): A game-changer for crispness. Cornstarch absorbs surface moisture more efficiently than flour alone and forms a glassier, more brittle crust when fried—resulting in louder crunch and longer-lasting crispness, even under warm toppings. It also raises the starch gelatinization temperature, delaying sogginess.
- Seasoning Blend (2 tbsp total): A balanced mix typically includes chili powder (smoky depth), ground cumin (earthy warmth), smoked paprika (complex aroma), garlic powder (umami backbone), onion powder (sweet-savory lift), dried oregano (Mexican-style herbal note), salt (flavor enhancer & moisture regulator), and black pepper (bright heat). Optional additions: ½ tsp chipotle powder (for subtle smoke + heat) or ¼ tsp ground coriander (citrusy nuance).
- Eggs (2 large): Serve as the “glue” between wet and dry components. Beaten eggs create a viscous slurry that allows the breading to cling tenaciously. Adding 1 tsp Dijon mustard or hot sauce boosts emulsification and adds complexity.
- Panko Breadcrumbs (1 cup): Japanese-style breadcrumbs are airy, flaky, and irregularly shaped—creating dramatically more surface area for crisping and trapping less oil than traditional crumbs. Toasting them lightly in butter or olive oil before breading deepens nuttiness and further enhances crunch. Gluten-free panko alternatives (made from rice or quinoa) perform admirably when toasted.
- Neutral Oil for Frying (4–6 cups): High smoke point is critical: peanut (450°F), avocado (520°F), or refined safflower (510°F) oils prevent burning and off-flavors. Avoid olive oil (low smoke point) or unrefined coconut oil (strong flavor, low smoke point). For air-frying, use 1–2 tsp oil per batch sprayed evenly.
- Tortillas (8–12 count): Double-warm corn tortillas (preferably 6-inch) are traditional and authentic—heat them on a dry cast-iron skillet for 30 seconds per side until pliable and slightly blistered. Flour tortillas (8-inch) offer greater flexibility and softness, ideal for heavier toppings. For gluten-free, certified GF corn or cassava tortillas work well. Never serve cold or stiff tortillas—they crack and leak.
- Essential Toppings: Shredded iceberg or romaine lettuce (cool crunch), diced white or red onion (sharp bite), fresh cilantro (bright, citrusy finish), lime wedges (acidic lift that cuts richness), and crumbled queso fresco or cotija (salty, milky tang). Each serves a textural and flavor-balancing role.
- Signature Sauces: Creamy chipotle crema (blended chipotles in adobo + sour cream + lime), avocado-cilantro lime crema, or tangy tomatillo salsa verde add moisture, acidity, heat, and herbaceous freshness—countering the chicken’s richness and binding all elements together.
Step-by-Step Recipe
- Brine & Marinate the Chicken (30 min–2 hrs): Slice chicken into uniform ½-inch thick strips. Place in a non-reactive bowl and fully submerge in buttermilk seasoned with 1 tsp salt and 1 tsp black pepper. Refrigerate for at least 30 minutes (optimal: 1–2 hours). Do not exceed 4 hours—prolonged marination can cause mushiness due to over-tenderization.
- Prepare Breading Stations (Mise en Place): Set up three shallow dishes: (1) Flour + full seasoning blend + 1 tsp salt; (2) Beaten eggs + 1 tsp Dijon mustard + 1 tsp hot sauce; (3) Panko + 1 tbsp melted butter (optional, for extra richness and browning). Toast panko in a skillet over medium-low heat for 3–4 minutes until golden—cool completely before using.
- Bread the Chicken (Gently!): Remove one piece of chicken from buttermilk, letting excess drip off (but don’t shake or pat dry—moisture helps adhesion). Dredge thoroughly in seasoned flour, shaking off excess. Dip into egg wash, coating fully. Then press firmly into toasted panko, ensuring full coverage and gentle compression for maximum crust adherence. Place breaded pieces on a wire rack set over parchment—not a plate—to prevent steaming and bottom-sogginess.
- Rest Before Cooking (10–15 min): Let breaded chicken rest uncovered at room temperature. This allows the coating to hydrate and set, significantly reducing breading loss during frying. Skipping this step risks patchy, flaking crusts.
- Heat Oil to Precise Temperature (350–365°F): Use a heavy-bottomed Dutch oven or deep fryer. Clip a candy/deep-fry thermometer to the side. Heat oil slowly—rushing causes uneven heating and burns. Test readiness: a 1-inch cube of bread should sizzle vigorously and turn golden in 60 seconds.
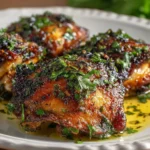
- Fry in Small Batches (2–3 mins per batch): Carefully lower 3–4 pieces into hot oil using tongs or a spider strainer. Do not overcrowd—this drops oil temp, causing greasiness and limp crusts. Fry undisturbed for 1 minute 30 seconds, then flip gently and cook another 1–1½ minutes until deep golden brown and internal temp reaches 165°F (use an instant-read thermometer). Transfer immediately to a wire rack set over paper towels—not a plate—to drain excess oil and preserve crispness.
- Double-Fry for Ultimate Crunch (Optional Pro Technique): For restaurant-level shatter, cool fried chicken completely (30 min), then reheat in 375°F oil for 45–60 seconds. This evaporates residual moisture trapped under the crust, creating unparalleled crispness and structural integrity.
- Warm Tortillas Thoughtfully: Heat corn tortillas individually on a dry, preheated cast-iron skillet for 25–30 seconds per side until soft, slightly puffed, and lightly speckled. Stack in a cloth-lined tortilla warmer or foil wrap to retain steam and pliability.
- Assemble with Intention (Last-Minute Only): Place 1–2 chicken strips per tortilla. Immediately top with cool, dry toppings (lettuce, onion, cheese), then drizzle generously with chilled sauce and finish with fresh cilantro and a generous squeeze of lime juice. Assembling ahead causes rapid sogginess—timing is everything.
- Serve Immediately: Crispness peaks within 3–5 minutes of frying. Accompany with extra lime wedges, additional sauces, pickled red onions, and a simple black bean & corn salad for contrast.
Tips
- Temperature Is Non-Negotiable: Oil below 350°F leads to greasy, pale chicken; above 375°F causes burnt crust and raw interior. Invest in a reliable thermometer—it’s the single most impactful tool for success.
- Dry Hands, Dry Tools: Always use separate tongs or utensils for each station (flour → egg → panko) to avoid clumping and cross-contamination. Keep a clean kitchen towel nearby to wipe hands frequently—wet fingers ruin breading consistency.
- Don’t Skip the Rest: That 10–15 minute rest after breading is your insurance policy against falling-off crusts. It lets the gluten in flour relax and the panko absorb just enough moisture to bind without turning gummy.
- Wire Rack > Paper Towels for Cooling: Placing hot chicken directly on paper towels traps steam underneath, softening the bottom crust. A wire rack allows 360° airflow—preserving crispness from all angles.
- Season Every Layer: Salt the buttermilk, the flour, and the panko. Flavor builds cumulatively—underseasoning any stage results in flat, one-dimensional chicken.
- Control Moisture in Toppings: Pat lettuce and tomatoes *completely* dry with paper towels before chopping. Excess water is the #1 cause of soggy tacos. Consider quick-pickling onions separately—they add zing without moisture.
- Prep Sauces Ahead, Chill Well: Cold sauces not only taste brighter but help lower the overall temperature of the taco, slowing the transfer of heat-induced steam from chicken to tortilla.
- Air Fryer Hack: For lighter crunch: spray breaded chicken with avocado oil, air-fry at 400°F for 10–12 minutes, flipping halfway. Finish under broiler 1 minute for extra browning. Not identical to deep-fry—but impressively close with far less oil.
- Re-Crisp Leftovers Properly: Never microwave! Reheat in a 400°F oven on a wire rack for 8–10 minutes—or air-fry at 375°F for 4–5 minutes. This drives out moisture and revives crunch without rubberizing the chicken.
- Batch Smartly: Fry no more than ⅓ of your oil’s volume at once. If making for a crowd, fry in waves and keep finished batches warm on a cooling rack in a 200°F oven—not covered—until serving.
Variations and Customizations
Crispy chicken tacos are a canvas—not a prescription. Here’s how to tailor them across cuisines, diets, heat preferences, and cooking constraints:
- Korean-Inspired: Swap buttermilk for gochujang-spiked soy milk marinade (¼ cup gochujang + 2 tbsp soy sauce + 1 tbsp rice vinegar + 1 tsp sesame oil + 1 tbsp brown sugar + 1 cup soy milk). Coat in panko + toasted sesame seeds. Top with kimchi slaw, scallions, and spicy mayo.
- Buffalo Style: Toss hot fried chicken in ¼ cup melted butter + ⅓ cup Frank’s RedHot. Serve with blue cheese crumbles, celery sticks, and ranch drizzle—skip tomato-based salsas to avoid clashing flavors.
- BBQ Ranch: Brush warm chicken with Kansas City–style BBQ sauce. Top with shredded cheddar, pickled jalapeños, red onion, and a swirl of dill ranch. Add crushed BBQ potato chips for extra crunch.
- Mediterranean Twist: Marinate in Greek yogurt + lemon zest + oregano + garlic. Use panko + grated Parmesan for breading. Top with tzatziki, chopped cucumber, kalamata olives, and crumbled feta.
- Vegetarian “Chicken” Option: Use thick-cut king oyster mushrooms (trimmed, pounded thin) or pressed, baked tofu slabs. Marinate in tamari + liquid smoke + nutritional yeast + garlic powder. Bread and fry same as chicken.
- Gluten-Free Version: Substitute GF all-purpose flour, GF cornstarch, and certified GF panko (rice or quinoa-based). Ensure tamari (not soy sauce) in any marinades. Use certified GF corn tortillas.
- Low-Carb/Keto: Skip flour and panko. Use crushed pork rinds + grated Parmesan + almond flour + spices for breading. Fry in avocado oil. Serve in large butter lettuce cups instead of tortillas.
- Spice-Ladder Options: Mild—omit chipotle, use sweet paprika. Medium—add ½ tsp ancho chili powder. Hot—include 1 minced serrano (seeds in) in egg wash. Nuclear—brush with ghost pepper oil post-fry (handle with gloves!).
- Breakfast Taco Fusion: Fry chicken with sage + thyme. Top with scrambled eggs, crumbled bacon, avocado slices, and chipotle-maple syrup drizzle.
- Gourmet Upscale: Use heritage-breed chicken thighs, brine in tequila + lime + cilantro. Bread in masa harina + ancho-chocolate crumb. Garnish with pickled purple carrots, pepitas, and hibiscus crema.
Health Considerations and Nutritional Value
A standard serving of two crispy chicken tacos (using 4 oz chicken breast, corn tortillas, minimal oil, and moderate toppings) delivers approximately:
- Calories: 420–510 kcal (varies by oil absorption, cheese quantity, and sauce richness)
- Protein: 32–38 g (excellent source—supports muscle repair and satiety)
- Total Fat: 18–24 g (mostly unsaturated if using heart-healthy oils; saturated fat remains low at ~3–4 g)
- Carbohydrates: 32–40 g (primarily complex carbs from corn tortillas and fiber-rich veggies)
- Fiber: 5–7 g (from corn tortillas, lettuce, onions, and optional black beans—supports digestion and gut health)
- Sodium: 580–720 mg (moderate; easily reduced by limiting added salt in breading and choosing low-sodium cheeses/sauces)
- Vitamins & Minerals: Rich in B6 and B12 (chicken), vitamin C (lime, cilantro, onions), folate (black beans, spinach), calcium (queso fresco), and antioxidants (cilantro, paprika, lime)
Health-Smart Swaps & Strategies:
- Fat-Conscious: Air-fry instead of deep-fry (cuts oil use by ~75%). Use skinless thighs—they’re naturally more flavorful, so you need less salt and oil.
- Sodium Reduction: Omit added salt in flour mixture; rely on herbs, citrus, and spice blends. Choose unsalted butter for panko toasting. Opt for low-sodium cotija or omit cheese entirely.
- Blood Sugar Friendly: Pair with high-fiber sides (roasted cauliflower rice, black bean & corn salad) to slow glucose absorption. Avoid sugary bottled sauces—make homemade crema with plain Greek yogurt instead of sour cream.
- Heart Health Focus: Use avocado or olive oil for frying (rich in monounsaturated fats). Include omega-3–rich toppings: chopped walnuts, hemp seeds, or flax oil drizzle.
- Digestive Wellness: Fermented toppings like house-made curtido (salvadoran cabbage slaw) or lacto-fermented jalapeños boost probiotics. Lime juice aids protein digestion via gastric acid stimulation.
- Allergen Awareness: Clearly label for common allergens: egg (breading), dairy (cheese, crema), wheat (if using flour tortillas or regular soy sauce), tree nuts (in some panko blends), and shellfish (if adding shrimp garnish).
- Portion Mindfulness: Serve with a generous side salad (massaged kale + jicama + orange segments) to increase volume and nutrient density without excess calories.
Importantly, crispy chicken tacos need not be “unhealthy” to be delicious. When prepared with whole-food ingredients, mindful techniques, and balanced accompaniments, they align seamlessly with Mediterranean, DASH, and flexitarian dietary patterns—proving nutrition and indulgence coexist beautifully.
Ingredients
- 1 pound boneless, skinless chicken thighs (or breasts), cut into ½-inch thick strips
- 1 cup buttermilk (or DIY: 1 cup whole milk + 1 tbsp lemon juice/vinegar, rested 10 min)
- ¾ cup all-purpose flour (or gluten-free 1:1 blend)
- ¼ cup cornstarch (non-negotiable for crunch)
- 2 tablespoons chili powder
- 1 tablespoon ground cumin
- 1 tablespoon smoked paprika
- 2 teaspoons garlic powder
- 2 teaspoons onion powder
- 1 teaspoon dried oregano
- 1½ teaspoons kosher salt (plus more to taste)
- 1 teaspoon freshly ground black pepper
- 2 large eggs
- 1 teaspoon Dijon mustard
- 1 teaspoon hot sauce (e.g., Cholula or Tapatío)
- 1 cup panko breadcrumbs (toasted in 1 tbsp butter until golden, then cooled)
- 4–6 cups neutral high-smoke-point oil (peanut, avocado, or refined safflower) for frying
- 8–12 (6-inch) corn tortillas (or flour, if preferred)
- 1 cup shredded iceberg or romaine lettuce
- ½ cup finely diced white or red onion
- ½ cup crumbled queso fresco or cotija cheese
- ¼ cup fresh chopped cilantro
- Lime wedges, for serving
- For Chipotle Crema: ½ cup full-fat sour cream (or Mexican crema), 1–2 canned chipotles in adobo (minced), 1 tbsp adobo sauce, juice of ½ lime, pinch of salt
Directions
- In a medium non-reactive bowl, combine chicken strips and buttermilk. Stir in 1 tsp salt and 1 tsp black pepper. Cover and refrigerate for 30 minutes to 2 hours.
- Meanwhile, prepare three shallow stations: (1) Whisk flour, cornstarch, chili powder, cumin, smoked paprika, garlic powder, onion powder, oregano, remaining salt, and pepper. (2) In a second bowl, whisk eggs, Dijon, and hot sauce until smooth. (3) In a third bowl, place toasted panko.
- Remove chicken from buttermilk one piece at a time, letting excess drip off (do not shake or pat dry). Dredge thoroughly in seasoned flour mixture, shaking off excess. Dip into egg mixture, coating completely. Press firmly into panko, ensuring full, even coverage. Place breaded chicken on a wire rack set over parchment paper.
- Let breaded chicken rest uncovered at room temperature for 10–15 minutes.
- Heat oil in a heavy-bottomed Dutch oven or deep fryer to 350–365°F, using a thermometer for accuracy.
- Fry chicken in small batches (3–4 pieces at a time) for 1 minute 30 seconds, flip, and cook another 1–1½ minutes until golden brown and internal temperature reaches 165°F. Transfer immediately to a wire rack to drain.
- While chicken fries, heat tortillas one at a time on a dry cast-iron skillet over medium-high heat for 25–30 seconds per side until soft and lightly blistered. Keep warm wrapped in a clean kitchen towel or foil.
- Make chipotle crema: Whisk sour cream, minced chipotles, adobo sauce, lime juice, and salt until smooth. Chill until ready to use.
- To assemble: Place 1–2 crispy chicken strips in center of warm tortilla. Top with lettuce, onion, cheese, and cilantro. Drizzle generously with chipotle crema and finish with a generous squeeze of fresh lime juice.
- Serve immediately with extra lime wedges, crema, and optional sides like Mexican street corn or black bean salad.
FAQ
- Can I bake these instead of frying?
- Yes—with caveats. Arrange breaded chicken on a wire rack over a parchment-lined sheet pan. Spray generously with avocado oil. Bake at 425°F for 14–16 minutes, flipping halfway, until golden and 165°F internally. Texture will be crisp-edged but not shatteringly crunchy—ideal for lower-oil needs.
- Why does my breading fall off?
- Most commonly: skipping the rest step, overcrowding the fryer (drops oil temp), using cold chicken straight from fridge (causes violent splatter + uneven adhesion), or not pressing panko firmly onto the egg-coated chicken. Also ensure chicken is patted *slightly* dry before flouring—not soaked, but not dripping.
- Can I make these ahead of time?
- You can prep and bread chicken up to 1 day ahead—store covered on a wire rack in the fridge. Do *not* fry ahead and reheat in microwave (ruins texture). Instead, fry just before serving, or reheat in oven/air fryer as directed in Tips section.
- What’s the best oil for frying?
- High smoke point + neutral flavor = optimal. Peanut oil (450°F) is classic and affordable. Avocado oil (520°F) is premium, heart-healthy, and virtually flavorless. Safflower and sunflower oils also excel. Avoid olive oil, butter, or unrefined coconut oil.
- Are corn tortillas gluten-free?
- 100% corn tortillas made from masa harina and water are naturally gluten-free—but always verify packaging for “certified gluten-free,” especially for those with celiac disease, as cross-contamination in facilities is common.
- How do I keep tacos from getting soggy?
- Three pillars: (1) Drain fried chicken on a wire rack—not paper towels; (2) Pat *all* wet toppings (tomatoes, onions, lettuce) bone-dry; (3) Assemble *only* when ready to eat—never pre-fill and wait. Sauce goes on last, right before biting.
- Can I freeze breaded chicken?
- Absolutely. Place breaded, uncooked chicken in a single layer on a parchment-lined tray. Freeze solid (2 hrs), then transfer to airtight freezer bag. Cook from frozen—add 1–2 minutes to fry time. Never thaw before frying (creates steam pockets and oil spatter).
- What can I use instead of panko?
- Crushed cornflakes, crushed melba toast, or even crushed plantain chips yield excellent crunch and gluten-free compatibility. Avoid fine breadcrumbs—they compact and steam instead of crisp.
- How spicy are these by default?
- Moderate—chili powder and smoked paprika