Introduction
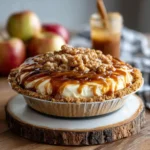
Welcome to the ultimate indulgence: the Lotus Biscoff Cheesecake Pie — a harmonious fusion of creamy New York–style cheesecake, rich caramelized speculoos magic, and buttery shortbread texture, all elegantly encased in a crisp, spiced Biscoff cookie crust. This isn’t just a dessert; it’s a sensory experience that marries the nostalgic warmth of Belgian cinnamon-spiced cookies with the luxurious silkiness of oven-baked (or no-bake!) cheesecake. Whether served at holiday gatherings, summer barbecues, bridal showers, or as a well-deserved “me-time” treat, this pie delivers bold flavor, stunning visual appeal, and unforgettable texture contrast — crunchy, creamy, crumbly, and velvety — all in one generous slice. Its viral popularity on TikTok, Instagram, and food blogs is no accident: it’s approachable for home bakers yet impressive enough for seasoned pastry enthusiasts.
The History
The Lotus Biscoff Cheesecake Pie is a brilliant example of modern global dessert evolution — born not in a centuries-old patisserie, but in the dynamic crossroads of social media innovation and ingredient accessibility. Its roots trace back to the 1930s, when Lotus Bakeries (then called “Lotus Suikerbakkerij”) began producing Biscoff — a caramelized, spiced biscuit inspired by traditional Belgian speculoos cookies, originally crafted for passengers aboard the Belgian National Railways. The iconic spread, Biscoff Cookie Butter, launched in 2007, ignited a worldwide craze for its deep molasses-like sweetness, warm notes of cinnamon, ginger, nutmeg, and clove, and unmistakable toasted brown sugar aroma. By the early 2010s, American home bakers began experimenting with Biscoff in cookies, frostings, and bars. The pivotal moment arrived around 2018–2019, when food creators started layering Biscoff into classic cheesecake formats — first as swirls, then as full crusts, and eventually as both crust *and* filling enhancer. The “pie” iteration gained traction as bakers sought a more rustic, sliceable, less intimidating alternative to tall springform cheesecakes — leveraging the pie plate’s wide surface area for dramatic Biscoff drizzle garnishes, visible crust layers, and easy portion control. Today, it stands as a beloved staple in recipe collections across the U.S., UK, Canada, Australia, and beyond — a testament to how heritage ingredients can be reimagined with joyful creativity.
Ingredients Breakdown
Every extraordinary dessert begins with intention — and this pie is no exception. Below is a meticulous, chef-level breakdown of each component, including *why* each ingredient matters, functional roles, and subtle nuances that elevate authenticity and texture:
For the Biscoff Cookie Crust:
- Lotus Biscoff Cookies (27–30 cookies, ~250g): The soul of the crust. Their high caramelized sugar content ensures natural binding when pulsed finely and melted with butter. Avoid generic “speculoos” imitations — only authentic Lotus Biscoff delivers the precise balance of spice, malt, and roasted depth. Whole cookies (not sandwich-style) are essential for optimal crunch-to-butter ratio.
- Unsalted Butter (6 tbsp / 85g, melted): Acts as the structural binder and flavor amplifier. Melted (not browned) butter coats each crumb evenly, enabling tight compaction. Salted butter may oversalt the crust — unsalted gives full control.
- Granulated Sugar (1–2 tbsp): Optional but recommended — enhances caramelization during pre-baking and balances the cookies’ inherent bitterness from roasted sugars.
- Pinch of Flaky Sea Salt (e.g., Maldon): A secret weapon. Added *after* baking, it heightens sweetness perception and adds textural intrigue against the smooth filling.
For the Creamy Biscoff Cheesecake Filling:
- Cream Cheese (24 oz / 680g, full-fat, room temperature): Must be *fully softened* (65–70°F) — cold cream cheese causes lumps; overheated leads to curdling. Philadelphia brand is preferred for consistency, but any high-quality full-fat block works. Low-fat or spreadable versions lack sufficient fat and protein structure, risking weeping or graininess.
- Granulated Sugar (1 cup / 200g): Not just for sweetness — it aids in aeration during mixing and stabilizes the emulsion. Confectioners’ sugar is *not* recommended here (cornstarch interferes with texture).
- Full-Fat Sour Cream (⅔ cup / 160g): Adds tang, moisture, and tenderizing lactic acid. Prevents over-firmness and contributes to that signature “cloud-soft” bite. Light or nonfat sour cream lacks fat needed for richness and may cause separation.
- Heavy Whipping Cream (⅓ cup / 80ml, cold): Enhances lush mouthfeel and helps control density. Cold cream prevents premature softening of the batter during mixing.
- Large Eggs (3, room temperature, plus 1 yolk): Eggs provide structure via coagulation during baking. The extra yolk adds emulsifying lecithin and luxurious richness without toughness. Cold eggs risk curdling the warm batter — always bring to room temp (15–20 min out of fridge).
- Pure Vanilla Extract (2 tsp): Complements Biscoff’s spices without competing. Avoid imitation — its alcohol base and complex phenolic notes deepen the overall profile.
- Lotus Biscoff Cookie Butter (¾ cup / 225g, smooth, room temperature): The star flavor agent. Use *only* the original smooth spread — not crunchy, not reduced-sugar, not off-brand. Stir well before measuring (oil separation is normal). Its high sugar and oil content necessitates careful folding to avoid overmixing.
- Unsweetened Cornstarch (1½ tsp): A critical insurance policy. Reinforces protein network, minimizes cracking, absorbs excess moisture, and yields a firmer yet still creamy set — especially vital when adding wet, oily Biscoff butter.
For the Signature Biscoff Drizzle & Garnish:
- Additional Lotus Biscoff Cookie Butter (¼ cup / 75g): Warmed gently (microwave in 5-sec bursts) until fluid but *not hot*. Ensures glossy, ribbon-like drizzle that sets with a delicate sheen.
- Crushed Lotus Biscoff Cookies (2–3 tbsp): For textural contrast and visual pop. Pulse briefly — aim for coarse sand, not dust.
- Optional Luxe Upgrades: Flaky sea salt flakes, edible gold dust, caramelized white chocolate shavings, or a quenelle of Biscoff-infused whipped cream.
Step-by-Step Recipe
This detailed, fail-safe method includes pro tips, timing cues, and troubleshooting checkpoints — designed to guide bakers from first pulse to final slice:
Step 1: Prepare & Preheat
Position oven rack in center position. Preheat oven to 325°F (163°C). Grease a standard 9-inch (23 cm) deep-dish pie plate (not a shallow tart pan) with unsalted butter or nonstick spray. Line the bottom with a round of parchment paper for effortless release — an often-overlooked step that guarantees clean slices every time.
Step 2: Make the Biscoff Crust
In a food processor, pulse whole Lotus Biscoff cookies until reduced to fine, even crumbs (about 30 seconds — avoid over-pulsing into paste). Transfer to a medium bowl. Add melted butter and optional granulated sugar; stir vigorously with a spatula or fork until *every* crumb is uniformly moistened and resembles wet sand. Pinch a handful — it should hold together firmly without crumbling. If too dry, add ½ tsp more melted butter. Press mixture evenly into the bottom *and up the sides* of the prepared pie plate, using the flat bottom of a measuring cup or glass for maximum compaction. Aim for ¼-inch thickness on bottom and ½-inch up the sides. Chill uncovered in freezer for 15 minutes (this prevents slumping during baking).
Step 3: Blind-Bake the Crust
Bake chilled crust for 12–14 minutes, until fragrant, lightly golden, and set. Do not underbake — a soggy crust will absorb filling moisture and turn gummy. Cool completely on a wire rack (minimum 30 minutes). While cooling, reduce oven temp to 300°F (149°C) — lower heat ensures gentle, even baking and minimizes cracks.
Step 4: Whip the Filling Base
In a large bowl, beat softened cream cheese with an electric mixer on medium-low for 1 minute — just until smooth and creamy (no air yet). Scrape bowl thoroughly. Add sugar and beat 2 minutes more until fully incorporated and slightly fluffy. Scrape again. Add sour cream and heavy cream; beat 1 minute until homogenous. Scrape. Add eggs one at a time, beating *just until yolk disappears* after each addition (approx. 15 seconds per egg). Overbeating incorporates excess air → cracks. Add vanilla and beat 10 seconds. Finally, add cornstarch and beat 15 seconds to disperse.
Step 5: Fold in the Biscoff Magic
In a separate small bowl, stir Biscoff cookie butter until smooth and pliable (if stiff, microwave 5 seconds). Using a silicone spatula, gently fold into the cream cheese mixture in two additions. Use slow, sweeping motions from bottom to top — *do not stir or whisk*. Stop as soon as no streaks remain (usually 20–25 folds). Overmixing introduces gluten development and air pockets — both lead to cracks and uneven texture. Batter should be thick, glossy, and uniformly tan-brown.
Step 6: Bake Low & Slow
Pour batter into cooled crust. Tap pie plate firmly on counter 3 times to release air bubbles. Run a knife gently around inner edge to loosen any batter clinging to side — this promotes even shrinkage and prevents pulling away from crust. Place pie plate on a parchment-lined baking sheet (for spill protection and even heat distribution). Bake at 300°F for 65–75 minutes. It’s done when edges are puffed and set, center jiggles *slightly* like Jell-O (not liquid), and internal temperature reads 150–152°F (65–67°C) on an instant-read thermometer inserted 1 inch from center. Do not open oven door before 60 minutes — temperature fluctuations cause collapse.
Step 7: The Essential Cool-Down Ritual
Turn off oven. Crack oven door open 1 inch with a wooden spoon handle. Let pie cool inside for 1 hour — this gradual temperature drop prevents dramatic contraction and surface fissures. Remove from oven and cool on wire rack for another 2 hours at room temperature. Then, cover loosely with plastic wrap (touching surface to prevent condensation) and refrigerate *uncovered* for minimum 12 hours — preferably 24–48 hours. This chilling period allows starches to fully hydrate, proteins to relax, and flavors to meld. Skipping this = soft, unstable slices and muted flavor.
Step 8: Garnish & Serve
Just before serving, gently warm reserved Biscoff cookie butter (5–10 sec microwaves) until fluid. Drizzle artistically over chilled pie using a spoon or piping bag. Sprinkle with crushed cookies and flaky salt. For clean cuts, dip a sharp, thin-bladed knife in hot water, wipe dry, and slice — repeating between each slice. Serve chilled, never straight from freezer (too firm) or fridge (too cold to taste fully).
Tips
- Room Temperature is Non-Negotiable: All dairy and eggs must be truly room temp (65–70°F). Cold ingredients cause lumps, curdling, and uneven baking. Plan ahead — take them out 2+ hours before starting.
- No Substitutions for Biscoff: Generic speculoos spreads vary wildly in oil/sugar ratios and spice blends. Only authentic Lotus Biscoff delivers reliable results and true flavor.
- Scrape Religiously: Scrape bowl and beater after *every single step*. Unmixed pockets of cream cheese or sugar create dense spots and graininess.
- Water Bath? Not Required — But Here’s Why: Traditional cheesecakes use a water bath to buffer heat. This pie’s lower bake temp, cornstarch reinforcement, and pie-plate geometry make it naturally crack-resistant. However, if you prefer ultra-smooth tops, place pie plate inside a larger roasting pan and pour hot water halfway up sides before baking.
- Freezing Works Brilliantly: Fully chilled, unwrapped pie freezes beautifully for up to 3 months. Wrap tightly in plastic + foil. Thaw overnight in fridge, then bring to cool room temp (15–20 min) before slicing and garnishing.
- Fixing Cracks? Embrace Them: A hairline crack is normal. Hide it with generous Biscoff drizzle, whipped cream rosettes, or a dusting of cinnamon-Biscoff powder (blend 1 tbsp cookies + ¼ tsp cinnamon).
- Why Deep-Dish? Standard 9″ pie plates hold ~4 cups — perfect volume for this filling. Shallow plates overflow; springforms lack the defined rim for clean slices and elegant presentation.
Variations and Customizations
This recipe is a vibrant canvas — adaptable for dietary needs, seasonal flair, or pure whimsy. Each variation maintains structural integrity while offering distinct personality:
Oven-Baked vs. No-Bake Options
- Oven-Baked (Classic): Richer, denser, with caramelized depth. Ideal for those who love traditional cheesecake texture.
- No-Bake Version: Replace baked crust with chilled pressed crust. For filling: whip 1½ cups cold heavy cream to stiff peaks; fold into mixture of 16 oz softened cream cheese, ⅓ cup powdered sugar, 2 tbsp lemon juice, 1 tsp vanilla, and ½ cup Biscoff butter. Pour into crust. Chill 8+ hours. Lighter, fluffier, and faster — perfect for summer or novice bakers.
Dietary Adaptations
- Gluten-Free: Use certified GF Lotus Biscoff cookies (available in EU/UK; verify label) or a GF speculoos-style cookie. Ensure Biscoff spread is GF (it is — no barley, wheat, or rye).
- Lower-Sugar: Substitute ½ cup monk fruit erythritol blend for granulated sugar. Reduce Biscoff butter to ½ cup and add 2 tbsp unsweetened applesauce for moisture. Note: texture will be slightly softer.
- Vegan: Use vegan cream cheese (Kite Hill or Miyoko’s), coconut cream instead of sour cream/heavy cream, flax eggs (3 tbsp ground flax + 9 tbsp water), and vegan butter in crust. Biscoff spread is already vegan (check label — it is).
Flavor & Texture Twists
- Biscoff Swirl: Reserve ⅓ cup Biscoff butter. After pouring filling, dollop over top and drag a toothpick through in figure-eights for marble effect.
- Espresso-Kissed: Add 1 tbsp instant espresso powder to dry ingredients in crust; stir 1 tsp into filling with vanilla for deep, roasted nuance.
- Maple-Biscoff Fusion: Replace 2 tbsp granulated sugar with pure maple syrup in filling; garnish with candied pecans.
- Spiced Pear & Biscoff: Fold in 1 cup finely diced, poached pear (in ginger syrup) into filling before baking.
- Chocolate-Biscoff Layer: Spread ¼ cup melted dark chocolate (70%) over baked, cooled crust before adding filling.
Seasonal & Occasion Editions
- Valentine’s: Heart-shaped cookie garnish; rosewater-infused whipped cream.
- Holiday: Crushed candy cane + Biscoff drizzle; peppermint extract (¼ tsp) in filling.
- Spring Brunch: Lemon-zest infused filling; fresh berries and mint.
- Summer BBQ: Serve with grilled peaches and a bourbon-Biscoff glaze.
Health Considerations and Nutritional Value
While undeniably decadent, understanding this dessert’s nutritional landscape empowers mindful enjoyment — without guilt, but with awareness:
Nutritional Snapshot (Per Standard Slice, 1/12 of Pie):
- Calories: ~420–460 kcal
- Total Fat: 28–31g (17–19g saturated)
- Carbohydrates: 38–42g (26–29g sugars)
- Protein: 6–7g
- Fiber: 0.5–0.8g (naturally low — enhanced by adding 1 tbsp ground flax to crust)
- Sodium: 220–260mg
Key Health Notes:
- Sugar Content: Primarily from Biscoff cookies/butter (caramelized sucrose + glucose/fructose) and added sugar. While not “health food,” it contains no HFCS, artificial colors, or preservatives — a cleaner indulgence than many commercial desserts.
- Healthy Fats? Yes — cream cheese and butter contain conjugated linoleic acid (CLA) and vitamins A/D/K2 in small amounts. Biscoff butter provides monounsaturated fats from palm oil (sustainably sourced by Lotus). Moderation remains key.
- Digestibility: Full-fat dairy supports satiety and slows sugar absorption. Lactose-intolerant? Try lactose-free cream cheese and sour cream — texture remains excellent.
- Allergens: Contains milk, wheat (gluten), soy (lecithin in Biscoff spread), and sometimes egg. Always verify labels if severe allergies exist.
- Mindful Serving Tip: Pair one slice with a cup of herbal tea (peppermint or ginger) and a small handful of almonds — balances richness and adds fiber/protein for sustained energy.
Ingredients
Makes one 9-inch pie (12 servings)
- For the Crust:
27–30 Lotus Biscoff cookies (about 250g)
6 tablespoons (85g) unsalted butter, melted
1 tablespoon granulated sugar (optional but recommended)
Pinch of flaky sea salt, for finishing - For the Filling:
24 ounces (680g) full-fat cream cheese, room temperature
1 cup (200g) granulated sugar
⅔ cup (160g) full-fat sour cream, room temperature
⅓ cup (80ml) cold heavy whipping cream
3 large eggs + 1 large egg yolk, room temperature
2 teaspoons pure vanilla extract
¾ cup (225g) smooth Lotus Biscoff cookie butter, room temperature
1½ teaspoons unsweetened cornstarch - For Garnish:
¼ cup (75g) smooth Lotus Biscoff cookie butter, warmed
2–3 tablespoons crushed Lotus Biscoff cookies
Flaky sea salt, for finishing
Directions
- Preheat oven to 325°F (163°C). Grease a 9-inch deep-dish pie plate and line bottom with parchment paper.
- In food processor, pulse Biscoff cookies until fine crumbs form. Transfer to bowl; stir in melted butter and optional sugar until mixture resembles wet sand. Press firmly into pie plate bottom and up sides. Freeze 15 minutes.
- Bake crust 12–14 minutes until fragrant and golden. Cool completely on wire rack (30+ min). Reduce oven to 300°F (149°C).
- In large bowl, beat cream cheese on medium-low 1 minute until smooth. Add sugar; beat 2 minutes. Scrape bowl. Add sour cream and heavy cream; beat 1 minute. Scrape. Add eggs one at a time, beating just until blended after each. Add vanilla; beat 10 seconds. Add cornstarch; beat 15 seconds.
- Stir Biscoff butter until smooth. Gently fold into cream cheese mixture in two additions until fully incorporated and uniform. Do not overmix.
- Pour filling into cooled crust. Tap plate firmly to release air bubbles. Run knife around edge. Place on parchment-lined baking sheet.
- Bake 65–75 minutes at 300°F until edges are set and center jiggles slightly. Internal temp should read 150–152°F (65–67°C).
- Turn off oven. Crack door open 1 inch with spoon handle. Cool pie in oven 1 hour. Remove and cool on rack 2 hours.
- Cover loosely with plastic wrap (touching surface) and refrigerate minimum 12 hours — ideally 24–48 hours.
- Before serving, warm reserved Biscoff butter until fluid. Drizzle over pie. Sprinkle with crushed cookies and flaky salt. Slice with hot, wiped knife.
FAQ
- Can I use Biscoff spread labeled “crunchy”?
- Avoid crunchy spread in the filling — texture becomes gritty and uneven. Save it for garnish! Smooth is mandatory for silky filling.
- Why did my crust stick to the pie plate?
- Likely due to missing parchment liner or insufficient buttering. Also ensure crust is *fully cooled* before adding filling — residual heat melts butter and loosens adhesion.
- My filling cracked — can I save it?
- Absolutely. Generous Biscoff drizzle conceals cracks beautifully. Or top with a swoosh of Biscoff-whipped cream and toasted cookie crumbles.
- Can I make this ahead for a party?
- Yes! It improves with time. Bake and chill 2 days ahead. Add garnish no more than 2 hours before serving to preserve drizzle sheen.
- Is there a way to make it lighter?
- Try “light” version: substitute half cream cheese with 12 oz low-fat ricotta (well-drained), reduce sugar to ¾ cup, and add 1 tbsp lemon juice for brightness. Texture will be slightly looser but still delicious.
- What if I don’t have a food processor?
- Place cookies in a heavy-duty zip-top bag. Use a rolling pin to crush into fine crumbs — takes 2–3 minutes. Sift through a mesh strainer to remove large shards.
- Can I use a springform pan instead?
- You can — but pie plates yield superior crust-to-filling ratio and cleaner slices. If using springform, line bottom with parchment, wrap exterior tightly in foil (to prevent water bath leaks), and follow same bake times.
- How do I store leftovers?
- Cover tightly with plastic wrap (pressed to surface) and refrigerate up to 5 days. For longer storage, freeze whole pie (wrapped in plastic + foil) up to 3 months.
Summary
The Lotus Biscoff Cheesecake Pie is a masterclass in balanced indulgence — where deeply spiced, caramelized Belgian cookie essence meets luxuriously creamy, perfectly set cheesecake in a buttery, crisp crust, all crowned with glossy Biscoff drizzle and textural flourish. It’s a showstopping, reliably delicious dessert that’s surprisingly approachable to make, endlessly customizable, and guaranteed to spark joy (and requests for the recipe) at every gathering.
Built on technique-driven steps, quality ingredients, and patient chilling, this pie transforms humble pantry staples into an unforgettable centerpiece — proving that the most magical desserts aren’t complicated, but thoughtfully composed, generously spiced, and unapologetically delicious.