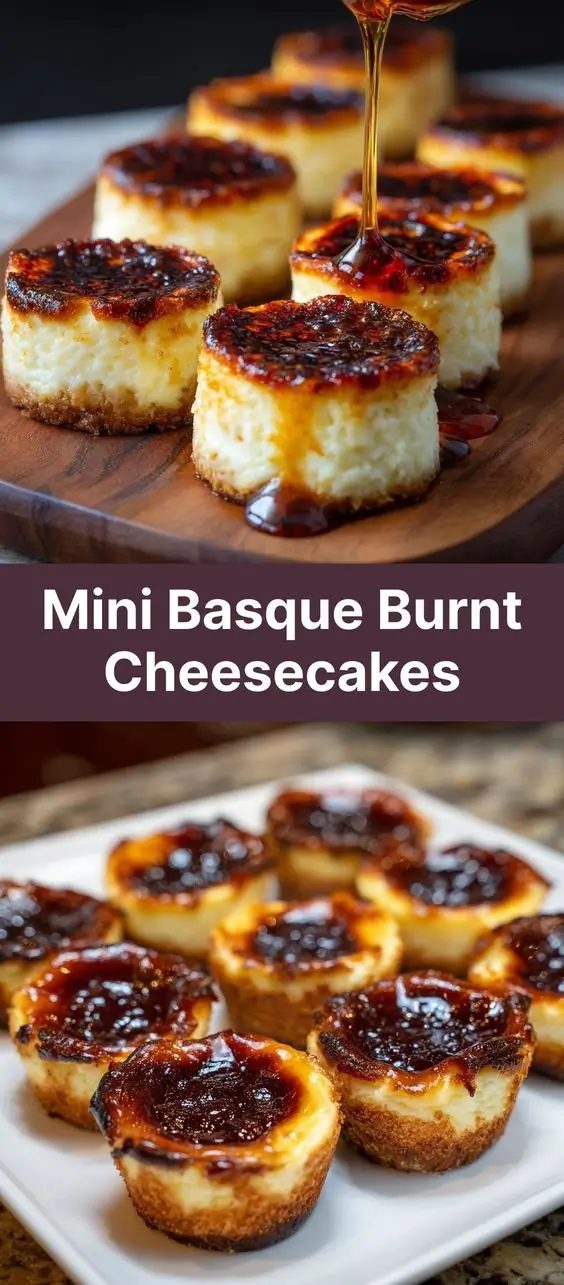
Mini Basque Burnt Cheesecakes: A Decadent Delight with a Charred Crown
Introduction
The Mini Basque Burnt Cheesecake has taken the dessert world by storm, captivating bakers and food lovers alike with its audacious appearance and luscious texture. Unlike traditional cheesecakes that pride themselves on smooth perfection, this Spanish-inspired treat celebrates imperfection—its deep golden-brown to almost black exterior conceals a creamy, custard-like interior that melts in your mouth. These individual-sized desserts are not only visually dramatic but also incredibly satisfying, offering a bold contrast between their slightly caramelized crust and velvety center. Perfect for dinner parties, afternoon tea, or as an elegant addition to any dessert spread, mini Basque burnt cheesecakes are as fun to make as they are to eat.
The History
The origin of the burnt cheesecake traces back to the Basque Country, a culturally rich region straddling northern Spain and southwestern France. Specifically, it was created at La Viña, a beloved bar and restaurant in San Sebastián (Donostia), around the 1970s. Legend has it that the head chef, Santiago Rivera, accidentally overbaked his classic cheesecake. Instead of discarding it, he served it anyway—and to everyone’s surprise, customers raved about the dark, custardy, almost smoky flavor. The “burnt” effect wasn’t truly burning, but rather a deep caramelization from high-heat baking that transformed the top into a flavorful crust while leaving the inside luxuriously soft.
This happy accident sparked a culinary sensation. Over decades, La Viña’s burnt cheesecake gained cult status, drawing tourists from around the world just to taste the iconic dessert. In recent years, thanks to social media platforms like Instagram and TikTok, the recipe exploded globally, especially in the form of mini versions. Bakers loved how the individual ramekins made portion control easy and presentation stunning. Today, the mini Basque burnt cheesecake is a symbol of modern rustic elegance—a dessert that turns flaws into art.
Ingredients Breakdown
Creating perfect mini Basque burnt cheesecakes hinges on using high-quality ingredients in precise ratios. Here’s a detailed look at each component and why it matters:
- Cream Cheese (32 oz / 900g, full-fat): This is the foundation. Full-fat cream cheese ensures richness, body, and a smooth texture. Low-fat versions can result in a watery or grainy consistency. Make sure it’s softened to room temperature for even mixing.
- Granulated Sugar (1 cup / 200g): Adds sweetness and aids in browning. Sugar also helps create the custard-like texture during baking. Some bakers use a mix of white and brown sugar for deeper flavor, but traditional recipes stick to granulated.
- Eggs (4 large): Provide structure and leavening. Eggs help bind the mixture and contribute to the jiggle and silkiness of the interior. Use room-temperature eggs to avoid curdling.
- Heavy Cream (1½ cups / 360ml): Adds moisture and fat, making the cheesecake extra creamy. It also contributes to the custard formation during the high-heat bake. Do not substitute with milk or half-and-half.
- Vanilla Extract (2 tsp): Enhances flavor complexity without overpowering. Pure extract is preferred over imitation for a more authentic aroma.
- All-Purpose Flour (3 tbsp): A small amount stabilizes the mixture and prevents excessive cracking (though some cracks are expected and desired). Too much flour makes it cakey, too little and it may collapse.
- Salt (¼ tsp): Balances sweetness and enhances overall flavor. Even a tiny pinch elevates the taste profile significantly.
- Lemon Zest (optional, 1 tsp): Brightens the richness and adds a subtle citrus note. Not traditional but appreciated by those who want a touch of freshness.
- Butter (for greasing ramekins): Ensures easy release after baking. Some bakers line ramekins with parchment paper strips for extra security.
Step-by-Step Recipe
Follow these meticulous steps to achieve bakery-quality mini Basque burnt cheesecakes every time:
- Preheat Oven: Set your oven to 425°F (220°C). Position the rack in the center. Unlike traditional cheesecakes, no water bath is needed—this one thrives on dry, intense heat.
- Prepare Ramekins: Select six 4-ounce ramekins or similar oven-safe containers. Generously butter the insides, then lightly dust with flour, tapping out excess. Alternatively, cut parchment paper into squares and press them into the bottom and sides for effortless removal later.
- Beat Cream Cheese: In a large bowl, beat softened cream cheese with an electric mixer on medium speed until smooth and fluffy (about 2 minutes). Scrape down the sides frequently.
- Add Sugar: Gradually add granulated sugar and continue beating until fully incorporated and lightened in color. Avoid overbeating, which can introduce too much air.
- Incorporate Eggs: Add eggs one at a time, mixing just until each is absorbed. Pause to scrape the bowl after each addition. Overmixing at this stage can lead to puffing and cracking.
- Blend in Liquids: Slowly pour in heavy cream and vanilla extract while mixing on low. Mix only until uniform—do not whip.
- Add Dry Ingredients: Sift in flour and salt. Gently fold with a spatula or mix on the lowest setting until just combined. If using lemon zest, fold it in now.
- Strain the Batter (Optional but Recommended): For ultra-smooth results, strain the batter through a fine-mesh sieve into another bowl. This removes lumps and ensures silkiness.
- Fill Ramekins: Divide the batter evenly among the prepared ramekins, filling each about ¾ full. Tap gently on the counter to release air bubbles.
- Bake: Place ramekins directly on the oven rack (no baking sheet required, though some prefer one for stability). Bake for 25–30 minutes. Watch closely—the tops should be deeply bronzed, nearly black in spots, puffed slightly, and still jiggly in the center.
- Cool Gradually: Remove from oven and let cool in ramekins on a wire rack for 30 minutes. Then cover and refrigerate for at least 4 hours, preferably overnight. Chilling firms up the texture and deepens the flavor.
- Serve: Run a knife around the edges if needed, or invert onto plates if parchment-lined. Dust with powdered sugar, garnish with berries, or serve plain to highlight the charred beauty.
Tips
- Room-Temperature Ingredients Are Crucial: Cold cream cheese or eggs cause lumps and uneven baking. Take everything out 1–2 hours before starting.
- Don’t Fear the Dark Top: The “burnt” look is intentional. It’s not burned in the negative sense—it’s a deep Maillard reaction creating complex, toasty flavors.
- Avoid Opening the Oven: Resist peeking during the first 20 minutes. Temperature fluctuations can cause sinking or uneven browning.
- Use an Oven Thermometer: Many ovens run hot or cold. An accurate reading ensures proper caramelization without actual charring.
- Chill Before Serving: These taste best cold. The contrast between the firm outer layer and the molten center develops fully after refrigeration.
- Experiment with Pan Types: Ceramic ramekins yield softer edges; metal molds conduct heat faster and may darken quicker.
- Freeze for Later: Fully baked and chilled mini cheesecakes can be frozen (wrapped individually) for up to 2 months. Thaw in the fridge overnight.
Variations and Customizations
While the classic version is timeless, feel free to get creative:
- Flavored Extracts: Swap vanilla for almond, bourbon, coffee, or orange extract for a unique twist.
- Chocolate Swirl: Melt 2 oz dark chocolate and swirl into the batter before baking for a marbled effect.
- Fruit-Infused: Add puréed raspberries, passionfruit, or mango (reducing cream slightly to maintain consistency).
- Spiced Version: Add a pinch of cinnamon, nutmeg, or cardamom to the batter for warmth.
- Gluten-Free: Replace all-purpose flour with cornstarch or a gluten-free 1:1 baking blend.
- Dairy-Free: Use plant-based cream cheese (like Kite Hill), coconut cream, and flax eggs—but results may vary in texture.
- Mini Molds: Try silicone muffin tins, tartlet pans, or even cupcake liners for novelty shapes.
- Alcohol-Enhanced: Stir in 1–2 tbsp of Grand Marnier, Baileys, or rum for an adult version.
- Toppings: Serve with whipped cream, fruit compote, caramel sauce, or a sprinkle of sea salt.
- Crust Option: Though traditionally crustless, you can add a thin base of crushed graham crackers or digestive biscuits held together with melted butter.
Health Considerations and Nutritional Value
Mini Basque burnt cheesecakes are indulgent treats best enjoyed in moderation. Here’s a general nutritional breakdown per mini cheesecake (based on 6 servings):
- Calories: ~380–420 kcal
- Fat: ~35g (mostly saturated from cream cheese and cream)
- Carbohydrates: ~18g (primarily from sugar and flour)
- Protein: ~7g (from eggs and dairy)
- Sodium: ~250mg
- Sugar: ~16g
Health Notes:
- High in saturated fats, so those monitoring cholesterol should consume sparingly.
- Not suitable for low-sugar or diabetic diets unless modified with sugar substitutes (e.g., erythritol or monk fruit).
- Lactose-intolerant individuals may experience discomfort due to cream and cream cheese content.
- Packed with calcium and protein from dairy, offering some nutritional benefits alongside indulgence.
- To reduce calories, consider using reduced-fat cream cheese and less sugar, but expect changes in texture and browning.
Ingredients
- 32 oz (900g) full-fat cream cheese, softened
- 1 cup (200g) granulated sugar
- 4 large eggs, room temperature
- 1½ cups (360ml) heavy whipping cream
- 2 teaspoons pure vanilla extract
- 3 tablespoons all-purpose flour
- ¼ teaspoon fine sea salt
- 1 teaspoon lemon zest (optional)
- Butter, for greasing ramekins
- Powdered sugar, for dusting (optional)
Directions
- Preheat oven to 425°F (220°C). Grease six 4-oz ramekins with butter and line with parchment paper if desired.
- In a large bowl, beat cream cheese with an electric mixer until smooth and creamy, about 2 minutes.
- Add sugar gradually and beat until well combined and fluffy.
- Add eggs one at a time, mixing on low speed after each until just incorporated. Scrape down the bowl.
- Slowly pour in heavy cream and vanilla extract. Mix on low until smooth.
- Sift in flour and salt. Fold gently until no streaks remain. Add lemon zest if using.
- For best texture, strain the batter through a fine-mesh sieve into a clean bowl.
- Divide batter evenly among ramekins. Tap gently to remove air bubbles.
- Place ramekins directly on the oven rack. Bake for 25–30 minutes, or until tops are deeply browned and centers still wobble slightly.
- Remove from oven and cool on a wire rack for 30 minutes.
- Refrigerate uncovered for at least 4 hours, or ideally overnight.
- Before serving, dust with powdered sugar and garnish as desired. Serve cold.
FAQ
Q: Why is my cheesecake too runny inside?
A: This could result from underbaking or using cold ingredients. Ensure the oven is fully preheated and the center jiggles only slightly when shaken gently.
Q: Can I make these ahead of time?
A: Absolutely! They keep well in the fridge for up to 5 days and taste even better the next day. You can also freeze them for longer storage.
Q: Do I need a water bath?
A: No. The charm of Basque cheesecake lies in its direct exposure to high heat, which creates the signature charred top.
Q: Why did my cheesecake crack excessively?
A: Some cracking is normal and part of the aesthetic. However, overmixing, sudden temperature changes, or overbaking can worsen cracks.
Q: Can I double the recipe?
A: Yes, just ensure your oven has enough space for even airflow. Avoid overcrowding.
Q: What size ramekins should I use?
A: Standard 4-ounce ramekins work perfectly. Larger ones may require longer baking and risk uneven doneness.
Q: Is the black top safe to eat?
A: Yes. The dark color comes from caramelization, not burning. It adds a subtle toasted flavor, not bitterness.
Summary
Mini Basque burnt cheesecakes combine striking visuals with irresistibly creamy interiors, turning dessert into drama. Born from a happy accident in Spain, they’re now a global favorite for their simplicity and bold flavor.