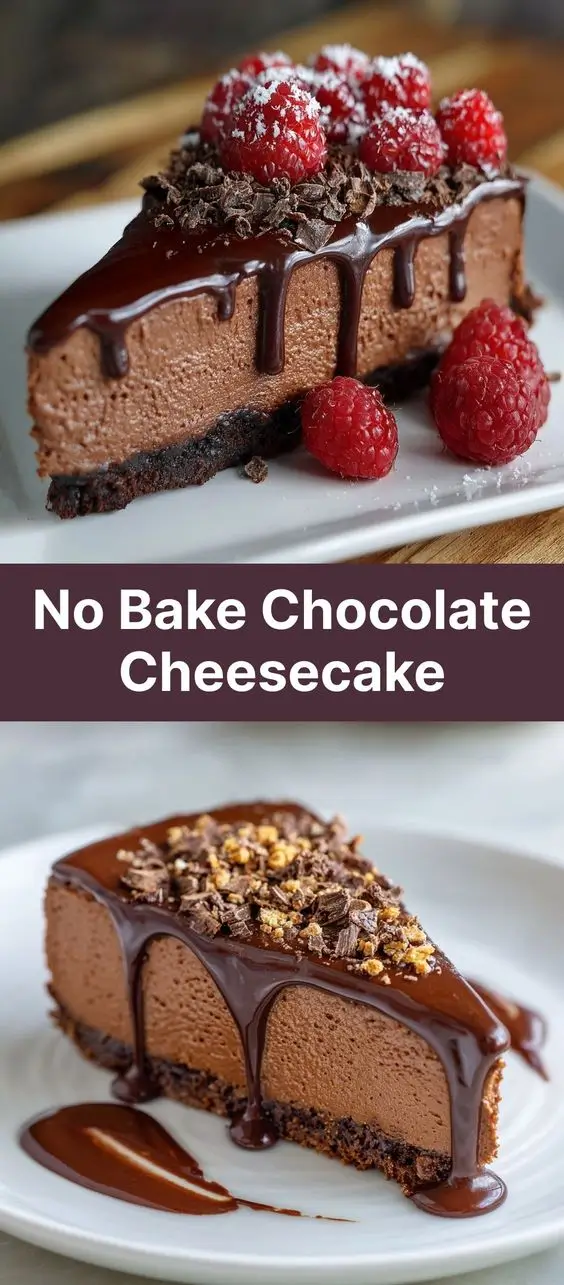
No Bake Chocolate Cheesecake: A Decadent Delight Without the Oven
The History of No Bake Cheesecake
The origins of cheesecake trace back thousands of years to ancient Greece, where it was served to athletes during the first Olympic Games in 776 BC. Made from simple ingredients like cheese, honey, and flour, early versions were more rustic than today’s luxurious iterations. Over time, cheesecake evolved through Roman and European culinary traditions, eventually making its way to America in the 18th century.
The concept of a “no bake” cheesecake emerged in the early 20th century with the advent of cream cheese—particularly the introduction of Philadelphia Cream Cheese in 1872—and the growing popularity of gelatin-based desserts. With refrigeration becoming common in households by the mid-1900s, chilled, set desserts gained favor for their convenience and refreshing texture. The no bake chocolate cheesecake, as we know it, likely became popular in the 1960s and 70s, when dessert recipes emphasized ease, elegance, and indulgence—perfect for dinner parties and holiday spreads.
Today, no bake chocolate cheesecake stands as a beloved staple in dessert culture, combining rich cocoa flavor with the creamy smoothness of traditional cheesecake—all without turning on the oven. It represents the perfect marriage of nostalgia and modern convenience, adored by home bakers and professional chefs alike.
Ingredients Breakdown: What Makes This Dessert So Irresistible?
The magic of a no bake chocolate cheesecake lies in its carefully balanced ingredients, each playing a crucial role in flavor, texture, and structure. Let’s dive into what goes into this luscious treat:
- Cream Cheese: The foundation of any cheesecake, full-fat cream cheese provides richness, body, and that signature tangy-sweet flavor. Always use brick-style cream cheese (not spreadable tubs) for best results.
- Heavy Cream (or Whipping Cream): Adds airiness and silkiness when whipped. It helps the filling set firmly while maintaining a melt-in-your-mouth consistency.
- Granulated Sugar: Sweetens the mixture and balances the acidity of the cream cheese. Powdered sugar can also be used for smoother texture.
- Cocoa Powder: Unsweetened natural or Dutch-process cocoa powder delivers deep chocolate flavor. Dutch-process tends to be smoother and less acidic, ideal for a refined taste.
- Dark Chocolate (optional but recommended): Melted dark chocolate enhances richness and gives a fudgy depth that cocoa alone can’t achieve.
- Vanilla Extract: Enhances overall flavor complexity and rounds out the sweetness.
- Lemon Juice or Vinegar (small amount): A touch of acid brightens the flavors and prevents the dessert from tasting flat or overly heavy.
- Gelatin (or agar-agar for vegan version): Acts as a setting agent to give the cheesecake its firm yet creamy texture. Unflavored gelatin is most commonly used.
- Digestive Biscuits or Graham Crackers: Forms the crust base. Their buttery, slightly sweet flavor complements the chocolate filling perfectly.
- Butter: Binds the crust crumbs together and adds richness. Melted unsalted butter is preferred for control over salt content.
- Salt: A pinch enhances all other flavors, especially chocolate.
Optional add-ins include chocolate chips, espresso powder (to intensify chocolate notes), liqueurs like Grand Marnier or Kahlúa, or even a swirl of peanut butter for a decadent twist.
Step-by-Step Recipe: How to Make No Bake Chocolate Cheesecake at Home
Follow this detailed guide to create a flawless no bake chocolate cheesecake that’s silky, rich, and impressively smooth.
Ingredients
- 250g (about 2 cups) digestive biscuits or graham crackers, finely crushed
- 100g (7 tbsp) unsalted butter, melted
- 600g (3 standard packages) full-fat cream cheese, softened to room temperature
- 150g (¾ cup) granulated sugar (adjust to taste)
- 60g (½ cup) unsweetened cocoa powder (Dutch-process preferred)
- 200ml (scant 1 cup) heavy whipping cream, cold
- 1 tsp pure vanilla extract
- 1 tbsp lemon juice (freshly squeezed)
- 1 pinch salt
- 10g (1 packet) unflavored gelatin
- 60ml (¼ cup) cold water
- 100g (3.5 oz) dark chocolate, melted and slightly cooled (optional, for extra richness)
- Chocolate shavings, whipped cream, berries (for garnish)
Directions
- Prepare the Crust: In a food processor or sealed bag with a rolling pin, crush the digestive biscuits or graham crackers into fine crumbs. Add the melted butter and mix until the crumbs are evenly moistened and resemble wet sand.
- Press the mixture firmly into the bottom and slightly up the sides of a 9-inch springform pan using the back of a spoon or flat glass. Chill in the refrigerator for at least 30 minutes to set.
- Bloom the Gelatin: In a small bowl, sprinkle the gelatin over cold water. Let it sit for 5–10 minutes to bloom (it will become thick and spongy). Then, gently heat in the microwave for 10–15 seconds or over a double boiler until fully dissolved and liquid. Set aside to cool slightly (but not set).
- Beat the Cream Cheese: In a large mixing bowl, beat the softened cream cheese with an electric mixer until smooth and creamy, about 2–3 minutes. Scrape down the sides as needed.
- Add sugar, cocoa powder, vanilla extract, lemon juice, and salt. Beat on medium speed until fully combined and smooth. If using melted dark chocolate, add it now and blend until incorporated.
- Slowly drizzle in the bloomed gelatin while mixing continuously. This ensures even distribution and prevents lumps.
- In a separate bowl, whip the cold heavy cream to stiff peaks. Be careful not to over-whip, or it may turn grainy.
- Fold one-third of the whipped cream into the chocolate-cheese mixture to lighten it, then gently fold in the remaining cream until no streaks remain. Use a spatula and fold gently to preserve airiness.
- Pour the filling over the chilled crust, smoothing the top with the back of a spoon or offset spatula for a polished finish.
- Cover loosely with plastic wrap (avoid touching the surface to prevent sticking) and refrigerate for at least 6 hours, preferably overnight, to allow the cheesecake to set completely.
- Before serving, remove the sides of the springform pan. Garnish with chocolate curls, fresh berries, a dusting of cocoa, or a swirl of whipped cream for visual appeal.
Tips for the Perfect No Bake Chocolate Cheesecake
- Room Temperature Cream Cheese is Crucial: Cold cream cheese leads to lumps. Let it sit out for 1–2 hours before starting.
- Don’t Skip the Chill Time for the Crust: A pre-chilled crust holds its shape better and prevents sogginess.
- Whip Cream Properly: Ensure your bowl and beaters are cold. Over-whipping can cause curdling; stop when stiff peaks form.
- Use a Springform Pan: Essential for easy release without damaging the delicate layers.
- Avoid Condensation: When covering the cheesecake, make sure plastic wrap doesn’t touch the surface. Alternatively, place a clean sheet of parchment paper directly on top before wrapping.
- Let it Set Overnight: While 6 hours works, 8–12 hours yields the firmest, slickest texture.
- Wipe the Knife Between Slices: For clean cuts, dip a sharp knife in hot water and dry it between each slice.
- Prevent Weeping: Avoid temperature fluctuations. Don’t place the cheesecake near the fridge fan or freezer compartment.
Variations and Customizations
The beauty of no bake chocolate cheesecake is its versatility. Here are some creative ways to personalize your dessert:
- White Chocolate Swirl: Melt white chocolate and drizzle it over part of the filling before swirling with a knife for a marbled effect.
- Mocha Version: Add 1–2 tsp instant espresso powder to the filling to enhance the chocolate flavor with a coffee kick.
- Peanut Butter Lover’s Twist: Swirl in ½ cup of warmed peanut butter or add a layer of peanut butter filling beneath the chocolate.
- Oreo Crust: Replace graham crackers with crushed Oreo cookies (filling included) for a cookies-and-cream style base.
- Mint Chocolate: Add ¼ tsp peppermint extract (do not exceed—mint is potent!) for a refreshing holiday-inspired treat.
- Fruity Fusion: Layer in raspberry jam or fresh berries at the base or create a berry compote topping.
- Gluten-Free Option: Use gluten-free cookies like Schär Digestive or GF graham crackers for the crust.
- Dairy-Free/Vegan: Substitute cream cheese with cashew cream or store-bought vegan cream cheese, use coconut cream instead of heavy cream, and replace gelatin with agar-agar.
- Alcohol Infusion: Add 1–2 tbsp of Baileys, Kahlúa, or bourbon to the filling for an adult-only version.
- Layered Cheesecake: Create a double-decker effect by adding a vanilla or strawberry layer underneath or on top.
Health Considerations and Nutritional Value
While undeniably delicious, no bake chocolate cheesecake is a high-calorie, high-fat dessert best enjoyed in moderation. Here’s a general nutritional breakdown per serving (based on 12 servings):
- Calories: ~400–450 kcal
- Total Fat: 30–35g (mostly saturated from cream, butter, and chocolate)
- Carbohydrates: 30–35g (including 20–25g sugar)
- Protein: 6–8g
- Sodium: 250–300mg
- Calcium: Moderate, from dairy ingredients
Considerations:
- High in Saturated Fat: Due to cream cheese, butter, and heavy cream. Those monitoring cholesterol should consume sparingly.
- Sugar Content: Can be reduced by using less sugar or sugar substitutes like erythritol or monk fruit, though texture may vary.
- Lactose Intolerance: Contains dairy; lactose-free alternatives are available for cream cheese and cream.
- Gluten Sensitivity: Easily adaptable with gluten-free crust options.
- Vegetarian-Friendly: Yes (if gelatin is acceptable). For vegans, agar-agar and plant-based substitutes make it suitable.
- Low-Carb/Keto Option: Possible with keto-friendly sweeteners, almond flour crust, and full-fat dairy. Count carbs from cocoa and adjust accordingly.
Despite its indulgence, this dessert can fit into a balanced diet when portion-controlled and reserved for special occasions.
Frequently Asked Questions (FAQ)
Can I make no bake chocolate cheesecake without gelatin?
Yes, though the texture will be softer. Alternatives include agar-agar (use 1 tsp dissolved in ¼ cup water), cornstarch (mix 1 tbsp with cold water and cook into filling), or simply relying on the whipped cream and chilling process. However, gelatin provides the best firmness and clean sliceability.
Why is my cheesecake runny?
This could be due to under-whipped cream, warm ingredients, insufficient chill time, or expired/inactive gelatin. Ensure all components are cold, gelatin is properly bloomed, and the cake chills for at least 6–8 hours.
Can I freeze no bake chocolate cheesecake?
Yes! Wrap tightly in plastic and place in an airtight container. Freeze for up to 1 month. Thaw overnight in the fridge before serving to maintain texture.
How long does it last in the fridge?
Up to 5 days when stored covered in the refrigerator. Beyond that, moisture loss and flavor degradation may occur.
Can I use milk instead of heavy cream?
No. Milk lacks the fat content needed to hold air when whipped and won’t provide the necessary structure. Always use heavy whipping cream (minimum 36% fat).
Why did my crust get soggy?
The filling may have been too warm when poured, or the crust wasn’t chilled beforehand. Pre-chill the crust and ensure the filling is cool (but not set) before pouring.
Can I make it in individual portions?
Absolutely! Use mason jars, parfait glasses, or silicone molds. Layer crust and filling, then chill. Great for parties!
Is this recipe safe during pregnancy?
Yes, as long as pasteurized dairy products are used and the recipe is kept refrigerated. Avoid raw eggs (this recipe doesn’t require them), so it’s generally safe.
Can I substitute cocoa powder with melted chocolate?
You can, but you’ll need to reduce other fats (like butter in crust) and possibly adjust sugar. Cocoa powder gives a more intense chocolate flavor without adding excess fat.
What size pan should I use?
A 9-inch springform pan is standard. Using a larger pan will yield a thinner cheesecake; smaller pans may require adjusting chill time.
Summary
No bake chocolate cheesecake is a sumptuous, no-fuss dessert that combines a buttery crust with a luxuriously creamy chocolate filling—set without an oven and perfect for any occasion.
With endless customization options, make-ahead convenience, and crowd-pleasing flavor, this classic treat deserves a permanent spot in your dessert repertoire.