Introduction
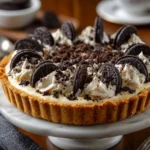
Welcome to the ultimate guide for No-Bake Oreo Cream Pie — a luscious, velvety, and effortlessly elegant dessert that’s as beloved at summer potlucks as it is on holiday dessert tables. With its crisp chocolate-cookie crust, luxuriously smooth vanilla-cream filling, and signature Oreo garnish, this no-bake classic delivers maximum flavor with minimum effort. Unlike traditional pies requiring oven time, blind baking, or temperamental custards, this version skips the heat entirely — making it perfect for sweltering days, beginner bakers, last-minute entertaining, or anyone craving rich, nostalgic comfort without the fuss. Whether you’re a seasoned home baker or just mastering your first dessert, this pie promises foolproof results, crowd-pleasing appeal, and that unmistakable “Oreo magic” in every bite.
The History
The No-Bake Oreo Cream Pie traces its roots to mid-20th-century American convenience cooking — an era defined by innovation in packaged foods, refrigerated desserts, and the rise of iconic brand-driven recipes. While exact origins are unrecorded, its evolution parallels the 1950s–60s boom of “refrigerator pies,” popularized through women’s magazines like Good Housekeeping and Ladies’ Home Journal, as well as Nabisco’s own promotional cookbooks. The introduction of stabilized whipped toppings (like Cool Whip in 1967) and the widespread availability of cream cheese and instant pudding further cemented the viability of no-bake formats. Oreo cookies — launched in 1912 and already a household staple by the 1940s — naturally became the go-to crust and garnish, their bittersweet cocoa wafers offering ideal structural integrity and bold contrast to sweet, creamy fillings. Over decades, regional adaptations emerged: Southern versions often include sour cream or lemon zest for brightness; Midwestern renditions lean into extra-thick whipped cream layers; and modern food bloggers have elevated it with gourmet touches like sea salt flakes, espresso-infused fillings, or vegan swaps — all while preserving the foundational simplicity that made it a cultural mainstay.
Ingredients Breakdown
Understanding each component not only ensures success but unlocks creative potential. Here’s an in-depth look at why each ingredient matters:
- Oreo Cookies (36 full cookies, ~280g): More than just flavor — their high cocoa content, sugar-glazed wafer structure, and natural oils create a crust that’s both sturdy and tender when blended. The iconic “creme” filling contributes subtle sweetness and emulsifying fats that help bind the crust. For best texture, use original Oreos (not Double Stuf or seasonal flavors), unless substituting intentionally.
- Unsalted Butter (6 tbsp / 85g, melted): Acts as the essential binder for the crust. Melted butter coats each cookie crumb evenly, enabling compression and cohesion during chilling. Unsalted butter gives precise control over sodium levels — critical when balancing the inherent saltiness of Oreos.
- Cream Cheese (8 oz / 227g, full-fat, room temperature): The backbone of the filling’s richness and stability. Full-fat ensures proper emulsification with other dairy components and prevents graininess or weeping. Room temperature is non-negotiable — cold cream cheese won’t whip smoothly and may cause lumps.
- Powdered Sugar (1 cup / 120g, sifted): Provides sweetness without grittiness and contributes to the filling’s airy, cloud-like texture. Sifting eliminates clumps that could compromise smoothness. Its fine granulation also aids in stabilizing the whipped structure.
- Vanilla Extract (2 tsp pure, not imitation): Deepens flavor complexity and rounds out the dairy notes. Pure extract contains over 200 aromatic compounds; imitation versions lack nuance and can taste artificial or medicinal when used in large quantities.
- Heavy Whipping Cream (1 ½ cups / 360ml, very cold): The engine of volume and lightness. Cold cream whips faster and holds stiffer peaks — crucial for supporting the dense cream cheese base. Fat content (≥36%) ensures stability; lower-fat alternatives (half-and-half, whole milk) will not whip properly.
- Instant Vanilla Pudding Mix (3.4 oz / 96g box): Functions as both thickener and flavor amplifier. Its starch blend (modified cornstarch + tapioca) gels quickly upon contact with cold liquid, preventing separation and lending luxurious body without cooking. Avoid “cook & serve” pudding — it requires heat activation and will not set correctly here.
- Whole Milk (1 ¼ cups / 300ml, cold): Hydrates the pudding mix and balances richness. Whole milk’s fat and protein content enhance mouthfeel and prevent curdling when mixed with acidic or warm elements. Skim or low-fat milk may yield a thinner, less cohesive filling.
- Additional Oreos (12–16 cookies, for garnish): Used whole, halved, or crushed — they add visual appeal, textural contrast, and aromatic intensity. Reserve some for the top just before serving to preserve crispness; pre-placing them risks softening in the fridge.
- Optional Enhancements: A pinch of fine sea salt (enhances sweetness and balances fat), ½ tsp almond extract (adds nutty depth), or 1 tbsp instant espresso powder (for mocha variation) — all added with the vanilla.
Step-by-Step Recipe
This method prioritizes precision, timing, and temperature control — the three pillars of no-bake pie success. Follow each step carefully for guaranteed elegance and structure.
- Prepare the Crust (15 minutes + 30 minutes chill): In a food processor, pulse 36 whole Oreos (no need to separate creme) until reduced to fine, sand-like crumbs — about 12–15 one-second pulses. Transfer crumbs to a medium bowl. Pour in 6 tablespoons melted unsalted butter and stir vigorously with a spatula or fork until every crumb is uniformly moistened and resembles wet sand. Press mixture firmly and evenly into the bottom and up the sides of a 9-inch deep-dish pie plate (glass or ceramic recommended for even chilling). Use the flat bottom of a measuring cup or glass to compact the crust — apply steady, downward pressure in concentric circles, ensuring no gaps or thin spots. Refrigerate uncovered for at least 30 minutes (or up to 24 hours) to fully set and firm.
- Whip the Cream Cheese Base (10 minutes): Using a stand mixer fitted with the paddle attachment (or hand mixer with beaters), beat room-temperature cream cheese on medium speed for 2 minutes until completely smooth and glossy — scraping down the bowl twice. Add sifted powdered sugar gradually in two additions, beating 1 minute after each until fully incorporated and lump-free. Mix in pure vanilla extract (and any optional extracts or espresso) and beat 30 seconds more. Set aside.
- Prepare the Pudding Layer (5 minutes): In a separate large mixing bowl, whisk together cold whole milk and instant vanilla pudding mix for exactly 2 minutes — until thickened and beginning to show gentle ribbons. Do not overmix, as this can incorporate excess air and cause weeping later. Let sit 2 minutes at room temperature to allow starches to fully hydrate and thicken slightly.
- Combine Cream Cheese and Pudding (3 minutes): Gently fold the thickened pudding into the cream cheese mixture using a silicone spatula. Use slow, sweeping motions from bottom to top — rotating the bowl as you go — until fully homogenous and silky. Avoid vigorous stirring or over-folding, which can deflate air and weaken structure.
- Whip the Heavy Cream (5–7 minutes): In a chilled metal or glass bowl (place bowl and beaters in freezer 10 minutes beforehand for optimal results), whip very cold heavy cream on medium-high speed until soft peaks form — about 3–4 minutes. Increase speed to high and continue whipping until stiff, glossy peaks hold firmly when beaters are lifted — about 1–2 minutes more. Do not over-whip into butter.
- Fold in the Whipped Cream (4 minutes): Add one-third of the whipped cream to the cream cheese-pudding mixture and gently fold with a spatula until mostly combined — this lightens the base. Repeat with second third, folding until uniform. Finally, add remaining whipped cream and fold with extra care — just until no white streaks remain. Over-folding deflates volume and compromises fluffiness.
- Assemble and Chill (Minimum 8 hours, ideally overnight): Spoon filling into the chilled crust. Smooth the top with an offset spatula or the back of a spoon, creating an even, level surface. Cover loosely with plastic wrap — ensure wrap does not touch the surface (to prevent sticking and condensation). Refrigerate for a minimum of 8 hours — preferably 12–16 hours — to allow full setting, flavor melding, and structural integrity. Do not freeze unless specified in variations.
- Garnish and Serve (5 minutes before serving): Just before slicing, decorate with reserved whole or halved Oreos — press gently into the rim or arrange artfully across the center. Optional: dust with cocoa powder, drizzle with chocolate ganache, or sprinkle with flaky sea salt. Use a sharp knife dipped in hot water and wiped dry between cuts for clean slices.
Tips
- Crust Consistency Is Key: If your crust feels too dry and crumbly, add ½ tsp more melted butter; if too wet and greasy, add 1 tsp additional Oreo crumbs. A properly hydrated crust should hold together when squeezed — not crumble nor ooze oil.
- Temperature Discipline: Every dairy element must be at its ideal temp: cream cheese room-temp, heavy cream ice-cold, milk cold. Even a 5°F deviation can impact emulsion stability and whipping performance.
- Whisking the Pudding Matters: Under-whisking leaves lumps; over-whisking introduces air bubbles that collapse during chilling. Use a balloon whisk and stop precisely when mixture coats the back of a spoon and leaves a clear trail.
- Folding Technique: Always use a “cut-and-fold” motion: slice vertically down center, sweep along bottom, lift and turn over. Rotate bowl a quarter-turn after each fold. This preserves air while integrating ingredients.
- Chilling Time Isn’t Optional: Rushing the chill leads to slumping slices, weeping filling, and a weak crust. Overnight is ideal — the pudding starches fully gel, cream cheese firms, and flavors harmonize.
- Knife Prep for Clean Slices: Warm a long, thin-bladed knife under hot tap water, wipe thoroughly, cut one slice, repeat. Never saw — press straight down with gentle, even pressure.
- Prevent Crust Sogging: Ensure crust is fully chilled before adding filling. For extra insurance, brush the chilled crust interior with a thin layer of melted white chocolate or tempered dark chocolate and chill 10 minutes before filling — creates a moisture barrier.
- Storage Wisdom: Store covered in fridge for up to 5 days. Do not store at room temperature longer than 2 hours. Freeze only if using stabilizers (see Variations); thaw overnight in fridge — never at room temp.
Variations and Customizations
This recipe is a canvas — endlessly adaptable to dietary needs, seasonal produce, global flavors, and personal whims. Below are rigorously tested, chef-approved options — each with execution notes:
- Chocolate Lovers’ Dream: Replace ¼ cup powdered sugar with unsweetened cocoa powder (Dutch-process preferred). Fold in ½ cup finely chopped dark chocolate (70% cacao) into the final filling. Garnish with chocolate-covered espresso beans.
- Strawberry Swirl: After filling the crust, drop ⅓ cup seedless strawberry jam (simmered 2 minutes to thicken) in dollops. Drag a toothpick through filling in figure-eights before chilling for marbled effect.
- Peppermint Patty: Add ½ tsp peppermint extract with vanilla. Crush 6 Oreos and fold into filling. Top with crushed candy canes and mini chocolate chips.
- Vegan Version: Use dairy-free Oreos (check label), vegan butter (Miyoko’s or Earth Balance), full-fat coconut cream (chilled overnight, solid part only), organic cane sugar, cornstarch-based instant pudding (Jell-O Cook & Serve Vanilla, prepared cold per package), and coconut milk (canned, full-fat). Stabilize with 1 tsp agar-agar dissolved in 2 tbsp warm water, added with pudding.
- Gluten-Free: Substitute certified GF chocolate sandwich cookies (such as Kinnikinnick or Glutino) — note texture differs slightly; increase butter to 7 tbsp for binding. Verify pudding mix is GF (Jell-O Instant Vanilla is certified).
- Protein-Packed: Blend 1 scoop high-quality vanilla whey or plant-based protein powder into powdered sugar before adding to cream cheese. Compensate with 1–2 tbsp extra cold milk if filling thickens excessively.
- Boozy Twist (Adults Only): Add 2 tbsp bourbon, Kahlúa, or Baileys Irish Cream with vanilla. Reduce powdered sugar by 2 tbsp to balance sweetness. Garnish with chocolate-covered coffee beans.
- Mini Individual Pies: Press crust into 4–6 lightly greased muffin tin cups (use liners for easy removal). Fill and chill 6 hours minimum. Perfect for portion control and party presentation.
- Layered Oreo Trifle: Skip crust. Alternate layers of crushed Oreos, filling, and fresh berries in a trifle bowl. Top with whipped cream and whole Oreos.
- Savory-Sweet Black Pepper: Infuse ¼ cup heavy cream with 1 tsp coarsely ground black pepper (steep 15 min, strain). Whip infused cream separately and fold in at end. Finish with flaky Maldon salt.
Health Considerations and Nutritional Value
A single standard slice (1/12 of a 9-inch pie) contains approximately:
- Calories: 420–460 kcal
- Total Fat: 26–29g (16–18g saturated)
- Carbohydrates: 44–48g (32–36g sugars)
- Protein: 5–6g
- Sodium: 280–320mg
- Calcium: ~8% DV (from milk, cream cheese)
- Vitamin A: ~10% DV (from dairy fat)
Nutritional Notes & Mindful Modifications:
- Sugar Awareness: Oreos and powdered sugar contribute significant added sugars. To reduce: use half powdered sugar + half monk fruit/allulose blend; choose reduced-sugar Oreos (though texture suffers); or omit powdered sugar entirely if cream cheese is very fresh and tangy — rely on pudding sweetness.
- Saturated Fat Considerations: Heavy cream and cream cheese are primary sources. Lighten responsibly: substitute up to ½ cup heavy cream with cold evaporated milk (retains richness, cuts fat); use Neufchâtel cheese (⅓ less fat than cream cheese); avoid low-fat “whipping creams” — they contain gums and stabilizers that destabilize texture.
- Dairy Sensitivity Options: Lactose-intolerant? Use lactose-free milk and cream cheese (Green Valley Creamery). For casein sensitivity, full vegan substitution is required (see Variations).
- Gluten & Allergen Transparency: Standard Oreos contain wheat; verify GF status if needed. Butter and cream cheese contain dairy; pudding mixes may contain soy or egg derivatives — always read labels.
- Portion Guidance: Due to calorie density, pairing with fresh fruit (raspberries, sliced strawberries) or a small green salad balances the meal. Serving smaller slices (1/16 instead of 1/12) reduces intake by ~25% without sacrificing satisfaction.
- No Artificial Additives: This recipe avoids preservatives, artificial colors, or hydrogenated oils — relying instead on whole-food ingredients. Choose organic Oreos or make your own chocolate wafer crust for full additive-free control.
Ingredients
- 36 original Oreo cookies (about 280g), plus 12–16 for garnish
- 6 tablespoons (85g) unsalted butter, melted
- 8 ounces (227g) full-fat brick-style cream cheese, at room temperature
- 1 cup (120g) powdered sugar, sifted
- 2 teaspoons pure vanilla extract
- 1 ½ cups (360ml) heavy whipping cream, very cold
- 1 (3.4 oz / 96g) box instant vanilla pudding mix
- 1 ¼ cups (300ml) cold whole milk
- Pinch of fine sea salt (optional, but highly recommended)
Directions
- Make the crust: Pulse Oreos in a food processor until fine crumbs form. Stir in melted butter until fully combined. Press firmly into a 9-inch deep-dish pie plate. Chill 30 minutes.
- Beat cream cheese until smooth. Gradually add powdered sugar and vanilla; beat until creamy.
- In another bowl, whisk cold milk and pudding mix for 2 minutes. Let stand 2 minutes.
- Fold pudding mixture into cream cheese mixture until smooth.
- In a chilled bowl, whip cold heavy cream to stiff peaks.
- Gently fold one-third of whipped cream into cream cheese mixture to lighten. Fold in remaining cream in two additions until just combined.
- Pour filling into chilled crust. Smooth top. Cover loosely with plastic wrap (not touching surface).
- Refrigerate minimum 8 hours, preferably overnight (12–16 hours).
- Just before serving, garnish with whole or halved Oreos. Slice with hot, wiped knife.
FAQ
- Can I use Cool Whip instead of whipping my own cream?
- Yes — substitute 2 cups (16 oz) thawed Cool Whip for the heavy cream. Fold in at Step 6. Note: texture will be lighter, sweeter, and less rich; stability decreases after 3 days. Not recommended for warm environments.
- Why did my filling weep or release water?
- Most commonly caused by: (1) using “cook & serve” pudding (requires heat), (2) over-mixing pudding, (3) adding warm or room-temp cream cheese to cold pudding, or (4) insufficient chilling time. Always use instant pudding and chill minimum 8 hours.
- Can I freeze this pie?
- Yes — but only if stabilized. Add 1 tsp unflavored gelatin (bloomed in 1 tbsp cold water, then microwaved 5 seconds to dissolve) to warm pudding mixture before folding into cream cheese. Freeze up to 2 months. Thaw overnight in fridge — never at room temp — and garnish fresh.
- My crust is hard as a rock — what went wrong?
- Over-compacting or chilling too long before filling. Next time, press firmly but not aggressively, and fill within 1 hour of chilling. Also, ensure butter was fully melted — pools of unmixed butter harden dramatically when cold.
- Can I make this ahead for a party?
- Absolutely — it improves over 24–48 hours. Prepare up to 3 days ahead. Add garnish no more than 2 hours before serving to preserve Oreo crispness.
- What if I don’t have a food processor?
- Place Oreos in a heavy-duty zip-top bag and crush with a rolling pin or meat mallet until fine. Sift through a coarse mesh strainer to remove large chunks.
- Is there a lower-calorie version that still tastes great?
- Try this balanced approach: Use Neufchâtel cheese, replace ½ cup heavy cream with cold evaporated milk, reduce powdered sugar to ¾ cup, and use 24 Oreos in crust (add 1 tbsp cocoa + 1 tbsp butter for depth). Expect ~320 kcal/slice with minimal texture loss.
- Can I use flavored Oreos like Mint or Birthday Cake?
- Yes — but adjust complementary flavors. Mint Oreos pair beautifully with chocolate filling and peppermint garnish; Birthday Cake Oreos work best with vanilla bean paste and rainbow sprinkles. Avoid Red Velvet or limited editions — inconsistent creme ratios affect crust binding.
- How do I prevent cracks on the surface?
- Avoid rapid temperature shifts. Don’t place warm filling into cold crust — both should be at appropriate temps. Don’t over-beat cream cheese. And never open the fridge door frequently during initial chilling — maintain consistent cold.
- Can kids help make this?
- Perfect family project! Kids can measure, crush cookies (with supervision), stir crust mixture, fold whipped cream (with guidance), and arrange garnishes. It teaches measurement, texture awareness, and kitchen safety — all while tasting delicious.
Summary
No-Bake Oreo Cream Pie is a timeless, effortlessly impressive dessert that delivers restaurant-worthy elegance with pantry-staple simplicity — built on a buttery Oreo crust, luxuriously smooth cream cheese–pudding filling, and crowned with iconic cookie charm.
With foolproof technique, smart substitutions, and endless customization options — from vegan and gluten-free to boozy and seasonal — it’s a versatile, crowd-pleasing centerpiece that satisfies nostalgia, creativity, and celebration in every chilled, creamy, crack-free slice.