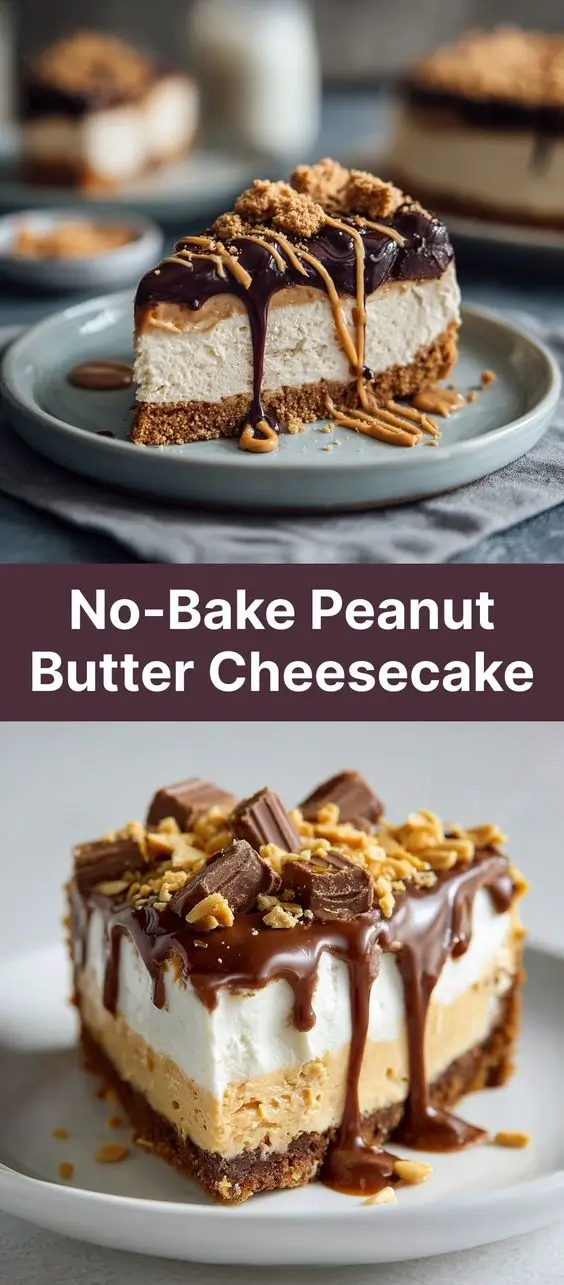
No-Bake Peanut Butter Cheesecake: A Creamy, Decadent Delight
Introduction
If you’re craving a rich, velvety dessert that requires no oven time, look no further than this luscious No-Bake Peanut Butter Cheesecake. Combining the smoothness of classic cheesecake with the nutty richness of peanut butter, this treat is perfect for any occasion—from casual family dinners to elegant dinner parties. It’s effortlessly simple to prepare, incredibly satisfying, and always a crowd-pleaser. Whether you’re a baking novice or a seasoned kitchen enthusiast, this no-bake version offers all the indulgence without the hassle.
The History
The origins of cheesecake stretch back thousands of years to ancient Greece, where it was served to athletes during the first Olympic Games as an energy-boosting food. Over centuries, cheesecake evolved across Europe and eventually made its way to America, where modern cream cheese-based versions became popular in the 20th century—especially after the invention of Philadelphia-brand cream cheese.
No-bake cheesecakes gained popularity in the mid-1900s alongside the rise of convenience foods and refrigeration. With the advent of pre-made graham cracker crusts and stabilized whipped toppings, home cooks could create elegant desserts without turning on their ovens. Peanut butter, a staple in American pantries since the early 1900s, naturally found its way into sweet recipes. The fusion of peanut butter and cheesecake emerged as a beloved variation, especially among fans of both desserts and candy bars like Reese’s. Today, the No-Bake Peanut Butter Cheesecake stands as a testament to American culinary creativity—simple, decadent, and deeply comforting.
Ingredients Breakdown
Every ingredient in this No-Bake Peanut Butter Cheesecake plays a crucial role in delivering flavor, texture, and structure. Here’s a detailed look at what goes into this creamy masterpiece:
- Cream Cheese (32 oz): The foundation of any cheesecake, full-fat block cream cheese ensures a rich, smooth texture. Avoid using tub cream cheese, as it contains stabilizers that can make the filling grainy.
- Peanut Butter (1 cup): Use a creamy, unsweetened, and unsalted natural peanut butter for the best flavor control. If you prefer a sweeter taste, you can use a brand like Jif or Skippy, but adjust sugar accordingly.
- Powdered Sugar (1 cup): Adds sweetness and helps stabilize the mixture. Sift it before use to prevent lumps.
- Heavy Whipping Cream (1 ½ cups): When whipped, this adds lightness and fluffiness to the filling, giving the cheesecake a mousse-like consistency.
- Vanilla Extract (2 teaspoons): Enhances overall flavor and balances the richness of the peanut butter and cheese.
- Lemon Juice (1 tablespoon): A small amount brightens the flavor and cuts through the fat, making each bite more refreshing.
- Graham Cracker Crumbs (2 cups): Forms the base of the crust. You can substitute with digestive biscuits or vanilla wafers for a different twist.
- Butter (½ cup, melted): Binds the crust together and adds a toasty, buttery flavor when chilled.
- Brown Sugar (¼ cup, optional): Deepens the crust’s flavor with a hint of molasses-like warmth.
- Salt (¼ teaspoon): Balances sweetness and enhances all other flavors.
- Chocolate Chips or Ganache (optional topping): For those who love a peanut butter-chocolate combo, a drizzle of melted chocolate or ganache elevates the dessert to new heights.
- Chopped Peanuts (optional): Adds crunch and visual appeal when sprinkled on top.
Step-by-Step Recipe
- Prepare the Crust: In a medium bowl, combine graham cracker crumbs, melted butter, brown sugar (if using), and a pinch of salt. Mix until the crumbs are evenly moistened and resemble wet sand.
- Press Into Pan: Transfer the mixture to a 9-inch springform pan. Using the bottom of a glass or your fingers, press the crumbs firmly into the bottom and slightly up the sides to form an even crust. Chill in the refrigerator for at least 20 minutes to set.
- Softening the Cream Cheese: Remove the cream cheese from the fridge 30–60 minutes ahead of time to soften. This prevents lumps when mixing.
- Beat the Cream Cheese: In a large mixing bowl, beat the softened cream cheese with an electric mixer on medium speed until smooth and creamy (about 2 minutes).
- Add Peanut Butter: Add the peanut butter and continue beating until fully incorporated and fluffy.
- Incorporate Sweeteners and Flavor: Gradually add powdered sugar, vanilla extract, lemon juice, and salt. Beat on low initially to avoid clouding, then increase speed until smooth.
- Whip the Cream: In a separate bowl, whip the cold heavy cream until stiff peaks form. This step is critical for a light, airy texture.
- Fold in Whipped Cream: Gently fold the whipped cream into the peanut butter mixture in two or three additions, using a spatula. Be careful not to deflate the mixture—fold just until no white streaks remain.
- Fill the Crust: Pour the filling over the chilled crust. Smooth the top with an offset spatula or the back of a spoon for a polished finish.
- Chill Thoroughly: Cover loosely with plastic wrap and refrigerate for at least 6 hours, preferably overnight. This allows the cheesecake to firm up and develop its full flavor.
- Add Toppings (Optional): Before serving, drizzle with melted chocolate, sprinkle with chopped peanuts, or pipe on extra whipped cream.
- Serve: Run a warm knife around the edge of the pan before releasing the springform clasp. Slice with a clean, sharp knife for neat pieces.
Tips
- Room Temperature Cream Cheese is Key: Cold cream cheese leads to lumpy batter. Let it sit out until it yields slightly to touch.
- Don’t Overmix After Adding Cream: Once you begin folding in the whipped cream, stop as soon as the mixture is uniform. Overmixing can cause the cheesecake to collapse when chilled.
- Use a Springform Pan with Confidence: Line the bottom with parchment paper for easy removal. Wrap the outside in plastic wrap if storing for multiple days to prevent odor absorption.
- Chill Your Bowl and Beaters: For best whipped cream results, chill your mixing bowl and beaters in the freezer for 10–15 minutes before whipping the cream.
- Prevent Weeping: Avoid overbaking (though this is no-bake!) and temperature shocks. Keep the cheesecake refrigerated at all times before serving.
- Slice Cleanly: Dip your knife in hot water and wipe it dry between each cut for pristine slices.
- Make Ahead Friendly: This cheesecake can be made 2–3 days in advance. Store covered in the fridge.
Variations and Customizations
This No-Bake Peanut Butter Cheesecake is highly adaptable. Here are some delicious twists to try:
- Chocolate Swirl: Melt ½ cup of chocolate chips with 1 tsp coconut oil. Drizzle half into the crust before adding filling, and swirl the rest on top before chilling.
- Cookie Crust: Replace graham crackers with crushed Oreo cookies (filling included) for a chocolate-peanut butter dream.
- Crunchy Peanut Butter Layer: Mix chopped peanuts or peanut brittle into the filling for added texture.
- Dairy-Free Version: Use vegan cream cheese, dairy-free butter, and coconut cream instead of heavy cream. Choose dairy-free chocolate for toppings.
- Gluten-Free Option: Use gluten-free graham crackers or certified gluten-free cookies for the crust.
- Mini Cheesecakes: Prepare in mason jars, cupcake liners, or silicone molds for individual servings—perfect for parties!
- Fruit-Infused: Top with fresh banana slices or a layer of raspberry compote for a sweet-tart contrast.
- Protein Boost: Stir in 1–2 scoops of unflavored or vanilla protein powder into the filling (adjust liquid if needed).
- Salted Caramel Drizzle: Elevate the flavor profile with a luxurious salted caramel topping.
- Spiced Version: Add a pinch of cinnamon or cayenne pepper for a subtle kick that complements the peanut butter.
Health Considerations and Nutritional Value
While undeniably indulgent, this No-Bake Peanut Butter Cheesecake does offer some nutritional benefits when enjoyed in moderation:
- Protein Power: Peanut butter and cream cheese contribute protein, helping to keep you fuller longer.
- Healthy Fats: Peanut butter contains monounsaturated fats, which support heart health when consumed in balance.
- Calcium Source: Dairy ingredients like cream cheese and heavy cream provide calcium for bone health.
- Energy-Dense: This dessert is high in calories and fat, making it a good occasional treat but not ideal for daily consumption, especially for those managing weight or cholesterol.
- Sugar Content: Contains significant added sugars from powdered sugar and optional toppings. Consider reducing sugar or using a powdered erythritol blend for a lower-sugar version.
- Allergens: Contains dairy, peanuts, and wheat (from graham crackers). Not suitable for individuals with these allergies unless substitutions are made.
Nutritional Estimate (per slice, 1/12th of cake):
Calories: ~480 | Fat: 36g | Saturated Fat: 18g | Carbohydrates: 32g | Sugar: 24g | Protein: 10g | Sodium: 380mg
Ingredients
- 2 cups graham cracker crumbs (about 12 full sheets)
- ½ cup (1 stick) unsalted butter, melted
- ¼ cup brown sugar (optional)
- ¼ teaspoon salt
- 32 oz (4 packages) full-fat cream cheese, softened
- 1 cup creamy peanut butter (natural or conventional)
- 1 cup powdered sugar, sifted
- 2 teaspoons pure vanilla extract
- 1 tablespoon fresh lemon juice
- 1 ½ cups cold heavy whipping cream
- Optional toppings: melted chocolate, chopped peanuts, whipped cream, banana slices
Directions
- In a bowl, mix graham cracker crumbs, melted butter, brown sugar, and salt until combined. Press firmly into a 9-inch springform pan. Refrigerate for 20 minutes.
- In a large bowl, beat softened cream cheese until smooth. Add peanut butter and beat until creamy.
- Gradually mix in powdered sugar, followed by vanilla, lemon juice, and salt. Beat until well blended.
- In another bowl, whip cold heavy cream until stiff peaks form.
- Gently fold whipped cream into the peanut butter mixture until fully incorporated.
- Pour filling over chilled crust. Smooth the top with a spatula.
- Cover and refrigerate for at least 6 hours, preferably overnight.
- Before serving, add desired toppings. Release springform and slice with a warm knife.
FAQ
Can I freeze No-Bake Peanut Butter Cheesecake?
Yes! Wrap the chilled cheesecake tightly in plastic and foil. Freeze for up to 2 months. Thaw in the refrigerator for 6–8 hours before serving. Note: texture may be slightly softer after freezing.
Why is my cheesecake runny?
Common causes include using cold cream cheese, under-whipped heavy cream, or not chilling long enough. Ensure all steps are followed precisely, especially whipping the cream to stiff peaks.
Can I use low-fat ingredients?
Reduced-fat cream cheese and milk substitutes often result in a watery, less stable texture. For best results, stick to full-fat dairy.
How long does it last in the fridge?
Properly stored, it will stay fresh for 4–5 days. Always keep it covered to prevent absorbing odors.
Can I make this nut-free?
Yes, substitute peanut butter with sunflower seed butter (like SunButter) for a similar texture and flavor profile—ideal for school-safe or allergy-friendly events.
Can I use Cool Whip instead of whipped cream?
Yes, you can replace the whipped cream with 16 oz of thawed frozen whipped topping (like Cool Whip). Fold in gently. This makes the recipe quicker but slightly less rich.
What size pan should I use?
A 9-inch springform pan is ideal. Using a larger pan will result in a thinner cheesecake; a smaller one may overflow.
Summary
Indulge in the ultimate creamy, no-fuss dessert with this No-Bake Peanut Butter Cheesecake—rich, velvety, and packed with nutty goodness.
Perfect for any season, it’s a show-stopping treat that’s as easy to make as it is irresistible to eat.