No-Bake Strawberry Icebox Cake: A Cool, Creamy Delight for Every Season
The History of the No-Bake Strawberry Icebox Cake
The No-Bake Strawberry Icebox Cake has its roots deeply embedded in American culinary tradition, dating back to the early 20th century when refrigerators—then commonly referred to as “iceboxes”—became household staples. Before the advent of modern ovens and air conditioning, cooking during hot summer months was often avoided due to heat buildup in homes. As a result, cooks began experimenting with chilled desserts that required no baking and could be prepared ahead of time.
The original concept of the icebox cake emerged from resourcefulness and simplicity. Early versions were made by layering sweetened condensed milk with graham crackers or chocolate wafers, allowing the moisture from the milk to soften the cookies into a cake-like consistency after hours of chilling. The addition of fresh fruit, particularly strawberries, became popular in mid-century America, thanks to the seasonal availability of berries and the growing emphasis on light, refreshing desserts.
Over the decades, the recipe evolved with the times. The introduction of whipped topping (like Cool Whip) in the 1970s made the dessert even more accessible and convenient for home bakers. Today’s version combines old-world charm with modern convenience, featuring layers of fluffy whipped cream, crisp vanilla wafers or ladyfingers, and juicy, ripe strawberries—all melding together overnight in the refrigerator to create a harmonious, creamy, and fruity confection.
This dessert has become a staple at family gatherings, picnics, potlucks, and holiday celebrations across the United States. Its nostalgic appeal, minimal prep time, and crowd-pleasing flavor profile have solidified its status as a timeless classic. Whether served at a backyard barbecue or a formal dinner party, the No-Bake Strawberry Icebox Cake continues to delight generations with its cool elegance and effortless charm.
Ingredients Breakdown: What Goes Into a Perfect Icebox Cake?
Creating a delicious No-Bake Strawberry Icebox Cake starts with selecting high-quality ingredients that balance sweetness, texture, and freshness. Each component plays a vital role in achieving the final dish’s luxurious mouthfeel and vibrant flavor.
- Fresh Strawberries: The star of the show, strawberries should be ripe, firm, and bright red. They add natural sweetness, a pop of color, and a juicy contrast to the creamy layers. Sliced thinly, they integrate beautifully without making the cake soggy.
- Heavy Whipping Cream: Used to make freshly whipped cream, this ingredient provides a rich, airy texture. It’s essential to use cold cream straight from the fridge for optimal volume and stability.
- Confectioners’ Sugar: Also known as powdered sugar, it dissolves easily into the whipped cream, adding subtle sweetness without graininess. It also helps stabilize the whipped cream slightly.
- Vanilla Extract: Pure vanilla extract enhances the overall flavor profile, lending warmth and depth to the whipped cream. Avoid artificial extracts for best results.
- Vanilla Wafers or Ladyfingers: These form the structural base of the cake. Vanilla wafers are traditional, offering a buttery crunch that softens over time. Alternatively, ladyfingers can be used for a more elegant, European-inspired twist.
- Lemon Juice (optional): A small splash added to the strawberries helps preserve their color and brightens their flavor, especially if the berries aren’t perfectly ripe.
- Cream Cheese (optional variation): For a richer, cheesecake-like texture, some recipes incorporate softened cream cheese into the whipped cream mixture. This adds tanginess and improves structure.
Each ingredient contributes to the delicate balance between lightness and indulgence. The magic happens when these components rest together in the refrigerator—the wafers absorb moisture, becoming tender like cake, while the strawberries infuse the cream with fruity essence.
Step-by-Step Recipe: How to Make No-Bake Strawberry Icebox Cake
Follow this detailed guide to create a stunning and delectable No-Bake Strawberry Icebox Cake that’s perfect for any occasion.
Ingredients:
- 2 pounds (about 900g) fresh strawberries, hulled and sliced
- 1 tablespoon granulated sugar (or to taste)
- 1 teaspoon lemon juice (optional)
- 2 cups (480ml) cold heavy whipping cream
- 1/2 cup (60g) confectioners’ sugar
- 2 teaspoons pure vanilla extract
- 1 1/2 cups (approximately 150–170g) vanilla wafers or ladyfingers
- Fresh mint leaves for garnish (optional)
Directions:
- Prepare the strawberries: In a medium bowl, combine the sliced strawberries, granulated sugar, and lemon juice. Gently stir to coat the berries evenly. Set aside for 20–30 minutes to allow the juices to release. Stir occasionally to ensure even maceration.
- Chill your mixing bowl and beaters: Place the bowl and beaters (or whisk attachment) of your stand mixer in the freezer for 10–15 minutes before whipping the cream. Cold tools help the cream whip faster and hold its shape better.
- Whip the cream: Pour the cold heavy cream into the chilled bowl. Begin beating on medium speed until soft peaks start to form, about 2–3 minutes. Gradually add the confectioners’ sugar and vanilla extract. Increase speed to high and continue beating until stiff peaks form—when you lift the beaters, the tip of the peak should stand upright without drooping. Be careful not to overbeat, or the cream may turn grainy or butter-like.
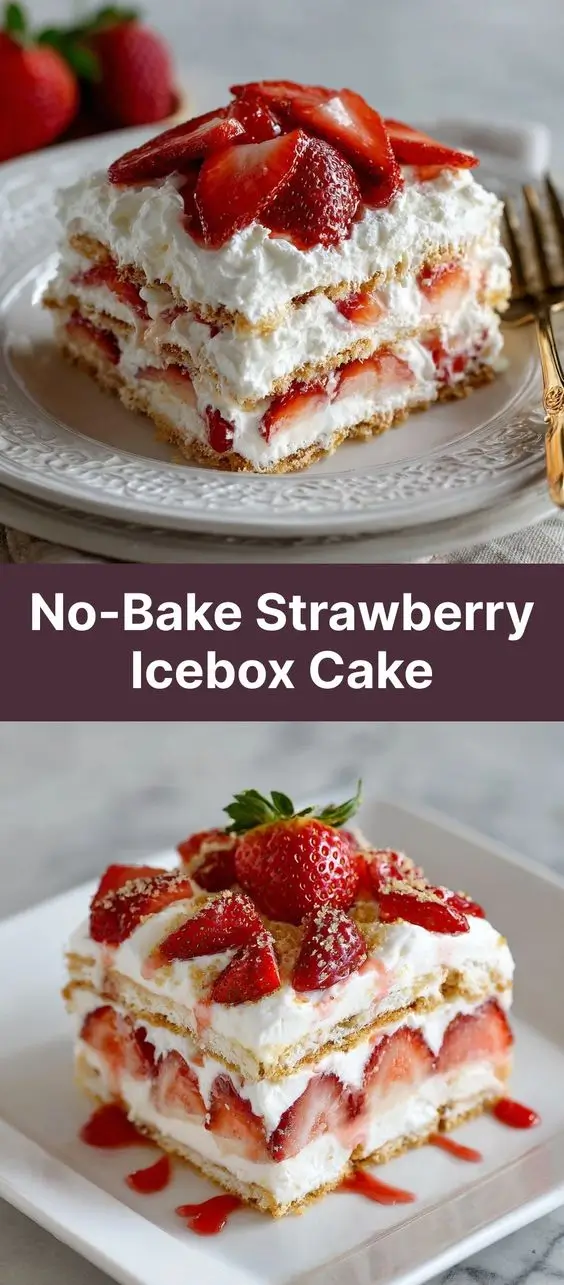
- Choose your pan: Select a 9×9-inch square dish, a 9-inch springform pan, or a clear glass trifle bowl to showcase the beautiful layers. If using a springform pan, line the bottom with parchment paper for easy removal.
- Begin layering: Start with a single layer of vanilla wafers, breaking them as needed to fit snugly and cover the bottom completely. Avoid large gaps.
- Add a layer of strawberries: Spoon about one-third of the macerated strawberries (including their juice) evenly over the wafers.
- Spread whipped cream: Carefully spread one-third of the whipped cream over the strawberries using a spatula. Try to create an even layer without disturbing the wafers too much.
- Repeat layers: Add another layer of wafers, followed by another third of strawberries and then another third of whipped cream. Repeat one final time so you end with a top layer of whipped cream.
- Smooth the top: Use the back of a spoon or an offset spatula to smooth the final layer of whipped cream into an elegant finish.
- Chill thoroughly: Cover the dish loosely with plastic wrap, making sure it doesn’t touch the surface of the cream (you can use a few toothpicks to hold the wrap up). Refrigerate for at least 8 hours, but ideally 12–24 hours. This extended chilling time allows the wafers to soften fully and all flavors to meld together.
- Garnish and serve: Just before serving, garnish with additional sliced strawberries, a dusting of confectioners’ sugar, or fresh mint leaves for a pop of color.
Tips for Making the Best No-Bake Strawberry Icebox Cake
- Use very cold cream: This is crucial for successful whipping. Store the cream in the fridge for at least 12 hours before use, and chill your equipment too.
- Don’t skip the resting time: While tempting to serve immediately, the cake needs at least 8 hours to set properly. Overnight chilling yields the best texture.
- Layer carefully: Pack the wafers tightly but don’t press down hard, which could crush them. Aim for even coverage in each layer.
- Slice strawberries uniformly: Cut them to about 1/4-inch thickness so they layer evenly and don’t create pockets of excess juice.
- Adjust sweetness based on berries: If your strawberries are very sweet, reduce the sugar in both the berry mix and whipped cream. Taste as you go.
- Avoid overmixing whipped cream: Stop once stiff peaks form. Over-whipping leads to curdling and a broken texture.
- Keep it covered: Prevent odor absorption and drying out by sealing the cake well during chilling.
- Serve chilled: Always serve straight from the refrigerator for the best texture. Let sit at room temperature for only 5–10 minutes before slicing.
- Use a sharp knife: Dip your knife in hot water and wipe it dry between cuts for clean slices.
- Assemble in stages: Prepare the strawberries and whipped cream ahead of time, but assemble the cake just before chilling to maintain texture.
Variations and Customizations
The beauty of the No-Bake Strawberry Icebox Cake lies in its versatility. Here are creative ways to customize it for different tastes, dietary needs, and occasions:
- Berry Medley Icebox Cake: Substitute or combine strawberries with other berries like blueberries, raspberries, blackberries, or sliced peaches for a colorful, mixed fruit version.
- Chocolate Lover’s Version: Replace vanilla wafers with chocolate wafers or Oreo cookies (with filling removed for cleaner layers). Add a thin layer of melted chocolate or chocolate ganache between layers.
- Cheesecake Swirl: Blend 8 oz of softened cream cheese with 1/4 cup sugar and 1 tsp vanilla, then fold into the whipped cream for a richer, tangier base reminiscent of strawberry cheesecake.
- Gluten-Free Option: Use certified gluten-free vanilla wafers or almond flour-based cookies. Ensure all ingredients are labeled gluten-free.
- Dairy-Free Alternative: Substitute heavy cream with chilled coconut cream (the thick part from canned full-fat coconut milk), whipped until fluffy. Use dairy-free cookies as the base.
- Vegan Icebox Cake: Combine coconut whipped cream, maple syrup, and vanilla for the cream layer. Use plant-based cookies and organic strawberries. Sweeten berries with agave instead of sugar.
- Kid-Friendly Fun: Use animal crackers, Teddy Grahams, or colored sandwich cookies for a playful twist kids will love.
- Alcohol-Infused Elegance: Add 1–2 tablespoons of Grand Marnier, Chambord, or limoncello to the whipped cream or macerate strawberries in liqueur for an adult-only dessert.
- Mint & Basil Infusion: Toss a few torn fresh mint or basil leaves with the strawberries for an herbal note that complements the sweetness.
- Layered Trifle Style: Use a tall glass bowl and add extra layers for visual drama. Include dollops of yogurt, custard, or lemon curd between layers.
- Mini Individual Cakes: Layer ingredients in mason jars, parfait glasses, or disposable dessert cups for portable, personalized servings—perfect for parties.
Health Considerations and Nutritional Value
While undeniably delicious, it’s important to consider the nutritional content and health aspects of No-Bake Strawberry Icebox Cake, especially when serving to individuals with dietary restrictions or health goals.
Nutritional Highlights (per serving, approximately 1/12 of recipe):
- Calories: ~300–350 kcal
- Fat: 20–25g (mostly from saturated fat in cream and butter in wafers)
- Carbohydrates: 30–35g (including natural sugars from fruit and added sugars)
- Protein: 3–5g
- Fiber: 2–3g (from strawberries and whole grain wafers, if used)
- Vitamin C: High—strawberries provide over 100% of the daily recommended intake per serving
- Calcium & Phosphorus: Moderate amounts from dairy
Pros:
- Rich in antioxidants and vitamin C from fresh strawberries
- No refined flour or baking required
- Can be adapted to be lower in sugar or made with healthier fats
- Contains no trans fats when made with real ingredients
Cons:
- High in saturated fat due to heavy cream and processed wafers
- Contains added sugars, which may be problematic for diabetics or those on low-sugar diets
- Not suitable for lactose-intolerant individuals unless modified
- Perishable and requires refrigeration
Dietary Modifications:
- Lower Sugar: Reduce or omit added sugar in both berries and whipped cream. Use stevia or monk fruit sweetener instead.
- Heart-Healthy Version: Use Greek yogurt blended with a little honey in place of half the whipped cream to reduce fat content.
- Diabetic-Friendly: Monitor portion size and substitute with low-glycemic berries like raspberries. Consult a dietitian for safe adjustments.
- Allergen Awareness: Check labels for common allergens like wheat, dairy, soy, or nuts, depending on cookie choices.
Frequently Asked Questions (FAQ)
Q: Can I make this cake ahead of time?
A: Absolutely! In fact, it’s designed to be made ahead. Chill for at least 8 hours, but up to 48 hours in advance. Add garnishes just before serving.
Q: How long does it last in the fridge?
A: Properly covered, it stays fresh for 3–4 days. After that, the texture may degrade, and the strawberries can begin to break down excessively.
Q: Can I freeze No-Bake Strawberry Icebox Cake?
A: Freezing is not recommended. The high water content in strawberries and the airy whipped cream do not freeze and thaw well, leading to sogginess and separation.
Q: Why are my wafers still crunchy?
A: Not enough chilling time! Ensure you refrigerate for at least 8–12 hours. Thicker wafers may require longer. You can also lightly brush them with milk or simple syrup to speed up softening.
Q: Can I use Cool Whip instead of homemade whipped cream?
A: Yes, a 12-ounce tub of whipped topping can replace the whipped cream. Fold in vanilla and a little powdered sugar for enhanced flavor. However, homemade tastes fresher and less artificial.
Q: Are there egg-free concerns?
A: Traditional recipes contain no raw eggs, so it’s safe for pregnant women and children. The whipped cream uses pasteurized dairy.
Q: Can I use frozen strawberries?
A: Not ideal. Frozen strawberries release too much water when thawed, making the cake soggy. Fresh, ripe berries work best.
Q: What can I use instead of vanilla wafers?
A: Try ladyfingers, shortbread cookies, Biscoff, graham crackers, or even brownie pieces for a decadent twist.
Q: Is this cake suitable for a birthday or special event?
A: Definitely! Serve in a clear trifle dish for a show-stopping centerpiece. Decorate with piped cream rosettes and a strawberry fan on top.
Q: Can I make it without sugar?
A: Yes, use a sugar substitute like erythritol or monk fruit in both the berries and whipped cream. Keep in mind that sugar helps stabilize whipped cream, so the texture might be slightly softer.
Summary
The No-Bake Strawberry Icebox Cake is a refreshing, make-ahead dessert that combines luscious strawberries, cloud-like whipped cream, and tender vanilla wafers into a harmonious chilled treat perfect for warm weather and busy schedules.
Easy to customize, naturally beautiful, and beloved by all ages, this classic dessert proves that sometimes, the simplest recipes create the most memorable moments.