Introduction
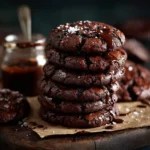
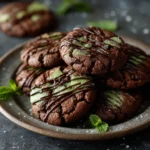
Peanut Butter Blossom Cookies are a beloved American classic—soft, chewy peanut butter cookies crowned with a glossy, melt-in-your-mouth chocolate kiss. Instantly recognizable by their signature glossy chocolate center nestled in a slightly crinkled, golden-brown cookie base, these treats evoke nostalgia, holiday traditions, and homemade warmth. Whether served at bake sales, Christmas cookie exchanges, or as an after-school snack, Peanut Butter Blossoms strike the perfect balance between rich nuttiness, subtle sweetness, and decadent chocolate—a timeless confection that continues to win hearts across generations.
The History
The Peanut Butter Blossom Cookie traces its origins to the mid-20th century, emerging from the fertile ground of American home baking innovation during the postwar era. While peanut butter cookies themselves date back to the early 1900s (with recipes appearing in cookbooks like The Boston Cooking-School Cook Book by Fannie Farmer), the iconic blossom variation was officially born in 1957—when Mrs. Freda Smith of Starkville, Mississippi, submitted her “Black-Eyed Susans” recipe to the Pillsbury Bake-Off Contest. Though she didn’t win first place, her creation—featuring a Hershey’s Milk Chocolate Kiss pressed into a rolled peanut butter cookie—earned Honorable Mention and quickly captured national attention. Pillsbury began promoting it under the name “Peanut Butter Blossoms,” and Hershey’s soon adopted the recipe for its own packaging, printing it directly on the foil wrapper of every standard milk chocolate kiss. By the 1960s, the cookie had become synonymous with holiday baking, appearing in church cookbooks, women’s magazines, and elementary school food fairs. Its enduring popularity is a testament not only to its irresistible flavor but also to its clever simplicity: a marriage of pantry staples elevated by one elegant, symbolic gesture—the gentle press of chocolate into warm dough.
Ingredients Breakdown
Every exceptional Peanut Butter Blossom begins with thoughtfully chosen, high-quality ingredients—each playing a distinct functional and flavor role:
- Unsalted Butter: Provides richness, tenderness, and flakiness. Unsalted allows precise control over sodium content and avoids interference with peanut butter’s natural salt profile.
- Granulated Sugar & Brown Sugar (light or dark): Granulated sugar delivers crisp edges and structural stability; brown sugar contributes moisture, chewiness, and subtle molasses depth. A 1:1 ratio yields ideal texture—too much brown sugar can cause overspreading; too much granulated may result in dryness.
- Creamy Peanut Butter (not natural/oil-separated): The star ingredient—must be shelf-stable, fully emulsified, and contain added sugars and hydrogenated oils (e.g., Jif, Skippy, or Peter Pan) to ensure proper structure and spread resistance. Natural peanut butter lacks stabilizers and will yield greasy, flat, oily cookies that fail to hold their shape or support the kiss.
- Large Eggs (room temperature): Act as binders and leavening agents, contributing to lift, moisture retention, and emulsification. Cold eggs can cause batter to seize; room temperature ensures seamless incorporation.
- Vanilla Extract (pure, not imitation): Enhances aromatic complexity and rounds out the peanut flavor without overpowering.
- All-Purpose Flour: Provides gluten structure. Measured correctly (spoon-and-level method—not scooped!) is critical—too much flour causes toughness and prevents proper spreading.
- Baking Soda: The sole leavening agent—reacts with acidic components (brown sugar, peanut butter) to create carbon dioxide, yielding lightness and the characteristic crinkled surface.
- Granulated Sugar (for rolling): Coating dough balls before baking creates a delicate, crackled crust and adds textural contrast and subtle sweetness to the exterior.
- Hershey’s Milk Chocolate Kisses (original, unwrapped): Chosen for their specific melting point, cocoa butter content, and iconic shape. Their gentle heat resistance allows them to soften—not liquefy—when pressed into warm cookies. Other chocolates (dark, white, or non-Hershey’s kisses) behave differently due to varying fat ratios and tempering.
Step-by-Step Recipe
- Prep Work (15 minutes): Position oven racks in upper and lower thirds. Line two large baking sheets with parchment paper or silicone baking mats—do not use greased surfaces, as excess oil interferes with crinkling and kiss adhesion. Measure all ingredients precisely. Allow butter and eggs to reach room temperature (65–70°F). Unwrap Hershey’s Kisses and set aside at room temperature—chilled kisses may crack the cookie surface upon pressing.
- Cream Butter & Sugars (3–4 minutes): In a large stand mixer fitted with the paddle attachment (or using a hand mixer), beat unsalted butter, granulated sugar, and brown sugar on medium-high speed until light, fluffy, and pale—about 3–4 minutes. Scrape bowl thoroughly halfway through. Proper creaming incorporates air, ensuring lift and tenderness.
- Incorporate Wet Ingredients (2 minutes): Add creamy peanut butter and beat on medium speed for 1 minute until fully combined and homogenous. Add eggs one at a time, beating well after each addition (about 30 seconds per egg) until fully emulsified. Stir in vanilla extract and mix just until incorporated—overmixing develops gluten and causes toughness.
- Combine Dry Ingredients (1 minute): In a separate medium bowl, whisk together all-purpose flour, baking soda, and fine sea salt until evenly distributed. Sifting is optional but recommended if flour has been compacted.
- Gradual Dry-Incorporation (2 minutes): Reduce mixer speed to low. Add dry ingredients in three equal portions, mixing only until *just* combined after each addition—about 15–20 seconds per portion. Stop immediately when no dry streaks remain. Overmixing = dense, tough cookies.
- Chill Dough (Minimum 30 minutes, ideally 1–2 hours): Cover bowl tightly and refrigerate dough. Chilling solidifies butter, preventing excessive spread, enhancing flavor development, and making dough easier to handle. For best results—and maximum crinkles—chill for 90 minutes. Do not skip this step.
- Preheat & Prep for Baking (10 minutes): Preheat oven to 375°F (190°C) at least 15 minutes before baking. Pour ½ cup granulated sugar into a shallow bowl for rolling.
- Portion & Roll (5 minutes): Using a 1.5-tablespoon cookie scoop (or a heaping tablespoon), portion chilled dough. Roll each portion firmly between palms into smooth, tight 1¼-inch balls. Roll each ball generously in granulated sugar until fully coated—this ensures pronounced cracks and visual appeal. Place balls 3 inches apart on prepared sheets (no more than 12 per standard half-sheet pan).
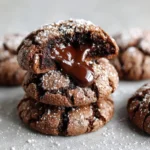
- Bake (9–11 minutes): Bake one sheet at a time on center rack for 9–11 minutes—or until edges are set and lightly golden, centers appear puffed and *just* beginning to lose their raw shine (they should still look soft and slightly underbaked in the middle). Rotate pan front-to-back halfway through for even baking. Avoid overbaking—cookies continue cooking on hot pans.
- Press Kisses (Immediately after removal): Within 30–60 seconds of pulling cookies from the oven—while still very soft and pliable—gently press one unwrapped Hershey’s Kiss straight down into the center of each cookie, rotating slightly as you press to embed fully without cracking. The cookie should rise slightly around the kiss’s base, creating a secure “nest.” Do not wait—delayed pressing causes cracking or slipping.
- Cool Completely (20–25 minutes): Let cookies cool on baking sheets for 5 minutes to set structure, then carefully transfer to wire racks using a thin spatula. Cool completely before storing—chocolate needs time to re-harden and cookies need time to finish setting. Rushing leads to broken kisses or misshapen cookies.
Tips
- Measure Flour Correctly: Use the spoon-and-level method—fluff flour in bag, spoon into measuring cup, level with straight edge. Scooping packs flour and adds up to 25% extra, resulting in dry, crumbly cookies.
- Butter Temperature Matters: Butter should be cool but pliable—not greasy or melty. If too warm, cookies spread excessively; if too cold, dough won’t cream properly. 65°F is ideal.
- Don’t Skip the Chill: Warm dough spreads uncontrollably, loses crinkles, and fails to hold the kiss upright. Even 30 minutes makes a difference—but 90 minutes is optimal.
- Use Real Hershey’s Kisses: Generic or off-brand kisses have different cocoa butter ratios and often melt too quickly or fail to hold shape. Original milk chocolate Hershey’s Kisses are scientifically calibrated for this recipe.
- Press While Hot—But Not Too Hot: Press too early (within 15 sec), and the kiss sinks too deep or melts unevenly. Press too late (after 90 sec), and the cookie resists indentation and cracks. Aim for 45 seconds post-oven.
- Rotate Pans, Not Racks: Always rotate pans front-to-back—not top-to-bottom—to avoid temperature shock. Switching racks mid-bake causes inconsistent browning.
- Batch Baking Strategy: Bake in small batches (max 12 cookies per sheet). Overcrowding traps steam, inhibiting crinkles and causing uneven baking.
- Freeze Dough Balls Ahead: Portion, roll in sugar, and freeze unbaked dough balls on a tray. Once solid, store in airtight freezer bags up to 3 months. Bake frozen—add 1–2 minutes to bake time. No thawing needed.
- Revive Stale Cookies: Place in a sealed container with a slice of fresh bread overnight—the bread’s moisture migrates into cookies, restoring softness.
- Uniformity Is Key: Use a cookie scoop for consistent size—ensures even baking and uniform kiss placement. Irregular sizes lead to some cookies burning while others remain underdone.
Variations and Customizations
While traditional Peanut Butter Blossoms reign supreme, creative bakers have expanded the concept with thoughtful, tested adaptations—each preserving structural integrity while offering new sensory experiences:
- Dark Chocolate Blossoms: Substitute Hershey’s Special Dark Chocolate Kisses. Adds bitterness and sophistication—pair with a pinch of flaky sea salt on top after pressing.
- Peanut Butter Cup Blossoms: Replace standard kisses with miniature Reese’s Peanut Butter Cups (unwrapped). Ensure they’re chilled before pressing to prevent smearing. Adds double peanut butter impact and creamy texture.
- Gluten-Free Blossoms: Swap all-purpose flour 1:1 with a certified GF all-purpose blend containing xanthan gum (e.g., King Arthur Measure-for-Measure or Bob’s Red Mill 1-to-1). Add ¼ tsp xanthan gum if blend doesn’t include it. Chill dough 2+ hours—GF dough spreads more readily.
- Vegan Blossoms: Use vegan butter (Miyoko’s or Earth Balance), flax eggs (1 tbsp ground flax + 2.5 tbsp water per egg), and dairy-free chocolate kisses (Enjoy Life or Unreal). Ensure peanut butter is vegan (no honey). Texture will be slightly denser but still tender.
- Flourless Peanut Butter Blossoms: Replace flour entirely with ¾ cup finely ground roasted peanuts or oat flour. Increases peanut intensity and yields ultra-chewy, fudgy centers—bake 1–2 minutes less.
- Spiced Blossoms: Add 1 tsp ground cinnamon + ¼ tsp ground ginger + pinch of cloves to dry ingredients. Complements peanut butter’s earthiness and adds warmth—ideal for fall baking.
- Espresso Blossoms: Dissolve 1 tsp instant espresso powder in vanilla extract before adding. Deepens chocolate notes and adds subtle café nuance without bitterness.
- Mini Blossoms: Use a 1-teaspoon scoop, chill 20 min, bake 6–7 minutes at 375°F. Perfect for parties, gift boxes, or portion control—press mini kisses or chopped chocolate.
- Savory-Sweet Blossoms: Add ½ tsp smoked paprika + ¼ tsp cayenne to dry ingredients, and finish with flaky salt + crushed roasted peanuts atop kisses. Unexpected, complex, and addictive.
- Protein-Boosted Blossoms: Replace 2 tbsp flour with unflavored whey or plant-based protein powder. Compensate with 1 extra tsp milk or peanut butter to retain moisture.
Health Considerations and Nutritional Value
A single traditional Peanut Butter Blossom Cookie (approx. 2.5″ diameter, made with standard ingredients) contains roughly:
- Calories: 160–180 kcal
- Total Fat: 9–10 g (including 3–4 g saturated fat)
- Carbohydrates: 18–20 g (11–13 g sugars, primarily from added sucrose and corn syrup in peanut butter and chocolate)
- Protein: 3–4 g (primarily from peanut butter and egg)
- Fiber: <1 g (low unless whole wheat or oat flour is substituted)
- Sodium: 90–120 mg (moderate—largely from peanut butter and butter)
Key Considerations:
- Sugar Content: Two sources contribute significantly—granulated/brown sugar in dough + added sugars in commercial peanut butter and chocolate kisses. One cookie contains ~12g added sugar—nearly 1/3 of the American Heart Association’s daily limit (36g) for men and >½ for women (25g). To reduce: cut granulated sugar by 2 tbsp, use reduced-sugar peanut butter (e.g., Smucker’s Natural PB + 1 tsp honey), and opt for dark chocolate kisses with <7g sugar per piece.
- Fat Profile: Primarily unsaturated fats from peanut butter (heart-healthy monounsaturated and polyunsaturated fats), balanced with saturated fat from butter and chocolate. Choosing unsalted butter and natural-style peanut butter (without hydrogenated oils) improves fatty acid quality.
- Allergens: Contains major allergens: peanuts, milk (in chocolate and butter), eggs, and wheat. Vegan/GF versions address some, but cross-contamination risk remains in shared facilities.
- Nutrient Density: Modest source of niacin, magnesium, and vitamin E from peanuts; calcium and vitamin D from milk chocolate; choline from eggs. Not inherently “nutrient-dense,” but becomes more so with whole grain flour, added flaxseed, or dark chocolate (>70% cacao).
- Dietary Adaptations: Gluten-free versions are safe for celiac disease when certified GF ingredients are used. Low-sugar options suit prediabetes or metabolic health goals—though texture and spread may change. High-protein versions support satiety and muscle maintenance.
- Mindful Enjoyment: These are celebratory treats—not everyday foods. Pairing with a glass of unsweetened almond milk or serving alongside fresh fruit balances indulgence. Portion awareness (e.g., limiting to 1–2 cookies per sitting) supports long-term dietary harmony.
Ingredients
- ¾ cup (170g) unsalted butter, room temperature
- ¾ cup (150g) granulated sugar
- ¾ cup (165g) packed light brown sugar
- ¾ cup (190g) creamy peanut butter (standard shelf-stable type—e.g., Jif or Skippy)
- 1 large egg, room temperature
- 1 large egg yolk, room temperature (for extra richness and chew)
- 1½ tsp pure vanilla extract
- 2¼ cups (280g) all-purpose flour, spooned & leveled
- 1 tsp baking soda
- ½ tsp fine sea salt
- ½ cup (100g) granulated sugar (for rolling dough balls)
- 36–48 unwrapped Hershey’s Milk Chocolate Kisses (original, not dark or special dark)
Directions
- Preheat oven to 375°F (190°C). Line two large baking sheets with parchment paper or silicone baking mats.
- In the bowl of a stand mixer fitted with the paddle attachment, beat butter, granulated sugar, and brown sugar on medium-high speed for 3–4 minutes, until light, fluffy, and pale yellow. Scrape bowl thoroughly.
- Add peanut butter and beat on medium speed for 1 minute until fully incorporated and smooth. Add egg, egg yolk, and vanilla; beat on medium for 1 minute, scraping bowl as needed, until homogeneous and slightly glossy.
- In a separate medium bowl, whisk together flour, baking soda, and salt until no streaks remain.
- Reduce mixer speed to low. Gradually add dry ingredients in three parts, mixing only until *just* combined after each addition—about 15 seconds per addition. Do not overmix. Dough will be soft and slightly sticky.
- Cover bowl tightly with plastic wrap and refrigerate for at least 1 hour (preferably 1.5–2 hours) to firm up and enhance flavor.
- Once chilled, pour ½ cup granulated sugar into a shallow bowl. Scoop dough using a 1.5-tablespoon cookie scoop (or heaping tablespoon). Roll each portion firmly between palms into smooth, tight 1¼-inch balls. Roll each ball generously in sugar until fully coated.
- Place dough balls 3 inches apart on prepared baking sheets (no more than 12 per sheet). Refrigerate unbaked sheets for 10 minutes while oven fully preheats—this further prevents spread.
- Bake one sheet at a time on center rack for 9–10 minutes, or until edges are set and lightly golden and centers appear puffed and just losing their raw sheen (they will look soft and slightly underbaked—this is correct).
- Immediately upon removing from oven, gently press one unwrapped Hershey’s Kiss into the center of each cookie, rotating slightly as you press to embed fully. Allow cookies to cool on baking sheet for 5 minutes.
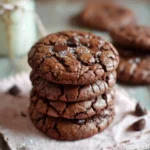
- Using a thin, flexible spatula, carefully transfer cookies to wire racks to cool completely—about 20 minutes. Chocolate will fully set as cookies cool.
- Store cooled cookies in an airtight container at room temperature for up to 5 days, or freeze for up to 3 months.
FAQ
- Why do my cookies spread too much?
- Most commonly due to warm dough, insufficient chilling, too much butter, or incorrect flour measurement. Also check if peanut butter is natural/oil-separated—this causes greasy spread. Ensure butter is cool-room-temp (65°F), chill dough ≥90 min, and measure flour accurately.
- Can I use natural peanut butter?
- Not recommended for traditional texture. Natural peanut butter separates, lacks stabilizers, and introduces excess oil—leading to flat, greasy, fragile cookies that won’t hold the kiss. If determined, stir thoroughly, blot excess oil, and add 1–2 tbsp extra flour—but expect compromised crinkles and chew.
- My kisses won’t stay centered—they slide off or sink too deep. What’s wrong?
- Kisses are likely too cold or pressed too late. Use room-temp kisses and press within 45 seconds of removing cookies from oven, while centers are soft but structured. Also ensure dough balls are rolled tightly—loose balls collapse inward.
- Can I make these ahead for holidays?
- Absolutely. Baked cookies freeze beautifully for 3 months in airtight containers with parchment between layers. Alternatively, freeze unbaked, sugar-coated dough balls for up to 3 months—bake from frozen, adding 1–2 minutes.
- Why do my cookies lack crinkles?
- Causes include overmixing dough (develops gluten), insufficient sugar coating (crinkles form where sugar crystals fracture surface), warm dough, or underbaking. Ensure proper chilling, generous sugar roll, and bake just until edges set but centers remain soft.
- Can I substitute oil for butter?
- Not advised. Butter provides essential structure, flavor, and steam for lift. Oil yields greasy, cakey, flat cookies with poor crinkle formation and weak kiss adhesion.
- How do I prevent kisses from cracking the cookie surface?
- Press gently and slowly—don’t slam. Rotate the kiss slightly as you press downward to encourage the dough to rise *around* it rather than split. Ensure cookies are baked just enough—underbaked centers are pliable; overbaked ones are brittle.
- Can I use chunky peanut butter?
- Yes—but expect less uniform texture and potentially uneven spread. Small peanut pieces may cause slight irregularities in crinkles. For showstopping appearance, creamy is preferred—but chunky adds delightful crunch.
- Are Peanut Butter Blossoms safe for nut-allergic individuals?
- No. They contain significant peanut content in both dough and often cross-contact risk in facilities. Even “peanut-free” versions using sunflower seed butter behave very differently and require full recipe reformulation.
- What’s the best way to transport these for a potluck?
- Let cookies cool completely, then layer in a rigid container with parchment between tiers. Place a small silica gel packet inside to absorb ambient moisture and prevent chocolate bloom. Keep at room temp—refrigeration causes condensation and dulls chocolate sheen.
Summary
Peanut Butter Blossom Cookies are an iconic, crinkled peanut butter cookie crowned with a perfectly softened Hershey’s Milk Chocolate Kiss—born from 1957 Pillsbury Bake-Off ingenuity and perfected through decades of home baking tradition.
Success hinges on precise ingredient selection (especially shelf-stable peanut butter and authentic Hershey’s Kisses), disciplined chilling, correct flour measurement, and the critical 45-second window for kiss insertion—transforming simple pantry staples into a nostalgic, texturally brilliant, and universally cherished treat.