Strawberry Cheesecake Bars: A Decadent Delight for Every Occasion
Introduction
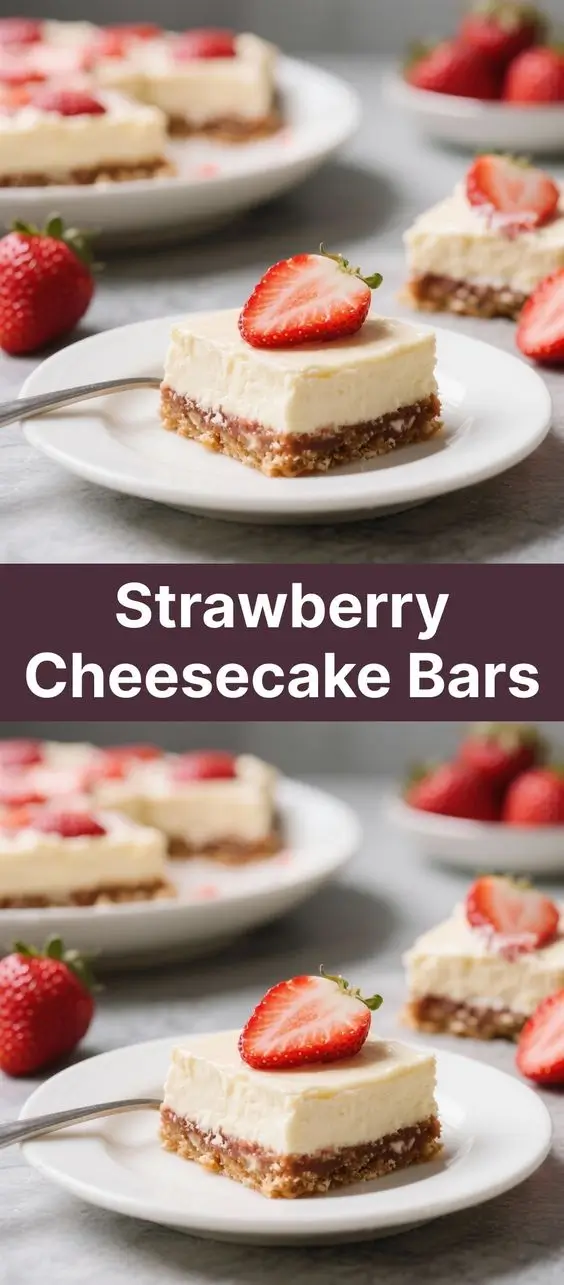
Indulge in the creamy, dreamy world of strawberry cheesecake bars — a delightful fusion of buttery crust, velvety cheesecake filling, and vibrant strawberry topping. These handheld treats are perfect for parties, picnics, or simply satisfying your sweet tooth. Unlike traditional cheesecakes that require slicing and plating, these bars offer convenience without compromising on flavor. With their stunning appearance and irresistible taste, strawberry cheesecake bars have become a favorite among dessert lovers of all ages.
The History
Cheesecake itself dates back thousands of years to ancient Greece, where it was served to athletes during the first Olympic games as a source of energy. Over centuries, cheesecake evolved and spread across Europe, eventually making its way to America, where it underwent further transformations. The classic New York-style cheesecake emerged in the late 19th century, characterized by its dense, rich texture.
The concept of turning cheesecake into bar form is a more modern innovation, likely born out of home bakers’ desire for portability and ease of serving. By the mid-20th century, with the rise of baking pans and accessible ingredients like cream cheese, cheesecake bars began appearing in American cookbooks. Strawberry cheesecake bars, in particular, gained popularity due to the natural pairing of sweet-tart strawberries with rich cream cheese. Today, they are a staple at bake sales, brunches, and family gatherings across the United States and beyond.
Ingredients Breakdown
To create the perfect strawberry cheesecake bars, you need three essential components: the crust, the cheesecake layer, and the strawberry topping. Each ingredient plays a crucial role in achieving the ideal balance of flavor, texture, and structure.
For the Crust:
- Graham Crackers (1 ½ cups, crushed): Provides a slightly sweet, nutty base with a pleasant crunch.
- Unsalted Butter (6 tablespoons, melted): Binds the crumbs together and adds richness.
- Granulated Sugar (2 tablespoons): Enhances sweetness and helps create a golden-brown finish when baked.
- Pinch of Salt: Balances flavors and enhances overall taste.
For the Cheesecake Layer:
- Cream Cheese (24 oz, full-fat, room temperature): The star ingredient; ensures a smooth, creamy texture.
- Granulated Sugar (¾ cup): Sweetens the filling while helping it set properly.
- Large Eggs (3): Provide structure and help the mixture rise slightly during baking.
- Vanilla Extract (1 teaspoon): Adds depth and warmth to the flavor profile.
- Sour Cream (½ cup): Contributes tanginess and moisture, preventing cracks.
- All-Purpose Flour (2 tablespoons): Helps stabilize the mixture and prevents excessive jiggling.
For the Strawberry Topping:
- Fresh Strawberries (2 cups, sliced): Deliver freshness, color, and natural sweetness.
- Granulated Sugar (¼ cup): Draws out juices and creates a glossy glaze.
- Lemon Juice (1 tablespoon): Brightens flavor and prevents oxidation.
- Cornstarch (1 tablespoon): Thickens the sauce for a professional finish.
- Optional: Red Food Coloring (a drop): Enhances visual appeal if desired.
Step-by-Step Recipe
Step 1: Prepare the Crust
- Preheat your oven to 325°F (165°C). Line a 9×13-inch baking pan with parchment paper, leaving an overhang on two sides for easy removal.
- In a medium bowl, combine graham cracker crumbs, melted butter, sugar, and salt. Mix until the crumbs are evenly moistened and resemble wet sand.
- Press the mixture firmly into the bottom of the prepared pan using the back of a spoon or a flat-bottomed glass. Ensure it’s evenly distributed and compacted for structural integrity.
- Bake the crust for 10 minutes. Remove from oven and let cool while preparing the filling. Keep the oven on.
Step 2: Make the Cheesecake Filling
- In a large mixing bowl, beat the cream cheese with an electric mixer on medium speed until smooth and fluffy (about 2 minutes).
- Add sugar gradually, beating until fully incorporated. Scrape down the sides of the bowl as needed.
- Add eggs one at a time, mixing just until each is blended. Do not overmix, as this can incorporate too much air and lead to cracking.
- Mix in vanilla extract, sour cream, and flour. Blend until just combined and silky.
- Pour the filling over the cooled crust, spreading it evenly with a spatula.
Step 3: Bake the Bars
- Place the pan in the preheated oven and bake for 35–40 minutes, or until the edges are set but the center still has a slight jiggle (like Jell-O).
- Turn off the oven, crack the door open slightly, and let the bars cool inside for 1 hour. This gradual cooling minimizes cracks and ensures even setting.
- Remove from oven and cool completely at room temperature. Then refrigerate for at least 4 hours — preferably overnight — to allow the filling to firm up.
Step 4: Add the Strawberry Topping
- In a small saucepan, combine sliced strawberries, sugar, lemon juice, and cornstarch. Stir well.
- Cook over medium heat, stirring frequently, until the mixture comes to a gentle boil and thickens (about 8–10 minutes).
- Reduce heat and simmer for another 2 minutes. If desired, gently mash some strawberries for a chunkier texture.
- Let the sauce cool slightly, then spread it evenly over the chilled cheesecake layer.
- Refrigerate for an additional 30 minutes to set the topping before cutting.
Step 5: Cut and Serve
- Using the parchment overhang, lift the entire slab out of the pan and place it on a cutting board.
- With a sharp knife dipped in hot water and wiped dry between cuts, slice into 12–15 bars for clean edges.
- Serve chilled, optionally garnished with fresh strawberry slices, whipped cream, or mint leaves.
Tips
- Room Temperature Ingredients: Always use room temperature cream cheese, eggs, and sour cream to prevent lumps and ensure a smooth batter.
- Avoid Overmixing: Mix only until ingredients are incorporated. Overbeating introduces air bubbles that may cause cracks during baking.
- Water Bath Alternative: While traditional cheesecakes often use a water bath, the thinner layer of bar-style cheesecake usually doesn’t require one. However, placing a shallow pan of water on the lower rack can add humidity and reduce cracking.
- Use Parchment Paper: It makes lifting the bars out effortless and prevents sticking.
- Chill Thoroughly: Never rush the chilling process. Cold temperatures are essential for clean slicing and optimal texture.
- Knife Technique: Dip your knife in hot water and wipe it clean after every cut for pristine edges.
- Storage Tip: Store leftovers covered in the refrigerator for up to 5 days. They also freeze well for up to 2 months (without topping) — wrap individually in plastic and thaw in fridge before adding fresh topping.
Variations and Customizations
One of the greatest things about strawberry cheesecake bars is how easily they can be customized to suit different tastes, dietary needs, or seasonal occasions.
Crust Variations:
- Oreo Crust: Replace graham crackers with chocolate sandwich cookies for a chocolatey twist.
- Ginger Snap Crust: Offers a spiced, warm flavor that pairs beautifully with strawberries.
- Gluten-Free Option: Use gluten-free graham crackers or almond flour mixed with butter and sugar.
- Low-Sugar Crust: Substitute with crushed digestive biscuits or a mix of nuts and dates.
Filling Twists:
- Chocolate Swirl: Melt ½ cup chocolate chips and drizzle into the batter before baking; swirl with a knife.
- Lemon Zest: Add 1 tablespoon lemon zest to the filling for a citrusy brightness.
- Vanilla Bean: Use real vanilla bean paste instead of extract for a more aromatic experience.
- Ricotta or Mascarpone Blend: Replace half the cream cheese with ricotta or mascarpone for a lighter, Italian-inspired texture.
Topping Alternatives:
- Other Berries: Try blueberry, raspberry, or mixed berry compote for variety.
- Fresh Fruit Layer: Skip the cooked topping and arrange fresh strawberry slices on top, secured with a thin layer of warmed apricot jam or gelatin glaze.
- White Chocolate Drizzle: Melt white chocolate and drizzle over the finished bars for elegance.
- Marshmallow Fluff: For a s’mores version, toast marshmallow fluff under the broiler after adding the strawberry layer.
Dietary Modifications:
- Low-Fat Version: Use reduced-fat cream cheese and sour cream (though texture may be slightly less creamy).
- Sugar-Free Option: Substitute granulated sugar with erythritol or monk fruit sweetener, and use sugar-free jam for topping.
- Vegan Adaptation: Use plant-based cream cheese, coconut oil crust, and agar-agar instead of cornstarch. Top with fresh strawberries.
Health Considerations and Nutritional Value
While strawberry cheesecake bars are undeniably delicious, it’s important to enjoy them mindfully, especially for those monitoring calorie intake, sugar consumption, or specific dietary restrictions.
Nutritional Breakdown (Per Serving, Approximate – based on 15 servings):
- Calories: ~320 kcal
- Total Fat: 20g (Saturated Fat: 12g)
- Cholesterol: 85mg
- Sodium: 210mg
- Total Carbohydrates: 30g (Dietary Fiber: 1g, Sugars: 22g)
- Protein: 5g
Health Notes:
- High in Saturated Fat and Sugar: Due to cream cheese, butter, and added sugars, these bars should be considered an occasional treat rather than a daily snack.
- Lactose Content: Contains dairy; not suitable for lactose-intolerant individuals unless modified with lactose-free alternatives.
- Calcium Source: Cream cheese provides a modest amount of calcium, beneficial for bone health.
- Antioxidants from Strawberries: Fresh strawberries contribute vitamin C, manganese, and antioxidants like anthocyanins, which support heart health and reduce inflammation.
- Portion Control: Cutting smaller bars allows guests to enjoy the flavor without overindulging.
- Balanced Pairing: Serve with a side of fresh fruit or green tea to offset richness and aid digestion.
Ingredients
Full Ingredient List (for 9×13-inch pan, 12–15 bars):
- 1 ½ cups graham cracker crumbs (about 10 full sheets)
- 6 tablespoons unsalted butter, melted
- 2 tablespoons granulated sugar
- Pinch of salt
- 24 oz (3 packages) full-fat cream cheese, room temperature
- ¾ cup granulated sugar
- 3 large eggs, room temperature
- 1 teaspoon pure vanilla extract
- ½ cup sour cream, room temperature
- 2 tablespoons all-purpose flour
- 2 cups fresh strawberries, hulled and thinly sliced
- ¼ cup granulated sugar (for topping)
- 1 tablespoon lemon juice
- 1 tablespoon cornstarch
- Optional: drop of red food coloring
Directions
- Preheat oven to 325°F (165°C). Line a 9×13-inch baking pan with parchment paper, leaving overhang on two opposite sides.
- Make the crust: In a bowl, mix graham cracker crumbs, melted butter, 2 tbsp sugar, and salt. Press firmly into the bottom of the pan. Bake for 10 minutes. Cool completely.
- Make the filling: Beat cream cheese until smooth. Gradually add ¾ cup sugar and beat until creamy. Add eggs one at a time, mixing just until blended. Mix in vanilla, sour cream, and flour until smooth. Pour over cooled crust and spread evenly.
- Bake for 35–40 minutes until edges are set and center jiggles slightly. Turn off oven, crack door, and let cool inside for 1 hour. Cool completely at room temperature, then chill for at least 4 hours.
- Make topping: In a saucepan, combine strawberries, ¼ cup sugar, lemon juice, and cornstarch. Cook over medium heat, stirring constantly, until thickened (8–10 minutes). Cool slightly, then spread over chilled cheesecake.
- Chill for 30 more minutes. Lift out using parchment and cut into bars with a hot, clean knife.
- Serve cold, optionally garnished with extra berries or whipped cream.
FAQ
Can I make strawberry cheesecake bars ahead of time?
Yes! These bars actually benefit from being made 1–2 days in advance. The flavors deepen and the texture firms up in the fridge. Store covered until ready to serve.
Why did my cheesecake crack?
Cracking is usually caused by overbaking, overmixing, or rapid cooling. To prevent this, avoid overbeating the batter, bake until only slightly jiggly in the center, and cool slowly in the turned-off oven.
Can I use frozen strawberries?
You can, but fresh strawberries are preferred for better texture and less excess moisture. If using frozen, thaw and drain thoroughly before cooking to avoid a watery topping.
How do I store leftover bars?
Keep in an airtight container in the refrigerator for up to 5 days. Place parchment between layers to prevent sticking.
Can I freeze strawberry cheesecake bars?
Yes, but it’s best to freeze them before adding the strawberry topping. Wrap tightly in plastic and freeze for up to 2 months. Thaw in the fridge overnight, then add fresh topping before serving.
Can I make mini cheesecake bars?
Absolutely! Use a muffin tin lined with paper liners. Reduce baking time to 20–25 minutes and adjust crust amount accordingly.
Is there a no-bake version?
Yes, though texture will differ. Use a base of melted butter and cookies, a filling of whipped cream cheese, powdered sugar, and whipped topping, chilled until firm. Top with fresh strawberries and glaze.
Can I use store-bought strawberry jam?
Yes, you can warm and strain jam to create a quick glaze. However, homemade topping offers superior flavor and control over sweetness and texture.
Are these bars gluten-free?
Not by default, due to graham crackers and flour. But you can make them gluten-free by using certified gluten-free graham crackers and omitting or substituting the flour with cornstarch or gluten-free all-purpose flour.
What size pan should I use?
A 9×13-inch rectangular pan is ideal. Using a different size (like 8×8) will change thickness and baking time — adjust accordingly.
Summary
Strawberry cheesecake bars combine a buttery graham cracker crust, rich and creamy cheesecake filling, and a glossy homemade strawberry topping for a show-stopping dessert that’s as beautiful as it is delicious. Easy to prepare, customizable, and perfect for sharing, these bars are sure to become a favorite at any gathering.