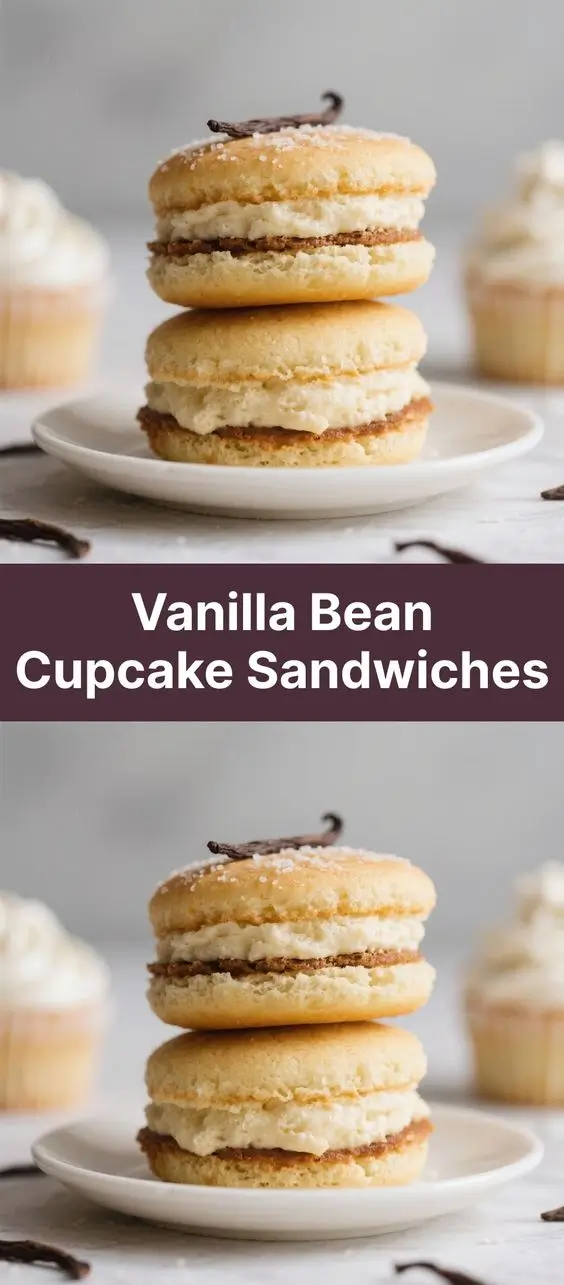
Vanilla Bean Cupcake Sandwiches: A Delightful Treat for Every Occasion
Indulge in the heavenly charm of Vanilla Bean Cupcake Sandwiches — a whimsical twist on classic cupcakes that brings together two soft, fluffy vanilla bean cupcakes with a luscious filling to create an edible masterpiece. Whether you’re planning a birthday party, a baby shower, or simply craving something sweet and satisfying, these cupcake sandwiches are sure to impress. With their delicate aroma, moist crumb, and creamy center, they’re not just desserts — they’re experiences.
The History of Vanilla Bean Cupcake Sandwiches
While cupcakes themselves have been around since the 19th century, the concept of a “cupcake sandwich” is a modern culinary innovation born from the creative minds of bakers looking to elevate traditional treats. Originating in boutique bakeries across the United States during the early 2010s, cupcake sandwiches emerged as part of the gourmet dessert trend, where presentation and flavor pairing became just as important as taste.
Vanilla bean, often referred to as the “queen of spices,” has long held a place of honor in baking. Its use dates back to the Totonac people of Mexico, who first cultivated the vanilla orchid. When European explorers brought it to Europe, it quickly became a prized ingredient in fine pastries and confections. The combination of this rich heritage with modern creativity gave rise to the Vanilla Bean Cupcake Sandwich — a dessert that celebrates both tradition and innovation.
Beyond aesthetics, the sandwich format offers practical advantages: easier handling, portion control, and endless possibilities for fillings and decorations. Today, these treats are staples at trendy cafes, food festivals, and home kitchens alike, loved for their playful appearance and decadent flavor.
Ingredients Breakdown: What Makes These Cupcakes Special
The magic of Vanilla Bean Cupcake Sandwiches lies in the quality and synergy of ingredients. Each component is carefully chosen to deliver maximum flavor, texture, and visual appeal.
- Vanilla Beans (Real Pods): Using real vanilla beans instead of extract provides speckled elegance and a deeper, floral aroma. One pod can infuse an entire batch with authentic warmth and complexity.
- All-Purpose Flour: Provides structure while maintaining tenderness. Sifted thoroughly to avoid clumps and ensure lightness.
- Baking Powder & Baking Soda: Leavening agents that give the cupcakes their signature rise and airy texture.
- Butter (Unsalted): High-fat butter contributes richness and moisture. Creamed properly with sugar, it traps air for a fluffy crumb.
- Granulated Sugar: Sweetens and helps aerate the batter during creaming.
- Eggs (Large, Room Temperature): Bind the ingredients and add volume. Room temperature ensures even mixing.
- Sour Cream or Full-Fat Yogurt: Adds tanginess and moisture, resulting in a denser yet still tender cake compared to using milk alone.
- Whole Milk: Balances the batter’s consistency and enhances mouthfeel.
- Pure Vanilla Extract: Complements the vanilla bean for layered flavor depth.
- Salt: Enhances all flavors and prevents sweetness from becoming cloying.
For the filling, options vary widely — from classic vanilla buttercream to fruit compotes, chocolate ganache, or mascarpone whipped cream — each adding its own personality to the sandwich.
Step-by-Step Recipe: How to Make Perfect Vanilla Bean Cupcake Sandwiches
Follow this detailed guide to create bakery-quality Vanilla Bean Cupcake Sandwiches right in your kitchen.
Ingredients
For the Vanilla Bean Cupcakes:
- 2 cups (250g) all-purpose flour
- 1 ¾ tsp baking powder
- ½ tsp baking soda
- ½ tsp salt
- ¾ cup (170g) unsalted butter, softened
- 1 ½ cups (300g) granulated sugar
- 2 large eggs, room temperature
- 1 tbsp pure vanilla extract
- 1 vanilla bean pod, seeds scraped
- ¾ cup (180g) sour cream, room temperature
- ¼ cup (60ml) whole milk, room temperature
For the Vanilla Bean Buttercream Filling:
- 1 cup (230g) unsalted butter, softened
- 4 cups (480g) powdered sugar, sifted
- 2–3 tbsp heavy cream or milk
- 1 tsp pure vanilla extract
- 1 vanilla bean pod, seeds scraped
- Pinch of salt
Directions
- Preheat and Prepare: Preheat oven to 350°F (175°C). Line two standard muffin tins with 18 cupcake liners. Set aside.
- Infuse the Sugar (Optional but Recommended): For extra vanilla flavor, rub the scraped vanilla bean seeds into the granulated sugar using your fingers. Let sit for 10–15 minutes to allow the aromatic oils to disperse.
- Mix Dry Ingredients: In a medium bowl, whisk together flour, baking powder, baking soda, and salt. Set aside.
- Cream Butter and Sugar: In a large mixing bowl, beat softened butter and infused sugar together on medium-high speed until light and fluffy (about 3–4 minutes).
- Add Eggs and Vanilla: Add eggs one at a time, beating well after each addition. Scrape down the sides of the bowl. Mix in vanilla extract and scraped vanilla bean seeds.
- Alternate Wet and Dry Ingredients: Gradually add the dry ingredients in three parts, alternating with sour cream and milk, beginning and ending with dry ingredients. Mix on low speed just until combined. Do not overmix.
- Fill Liners: Divide batter evenly among cupcake liners, filling each about ⅔ full.
- Bake: Bake for 18–22 minutes, or until a toothpick inserted into the center comes out clean. Rotate pans halfway through for even baking.
- Cool: Allow cupcakes to cool in pans for 5 minutes, then transfer to a wire rack to cool completely before frosting.
- Prepare Buttercream: While cupcakes cool, make the filling. Beat softened butter on medium speed until creamy (about 2 minutes). Gradually add sifted powdered sugar, one cup at a time, mixing on low.
- Add Flavor and Adjust Consistency: Mix in vanilla extract, scraped vanilla bean seeds, and salt. Add heavy cream one tablespoon at a time until desired spreading consistency is reached. Whip for 2–3 minutes until light and fluffy.
- Assemble the Sandwiches: Once cupcakes are fully cooled, slice each horizontally into two even layers using a serrated knife. Place a generous dollop of buttercream on the bottom half, then top with the upper half to create a sandwich. Press gently to adhere.
- Optional Decoration: Dust with powdered sugar, drizzle with caramel, garnish with fresh berries, or roll edges in sprinkles for added flair.
- Serve or Store: Serve immediately, or store in an airtight container in the refrigerator for up to 3 days (bring to room temperature before serving).
Tips for Success: Expert Advice for Flawless Results
- Use Real Vanilla Beans: Don’t substitute imitation vanilla. Real beans provide superior flavor and beautiful black speckles that signal quality.
- Room Temperature Ingredients: Cold ingredients don’t emulsify well, leading to dense or curdled batter. Take butter, eggs, sour cream, and milk out 1–2 hours ahead.
- Sift Dry Ingredients: Prevents lumps and ensures even leavening distribution.
- Don’t Overmix: Once flour is added, mix only until incorporated. Overmixing develops gluten, resulting in tough cupcakes.
- Uniform Filling: Use a cookie scoop or ice cream scoop to portion batter evenly for consistent size and bake time.
- Cool Completely: Warm cupcakes will melt the buttercream, causing it to slide out. Patience is key!
- Sharp Knife for Slicing: Use a long serrated knife and saw gently to avoid compressing the delicate cake layers.
- Buttercream Too Thick? Add more cream, one teaspoon at a time. Too thin? Add more powdered sugar.
Variations and Customizations: Make It Your Own
Vanilla Bean Cupcake Sandwiches are incredibly versatile. Here are some creative ideas to personalize them:
- Fruit-Filled Delight: Replace buttercream with lemon curd and fresh raspberries for a bright, summery twist.
- Chocolate Lover’s Dream: Fill with chocolate ganache or Nutella. Roll edges in mini chocolate chips.
- Coffee Infusion: Add 1 tsp instant espresso powder to the batter or use coffee buttercream for a mocha version.
- Gluten-Free Option: Substitute all-purpose flour with a 1:1 gluten-free blend. Ensure other ingredients are certified GF.
- Dairy-Free Version: Use plant-based butter, coconut yogurt, and almond milk. Opt for dairy-free chocolate if adding.
- Vegan Adaptation: Replace eggs with flax eggs (1 tbsp ground flax + 3 tbsp water per egg), use vegan butter and non-dairy milk.
- Mini Sandwiches: Use a mini muffin tin and tiny fillings for bite-sized treats perfect for parties.
- Seasonal Themes: Decorate with pumpkin spice filling in fall, peppermint buttercream in winter, or strawberry cream in spring.
- Alcoholic Twist (Adults Only): Add 1–2 tbsp bourbon, Baileys, or Grand Marnier to the buttercream for a sophisticated edge.
- Nutty Crunch: Spread with almond butter and top with crushed toasted almonds or pecans.
Health Considerations and Nutritional Value
While Vanilla Bean Cupcake Sandwiches are undeniably indulgent, understanding their nutritional profile helps in making informed choices.
Nutritional Breakdown (Per Serving, Approximate):
- Calories: ~380–420 kcal
- Total Fat: 18–22g (mostly from butter and sour cream)
- Saturated Fat: 11–13g
- Cholesterol: ~60mg
- Sodium: ~200–250mg
- Total Carbohydrates: 50–55g
- Sugars: 38–42g (primarily from granulated and powdered sugar)
- Protein: 4–5g
- Fiber: ~1g
Considerations:
- High Sugar Content: Best enjoyed in moderation, especially for those managing blood sugar levels or diabetes.
- Low Fiber and Protein: Pair with a protein-rich beverage like Greek yogurt smoothie to balance the meal.
- Butter and Saturated Fat: While delicious, excessive intake may affect heart health. Consider reduced-fat versions cautiously (may alter texture).
- Allergens: Contains dairy, eggs, wheat, and potential tree nuts (depending on variations).
- Healthier Swaps: Use honey or maple syrup sparingly, though note they may change texture. Applesauce can replace some fat, but not all, to maintain structure.
Frequently Asked Questions (FAQ)
Q: Can I make these cupcakes ahead of time?
A: Yes! Bake and cool cupcakes up to 2 days in advance. Store unfrosted in an airtight container at room temperature. Frost the day of serving.
Q: Can I freeze Vanilla Bean Cupcake Sandwiches?
A: Absolutely. Freeze unfilled cupcakes for up to 3 months. Thaw overnight, then fill and serve. Avoid freezing filled sandwiches with perishable fillings like fresh fruit or custard.
Q: Why did my cupcakes sink in the middle?
A: Common causes include underbaking, opening the oven too early, too much leavening, or overmixing. Ensure accurate measurements and avoid drafts.
Q: Can I use vanilla bean paste instead of a real pod?
A: Yes. Vanilla bean paste offers convenience and visible specks. Use 1–2 teaspoons per recipe. Quality varies, so choose a reputable brand.
Q: How do I transport these without smushing?
A: Use a single-layer container with dividers or a muffin tin lined with parchment. Chill briefly before moving to firm the filling.
Q: Can I make them without sour cream?
A: Yes — substitute with full-fat Greek yogurt, plain kefir, or even mashed banana for a different flavor profile.
Q: Are these suitable for kids?
A: Yes! Kids love the fun sandwich style. Consider mini versions and decorate with colorful sprinkles or edible glitter.
Q: Can I use salted butter?
A: You can, but reduce added salt by half to avoid oversalting.
Summary
Vanilla Bean Cupcake Sandwiches combine the timeless elegance of real vanilla with the playful innovation of dessert engineering, resulting in a treat that’s as delightful to look at as it is to eat. With moist, fragrant cake layers hugging a rich, creamy filling, each bite is a celebration of flavor and texture.