Introduction
Chocolate Chip Cookie Cobbler is a decadent, nostalgic, and effortlessly elegant dessert that bridges the comforting familiarity of classic chocolate chip cookies with the warm, bubbling charm of a traditional cobbler. Unlike conventional cobblers—typically built on fruit bases—this inventive twist swaps berries or stone fruits for rich, buttery cookie dough studded with melty semi-sweet chocolate chips, then crowns it with a luxuriously soft, cake-like biscuit or batter topping that bakes up golden and tender. The result? A stunning two-layered dessert where the bottom layer transforms into a gooey, chewy, slightly caramelized cookie foundation, while the top puffs into a moist, crumbly, almost shortcake-like crown. Bubbling at the edges, fragrant with brown sugar, vanilla, and toasted butter, and crowned with a dusting of flaky sea salt or a scoop of melting vanilla bean ice cream, Chocolate Chip Cookie Cobbler is more than just dessert—it’s an experience: cozy yet impressive, simple to assemble yet deeply satisfying. Whether served straight from the oven at a holiday gathering, as a weekend treat for the family, or as a showstopping finale to a dinner party, this dessert delivers irresistible texture contrast, layered sweetness, and pure, unadulterated joy in every spoonful.
The History
Though cobblers trace their roots back to 17th-century England—and later evolved into beloved American staples during the colonial and pioneer eras—Chocolate Chip Cookie Cobbler is a decidedly modern fusion born from culinary creativity, pantry improvisation, and the enduring popularity of two all-American icons: the chocolate chip cookie (invented by Ruth Wakefield in 1938 at the Toll House Inn) and the fruit cobbler (a rustic, oven-baked dessert popularized across the U.S. South and Midwest for its simplicity and adaptability). The earliest documented references to “cookie cobbler” variations appear in mid-20th-century community cookbooks and regional home economics bulletins, where resourceful bakers substituted seasonal fruit fillings with pantry staples like canned pie filling—or even crushed graham crackers and pudding—in times of scarcity. However, the intentional, elevated marriage of chocolate chip cookie dough and cobbler technique didn’t gain widespread traction until the early 2000s, buoyed by food blogs, viral baking videos, and the rise of “deconstructed” and “hybrid” desserts. Pioneering bakers experimented with layering chilled cookie dough beneath a buttermilk biscuit topping, discovering that the steam and heat created a magical synergy: the base baked into a dense, fudgy, almost blondie-like layer, while the topping rose gently, absorbing buttery aromas and developing a delicate, crackled crust. By the 2010s, versions appeared in major publications like Bon Appétit, Food & Wine, and Martha Stewart Living, often rebranded as “Chocolate Chip Skillet Cobbler,” “Cookie Crisp Cobbler,” or “Brown Butter Chocolate Chip Cobbler.” Today, it stands as a beloved example of American dessert innovation—honoring tradition while fearlessly remixing it—with countless riffs appearing on TikTok, Instagram Reels, and Pinterest boards under hashtags like #CookieCobbler and #DessertHack.
Ingredients Breakdown
Understanding each ingredient’s role is key to mastering Chocolate Chip Cookie Cobbler—not just for flavor, but for texture, structure, and chemical harmony:
- All-Purpose Flour (2 ½ cups, spooned & leveled): Provides gluten structure for both the cookie base and biscuit topping. Too much leads to toughness; too little causes collapse. Bleached flour yields a more tender crumb, while unbleached offers slightly more chew.
- Granulated Sugar (¾ cup): Adds sweetness, aids in browning (via caramelization), and contributes to crispness in the base layer. Its fine crystals dissolve easily into the batter.
- Packed Brown Sugar (1 ¼ cups, light or dark): The soul of depth and moisture. Molasses content adds acidity (which activates baking soda), rich caramel notes, and hygroscopic properties that retain tenderness—even days later. Dark brown sugar intensifies flavor and color; light brown yields a milder, more balanced sweetness.
- Baking Soda (1 tsp): Reacts with the molasses’ acidity and heat to create carbon dioxide bubbles—essential for lift in the topping and slight spread in the base. Must be fresh (<6 months old) for full potency.
- Baking Powder (1 ½ tsp): Double-acting—provides initial lift when mixed with wet ingredients and secondary expansion in the oven. Works synergistically with baking soda for optimal rise and airy crumb in the biscuit layer.
- Salt (1 ¼ tsp fine sea salt or kosher salt): Not just for seasoning—it enhances all other flavors, controls yeast activity (not applicable here), and strengthens gluten bonds. Flaky Maldon or fleur de sel is ideal for finishing.
- Unsalted Butter (1 cup / 2 sticks, cold and cubed for topping; ½ cup melted and cooled for base): Cold butter in the topping creates steam pockets for flakiness; melted, cooled butter in the base ensures even distribution, richness, and chew. Browned butter (cooled) adds nutty complexity and deeper aroma.
- Large Eggs (2, room temperature): Bind ingredients, add moisture and fat, and contribute to leavening via trapped air when beaten. Room temperature ensures uniform emulsification—especially critical when combining with melted butter and sugars.
- Pure Vanilla Extract (2 tbsp): High-quality, alcohol-based extract (not imitation) delivers floral, creamy, and woody notes that elevate both layers. For intensity, add ½ tsp vanilla bean paste or seeds scraped from 1 pod.
- Whole Milk or Buttermilk (¾ cup, cold): Adds liquid, fat, and acidity. Buttermilk boosts tenderness and tang—ideal for balancing sweetness—and reacts with leaveners for extra lift. If using regular milk, add 1 tsp white vinegar or lemon juice and let sit 5 minutes to acidify.
- Semi-Sweet Chocolate Chips (2 cups, plus extra for garnish): Standard 60% cocoa chocolate provides ideal sweetness-to-bitterness balance and reliable melt. Mini chips distribute more evenly; chopped chocolate bars offer irregular pockets of intense flavor and glossy sheen. Avoid chips labeled “baking chips” or “melting wafers”—they contain stabilizers that inhibit proper melting and pooling.
- Optional Enhancements: 1 tsp cinnamon (warmth), ¼ tsp nutmeg (depth), ½ cup toasted walnuts or pecans (crunch), 2 tbsp instant espresso powder (bitter contrast), 1 tbsp corn syrup (chew retention), or a splash of bourbon (complexity).
Step-by-Step Recipe
- Preheat & Prep: Position oven rack in the lower third. Preheat oven to 350°F (175°C). Generously grease a deep 9×13-inch metal baking pan (or 10-inch cast-iron skillet for rustic presentation) with nonstick spray or softened butter. Line bottom with parchment paper, leaving 2-inch overhangs on two opposite sides for easy lifting.
- Mix Dry Ingredients for Base: In a large bowl, whisk together 1 ½ cups all-purpose flour, ¾ cup granulated sugar, 1 cup packed brown sugar, ½ tsp baking soda, ½ tsp salt, and optional spices (e.g., 1 tsp cinnamon). Ensure no lumps remain.
- Combine Wet Ingredients for Base: In a separate medium bowl, whisk ½ cup melted (and cooled to lukewarm) unsalted butter, 1 large egg, 1 tbsp vanilla extract, and ¼ cup whole milk until smooth and homogenous. No streaks of butter should remain.
- Form Cookie Base Batter: Pour wet mixture into dry ingredients. Stir with a sturdy spatula or wooden spoon just until no dry flour remains—about 30–45 seconds. Do not overmix. Fold in 1 ½ cups chocolate chips until evenly distributed. Batter will be thick, sticky, and slightly shaggy—similar to stiff cookie dough.
- Press Base Evenly: Transfer batter to prepared pan. Using lightly greased hands or a greased offset spatula, press firmly and evenly into the bottom—covering every corner and creating a uniform ½-inch-thick layer. Smooth surface with damp fingertips. Refrigerate uncovered for 15 minutes (this prevents excessive spreading and helps set structure).
- Prepare Biscuit Topping: In a food processor or large bowl, combine 1 cup all-purpose flour, ¼ cup granulated sugar, ¼ cup packed brown sugar, 1 ½ tsp baking powder, ½ tsp baking soda, and ½ tsp salt. Pulse or whisk until blended. Add ½ cup cold, cubed unsalted butter. Pulse (or cut in with pastry cutter) until mixture resembles coarse crumbs with some pea-sized butter pieces remaining.
- Hydrate Topping: In a small bowl, whisk 1 large egg, 2 tbsp vanilla extract, and ½ cup cold whole milk or buttermilk. Pour over flour-butter mixture. Gently stir with fork or spatula just until large clumps form and no dry flour remains—about 12–15 strokes. Batter will be shaggy and lumpy; do not overwork.
- Layer Topping: Remove base from refrigerator. Spoon biscuit topping evenly over chilled base in large dollops. Using an offset spatula or greased spoon, gently spread and pat into a mostly even layer—do not press down hard. It’s okay if some base shows through; gaps will fill as it bakes. Sprinkle remaining ½ cup chocolate chips evenly over top.
- Bake with Strategic Timing: Place pan on center oven rack. Bake for 45–55 minutes—rotating pan halfway through—until topping is deeply golden brown, springs back lightly when touched, and a toothpick inserted into the thickest part of the topping (avoiding molten chocolate) comes out with moist crumbs—not wet batter. The base layer should be set at edges but still slightly soft and jiggly in center (it will firm as it cools). Internal temperature of topping should read 205–210°F (96–99°C) on an instant-read thermometer.
- Cool & Set: Remove from oven and place pan on a wire rack. Let cool undisturbed for *at least 45 minutes*—this crucial step allows residual heat to finish cooking the base, sets the structure, and lets chocolate pools solidify slightly for clean slicing. For best texture, cool fully to warm (2 hours) before serving.
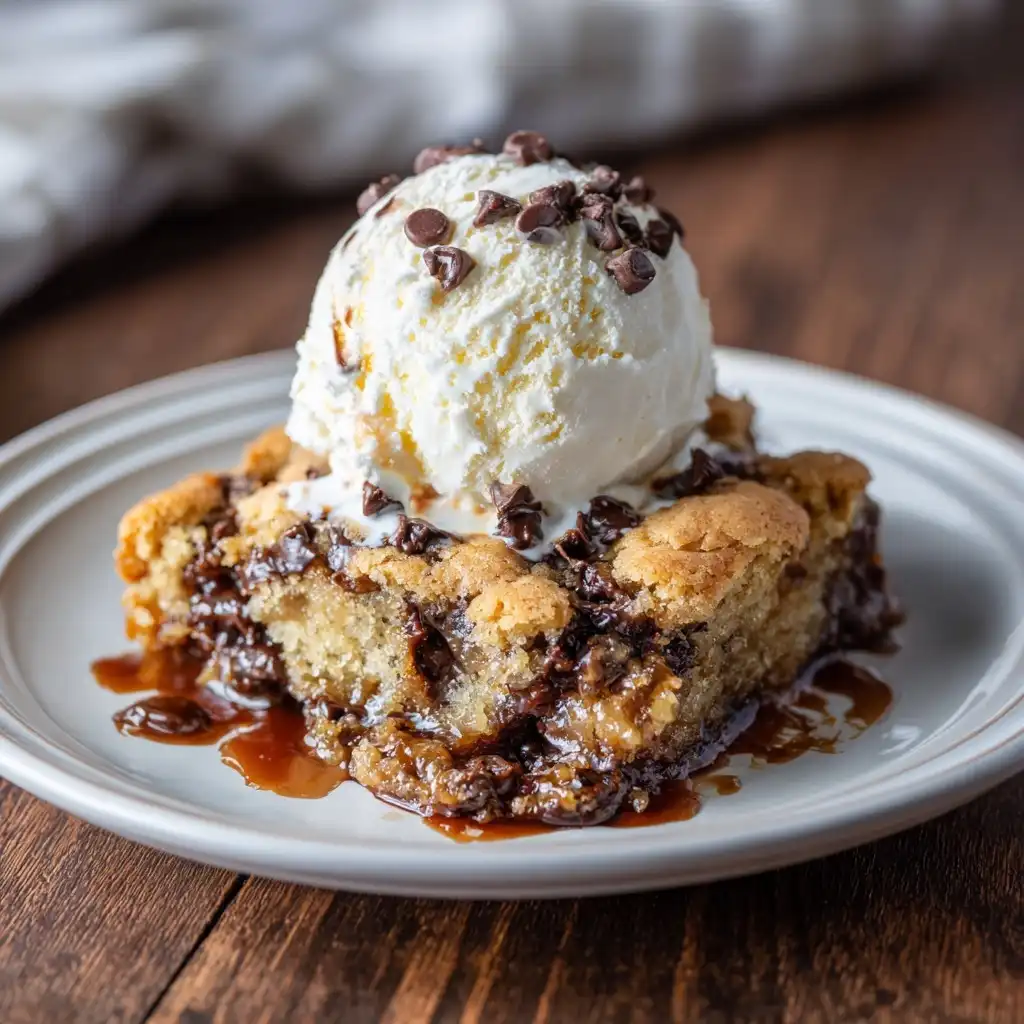
- Final Touches: Just before serving, sprinkle with flaky sea salt. Serve warm or at room temperature, optionally with vanilla ice cream, whipped cream, caramel drizzle, or a dusting of powdered sugar.
Tips
- Chill Everything: Cold butter for topping + chilled base = maximum lift and defined layers. Never skip the 15-minute refrigeration step—it prevents the base from bleeding into the topping during initial bake.
- Weigh Your Flour: Spoon-and-level can vary by up to 20%. For consistency, use a digital kitchen scale: 1 cup AP flour = 120g. Too much flour = dry, dense topping; too little = collapsed, greasy mess.
- Melt Butter Correctly: Melt butter slowly over low heat or in 15-second microwave bursts—never boil or brown unless intentionally making browned butter. Overheated butter separates, causing greasiness and poor emulsification.
- Don’t Overmix—Ever: Both base and topping suffer from gluten overdevelopment. Stir only until just combined. Lumps are your friend; smooth = tough.
- Oven Thermometer Required: Most home ovens run hot or cold. An accurate oven thermometer prevents underbaking (soggy topping) or overbaking (dry, cracked crust).
- Use Metal Pans: Glass or ceramic retains heat longer and bakes slower, risking burnt edges before center sets. Heavy-gauge aluminum or stainless steel ensures even conduction. Cast iron adds incredible browning—but preheat pan lightly before adding batter for best results.
- Test Doneness Wisely: Toothpick test works *only* in topping—not base. If inserted into base, it will always come out wet (it’s supposed to be fudgy!). Look for visual cues: golden crust, puffed dome, and slight pull-away from pan edges.
- Cooling Is Non-Negotiable: Cutting too soon releases steam, collapses structure, and turns chocolate into a river. Patience yields perfect squares with defined layers and chewy-yet-tender texture.
- Room Temperature Eggs: Cold eggs can seize melted butter or cause batter to curdle. Place eggs in warm water for 5 minutes if forgotten.
- High-Quality Chocolate Matters: Cheap chips contain palm oil and artificial flavors—they won’t melt properly or taste rich. Opt for Ghirardelli, Guittard, Callebaut, or Trader Joe’s Belgian Chocolate Chips.
- Double Batch Smartly: Make base and topping separately, then freeze unbaked portions individually. Thaw base overnight in fridge; keep topping cold until ready to layer.
Variations and Customizations
This recipe is gloriously adaptable—ideal for dietary needs, seasonal produce, flavor exploration, or playful twists:
- Gluten-Free: Substitute 1:1 gluten-free all-purpose flour blend (like King Arthur or Bob’s Red Mill) + ½ tsp xanthan gum (if not included). Add 1 tbsp ground flaxseed + 3 tbsp water (let sit 5 min) to replace egg binding in topping.
- Vegan: Use vegan butter (Miyoko’s or Earth Balance), flax egg (1 tbsp ground flax + 2.5 tbsp water per egg), coconut milk (full-fat, cold), and dairy-free chocolate chips. Increase baking powder to 2 tsp for lift.
- Reduced-Sugar: Replace ¼ cup granulated sugar with erythritol or monk fruit blend (not stevia—bitter aftertaste). Keep brown sugar for moisture and flavor. Add 1 tsp apple cider vinegar to boost leavening.
- Protein-Packed: Add ¼ cup unflavored whey or collagen peptides to dry ingredients. Swap ¼ cup flour for oat flour or almond flour. Top with Greek yogurt drizzle instead of ice cream.
- Seasonal Fruit Swirl: Before adding topping, swirl 1 cup macerated berries (strawberries, blueberries, or blackberries tossed with 2 tbsp sugar and 1 tsp lemon juice) into the base. Creates jammy pockets without compromising structure.
- Peanut Butter Swirl: Warm ½ cup creamy natural peanut butter with 1 tbsp honey until fluid. Drizzle over base before topping; use knife to marble gently.
- Salted Caramel Core: Press ½ cup thick, cool salted caramel sauce into center of base layer before topping. Ensures gooey ribbons without sinking.
- Spiced Chai Version: Infuse melted butter with 2 chai tea bags (steep 5 min, remove bags, cool). Add 1 tsp ground cardamom, ½ tsp ginger, ¼ tsp cloves to dry ingredients.
- Espresso Crunch: Dissolve 1 tbsp instant espresso powder in warm milk for topping. Fold ½ cup crushed toffee bits (like Heath) into topping before baking.
- Mini Mason Jar Individual Servings: Layer base in 6 oz jars (¾ full), top with 2 tbsp topping + 1 tsp chips. Bake at 375°F for 22–26 minutes. Perfect for portion control and gifting.
- Overnight Refrigerator Cobbler: Assemble completely, cover tightly, and refrigerate up to 16 hours. Bake straight from fridge—add 5–8 minutes to bake time. Flavor deepens overnight.
Health Considerations and Nutritional Value
While Chocolate Chip Cookie Cobbler is inherently indulgent—a celebratory dessert rather than an everyday health food—it can be mindfully enjoyed as part of a balanced diet when portioned and contextualized appropriately. A standard serving (1/12 of a 9×13-inch pan, approx. 200g) contains roughly:
- Calories: 380–420 kcal (depending on butter, chocolate, and sugar amounts)
- Total Fat: 18–22g (11–14g saturated; primarily from butter and chocolate)
- Carbohydrates: 52–58g (38–42g sugars, including naturally occurring lactose and fructose)
- Protein: 4–5g (from eggs, milk, and flour)
- Fiber: ~1g (low in standard version; increases to 3–4g with whole wheat flour or added oats)
- Sodium: 280–320mg (moderate; easily reduced by cutting salt by ¼ tsp)
Nutritional Highlights: Contains bone-supportive calcium and vitamin D (from milk/butter), brain-healthy flavonoids (in dark chocolate ≥70%), and satiating fats that slow glucose absorption—helping prevent blood sugar spikes when paired with protein-rich accompaniments like Greek yogurt or nuts. The brown sugar contributes trace minerals like potassium and iron, while vanilla offers antioxidant polyphenols.
Dietary Notes & Modifications:
- For Diabetics: Use sugar substitutes approved for baking (allulose, erythritol blends), increase fiber with oat flour, and serve with a side of Greek yogurt to moderate glycemic response.
- For Heart Health: Replace half the butter with avocado oil or light olive oil in base; use dark chocolate (70%+ cocoa); emphasize unsalted nuts in variations.
- Allergen Awareness: Naturally nut-free (unless added); contains gluten, dairy, and eggs. Vegan/GF versions address multiple restrictions simultaneously.
- Portion Mindfulness: Serve in 3×3-inch squares (not 4×4) and pair with fresh berries or mint to enhance volume and satisfaction without excess calories.
- Not a “Health Food”—But Not “Junk” Either: Made with real, whole-food ingredients (no hydrogenated oils, artificial colors, or preservatives), it avoids the ultra-processed pitfalls of many store-bought desserts—making it a far more nourishing choice for occasional enjoyment.
Ingredients
- For the Cookie Base:
- 1 ½ cups (180g) all-purpose flour, spooned & leveled
- ¾ cup (150g) granulated sugar
- 1 cup (200g) packed light or dark brown sugar
- ½ teaspoon baking soda
- ½ teaspoon fine sea salt
- ½ cup (1 stick / 113g) unsalted butter, melted and cooled to lukewarm
- 1 large egg, room temperature
- 1 tablespoon pure vanilla extract
- ¼ cup (60ml) whole milk
- 1 ½ cups (270g) semi-sweet chocolate chips
- For the Biscuit Topping:
- 1 cup (120g) all-purpose flour, spooned & leveled
- ¼ cup (50g) granulated sugar
- ¼ cup (50g) packed light brown sugar
- 1 ½ teaspoons baking powder
- ½ teaspoon baking soda
- ½ teaspoon fine sea salt
- ½ cup (1 stick / 113g) unsalted butter, cold and cubed
- 1 large egg, room temperature
- 2 tablespoons pure vanilla extract
- ½ cup (120ml) cold whole milk or buttermilk
- ½ cup (90g) semi-sweet chocolate chips, for sprinkling
- For Serving (Optional):
- Flaky sea salt (Maldon or Jacobsen)
- Vanilla bean ice cream or dairy-free alternative
- Whipped cream or coconut whip
- Warm caramel or chocolate ganache drizzle
Directions
- Preheat oven to 350°F (175°C). Grease a 9×13-inch metal baking pan (or 10-inch cast-iron skillet) generously with nonstick spray or softened butter. Line bottom with parchment paper, leaving overhang on two sides for easy removal.
- In a large bowl, whisk together for the base: 1 ½ cups flour, ¾ cup granulated sugar, 1 cup brown sugar, ½ tsp baking soda, and ½ tsp salt.
- In a medium bowl, whisk together: ½ cup melted (cooled) butter, 1 egg, 1 tbsp vanilla, and ¼ cup milk until smooth and emulsified.
- Pour wet ingredients into dry. Stir with spatula just until no dry flour remains (~30 seconds). Fold in 1 ½ cups chocolate chips. Batter will be thick and sticky.
- Transfer to prepared pan. Press firmly and evenly into a ½-inch-thick layer using greased hands or spatula. Refrigerate uncovered for 15 minutes.
- Meanwhile, make topping: In food processor or bowl, combine 1 cup flour, ¼ cup granulated sugar, ¼ cup brown sugar, 1 ½ tsp baking powder, ½ tsp baking soda, and ½ tsp salt. Pulse or whisk.
- Add ½ cup cold cubed butter. Pulse (or cut in) until mixture resembles coarse crumbs with pea-sized butter bits.
- In small bowl, whisk 1 egg, 2 tbsp vanilla, and ½ cup cold milk. Pour over flour mixture. Stir gently with fork until large clumps form and no dry flour remains (~12 strokes).
- Remove base from fridge. Spoon topping in dollops over base. Gently spread into even layer (don’t overpress). Sprinkle with remaining ½ cup chocolate chips.
- Bake 45–55 minutes, rotating pan halfway, until topping is deep golden, springs back when lightly pressed, and toothpick in topping (not base) yields moist crumbs.
- Cool in pan on wire rack for at least 45 minutes before slicing. For cleanest cuts, cool fully (2 hours). Garnish with flaky salt and desired accompaniments before serving.
FAQ
- Can I make this ahead of time?
- Absolutely! Assemble unbaked cobbler up to 16 hours in advance—cover tightly and refrigerate. Bake straight from the fridge, adding 5–8 minutes to total time. Fully baked cobbler keeps covered at room temperature for 2 days or refrigerated for 5 days. Reheat individual squares at 325°F for 10–12 minutes.
- Why did my topping sink into the base?
- Most commonly due to warm base (skip chilling), overmixed batter (gluten development), or melted butter used in topping instead of cold. Also occurs if oven wasn’t fully preheated—steam doesn’t form quickly enough to lift topping.
- Can I use a different pan size?
- Yes—with adjustments: An 8×8-inch pan yields thicker layers—bake 50–60 minutes. A 9-inch square requires 40–48 minutes. For mini muffin tin (24 cavities), fill ⅔ full and bake 14–17 minutes at 375°F.
- My cobbler is too sweet—how can I balance it?
- Next time, reduce granulated sugar by 2 tbsp, use dark brown sugar (more molasses, less sweetness), add 1 tsp flaky salt to topping, or serve with tart accompaniments: lemon curd, raspberry coulis, or crème fraîche.
- Can I freeze Chocolate Chip Cookie Cobbler?
- Yes—freeze unbaked (wrap pan tightly in plastic + foil) for up to 3 months. Thaw overnight in fridge, then bake as directed. Baked cobbler freezes well for 2 months: slice first, wrap squares individually in parchment + foil, thaw at room temp 2 hours, then reheat.
- What’s the best way to store leftovers?
- Cover tightly with plastic wrap or transfer to airtight container. Store at room temperature up to 48 hours (maintains best texture). Refrigerate beyond that—reheat gently to restore moisture and warmth.
- Can I substitute oil for butter?
- Not recommended for topping (oil won’t create steam pockets for lift), but you may replace up to half the butter in the base with neutral oil (avocado, grapeseed) for added tenderness—reduce milk by 1 tbsp to compensate.
- Why is my base greasy or oily?
- Over-melting butter (causing separation), using