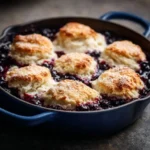
Introduction
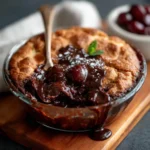
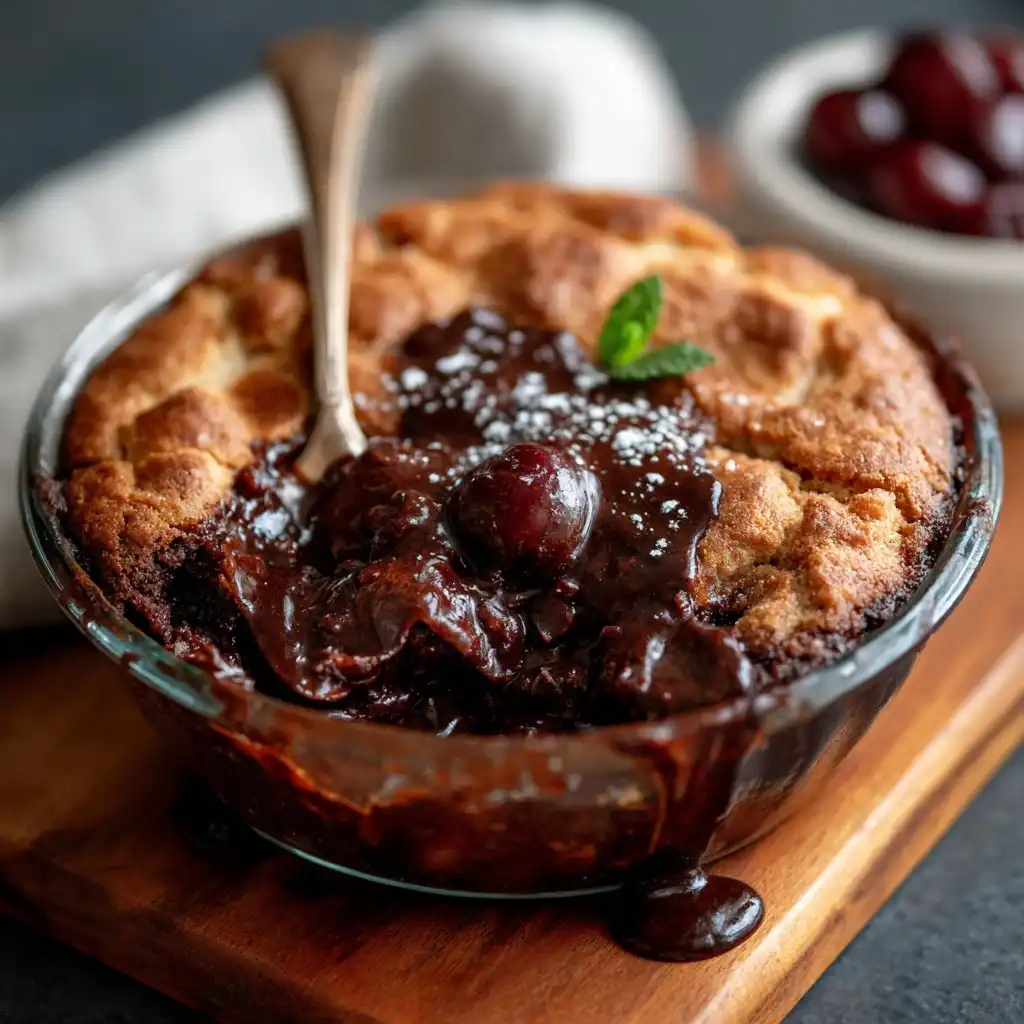
Chocolate Fudge Cobbler is a decadent, soul-warming dessert that marries the rich, velvety depth of molten chocolate fudge with the comforting, biscuit-topped charm of a classic cobbler. Unlike traditional cobblers—typically fruit-based with a pastry or dumpling topping—this luxurious twist features a luscious, self-saucing chocolate layer that bubbles up through tender, cake-like batter during baking, creating an irresistible contrast of textures: crisp golden edges, soft centers, and a warm, gooey, fudgy pool beneath. It’s the kind of dessert that fills kitchens with the intoxicating aroma of cocoa, brown sugar, and vanilla, evoking nostalgia while delivering bold, modern indulgence. Whether served straight from the oven with a scoop of vanilla bean ice cream melting into its glossy surface or enjoyed the next day warmed gently in the microwave, Chocolate Fudge Cobbler transcends seasons—it’s equally perfect for holiday gatherings, cozy Sunday evenings, or spontaneous “just-because” treats.
The History
Though its exact origins are delightfully murky—like many beloved American comfort desserts—Chocolate Fudge Cobbler emerged from the fertile crossroads of early 20th-century American baking innovation and Depression-era resourcefulness. The cobbler format itself dates back to colonial times, when settlers adapted English “cobbled” (i.e., uneven, stone-like) fruit tarts using available ingredients and rustic techniques. By the 1920s and ’30s, as cocoa powder became more widely accessible and affordable (thanks to innovations like Dutch-process cocoa and mass production), home bakers began experimenting beyond traditional spices and fruits. Early printed references appear in regional community cookbooks and women’s magazines—such as the 1938 Texas Home Economist and the 1945 Oklahoma Farm Bureau Cookbook—where recipes titled “Chocolate Boil-Over Pudding,” “Fudge-Drop Cobbler,” or “Cocoa Surprise Dessert” reveal the dish’s playful, improvisational roots. Crucially, these versions relied on simple pantry staples—flour, sugar, cocoa, milk, butter—and leveraged the magic of baking soda reacting with acidic buttermilk or vinegar to create lift *and* promote sauce formation. The term “fudge cobbler” gained traction in the 1950s and ’60s, especially across the South and Midwest, where church suppers and county fairs celebrated its crowd-pleasing ease and dramatic presentation. Over time, it evolved beyond humble beginnings into a signature dessert at diners, roadside cafés, and even upscale Southern restaurants—often rebranded as “Hot Fudge Cobbler” or “Chocolate Lava Cobbler.” Its enduring popularity lies not only in its nostalgic resonance but also in its brilliant engineering: no fancy equipment, no tempering chocolate, no double boilers—just one bowl, one pan, and transformative chemistry.
Ingredients Breakdown
Every ingredient in Chocolate Fudge Cobbler plays a precise, synergistic role—no element is arbitrary. Here’s a deep dive into why each matters:
- Unsalted Butter (½ cup, melted and slightly cooled): Provides richness, moisture, and structure. Melted (not hot) butter ensures even distribution without cooking the eggs prematurely. Unsalted allows full control over sodium balance, letting the deep cocoa notes shine.
- Granulated Sugar (¾ cup): Sweetens and contributes to caramelization and crust formation. Its fine crystals dissolve easily into the wet mixture, aiding in smooth batter development and promoting even browning.
- Packed Brown Sugar (½ cup): Adds molasses depth, moisture retention, and a subtle tang that enhances chocolate’s complexity. The natural acidity helps activate baking soda, while its hygroscopic nature keeps the cobbler tender for days.
- All-Purpose Flour (1¼ cups): The structural backbone. Not too high in protein (like bread flour) nor too weak (like cake flour), AP flour yields a tender-yet-cohesive batter that rises gently without toughness. Sifting is recommended to prevent lumps and ensure uniform texture.
- Natural or Dutch-Process Cocoa Powder (¾ cup): The soul of the dessert. Natural cocoa (acidic) works best with baking soda for optimal rise and vibrant flavor; Dutch-process offers mellow, rounded bitterness ideal for ultra-luxurious versions—but requires pairing with baking powder if used exclusively. High-fat cocoa (22–24% cocoa butter) delivers superior mouthfeel and gloss.
- Baking Soda (1 tsp): The essential leavening agent that reacts with the acidity in brown sugar, cocoa (if natural), and optional vinegar to produce carbon dioxide—creating lift *and* helping generate the signature fudgy sauce as steam lifts the batter and allows liquid to sink and thicken beneath.
- Salt (½ tsp): A critical flavor amplifier. Salt doesn’t make the dessert salty—it sharpens sweetness, balances bitterness, and unifies all other flavors. Fine sea salt or kosher salt dissolves evenly and avoids gritty texture.
- Large Eggs (2, room temperature): Bind the batter, add richness, and contribute to structure and tenderness. Room temperature eggs emulsify more readily with melted butter and sugars, preventing separation and ensuring a homogenous, airy batter.
- Vanilla Extract (2 tsp, pure): Adds aromatic warmth and floral nuance that complements—not competes with—chocolate. Mexican or Tahitian vanilla offers intriguing secondary notes (anise, cherry, or floral), while Madagascar bourbon vanilla provides classic creamy depth.
- Buttermilk (1 cup, well-shaken): The secret sauce catalyst. Its acidity activates baking soda, its lactic acid tenderizes gluten, and its slight thickness adds body without heaviness. For authenticity, use cultured buttermilk—not milk + vinegar substitutes—though the latter works in a pinch (see Variations).
- Boiling Water (1 cup): The transformative agent. Added last, it thins the thick batter just enough to allow the dense chocolate mixture to settle *beneath* the lighter batter during baking. As it heats, it converts starches and sugars into a glossy, viscous, self-made fudge sauce—no extra syrup or ganache needed.
Optional enhancements include espresso powder (1 tsp, boosts chocolate intensity without adding coffee flavor), instant coffee granules (½ tsp, for nuanced bitterness), or a pinch of cayenne (⅛ tsp, for sophisticated heat contrast). All serve to deepen, not distract from, the core chocolate experience.
Step-by-Step Recipe
- Preheat & Prep: Position oven rack in the center. Preheat oven to 350°F (175°C). Generously grease a 9×13-inch glass or ceramic baking dish (metal pans conduct heat faster and may cause over-browning—glass ensures gentle, even baking). Have all ingredients measured and ready—this is a quick-mix recipe with no resting time.
- Melt Butter & Combine Wet Base: In a large heatproof bowl (or the baking dish itself, for minimal cleanup), melt butter either in the microwave (30–45 sec) or on the stovetop. Let cool 2 minutes so it’s warm—not hot—to avoid scrambling eggs. Whisk in granulated sugar, brown sugar, and salt until fully combined and slightly glossy (about 1 minute).
- Add Eggs & Vanilla: Add eggs one at a time, whisking vigorously after each addition until fully incorporated and smooth. Stir in vanilla extract. The mixture should look pale tan and slightly foamy—this aeration helps with lift.
- Incorporate Dry Ingredients: In a separate bowl, sift together flour, cocoa powder, and baking soda. Gradually add the dry mixture to the wet ingredients in two additions, folding gently with a spatula after each until *just* combined. Do not overmix—small lumps are acceptable; overmixing develops gluten and yields toughness. Batter will be thick, glossy, and resemble brownie batter.
- Stream in Buttermilk: Slowly pour in the buttermilk while stirring continuously in a figure-eight motion. Mix only until fully absorbed—batter will thin considerably and become silky-smooth, with a pourable but still substantial consistency (like heavy pancake batter).
- Pour Into Dish: Immediately transfer batter to the prepared 9×13-inch dish. Use a spatula to spread evenly into the corners, smoothing the top with gentle strokes. Tap the dish lightly on the counter once to release air bubbles and ensure level surface.
- Prepare the Fudge Layer: In a small saucepan or heatproof measuring cup, combine 1 cup boiling water and 1 cup granulated sugar. Stir until sugar dissolves completely (about 30 seconds). Carefully pour this hot sugar-water mixture *evenly* over the surface of the batter. Do *not* stir—this is crucial. The hot liquid will naturally sink beneath the batter, forming the future fudge layer. You’ll see it begin to pool and ripple immediately.
- Bake with Precision: Place dish in preheated oven. Bake undisturbed for 42–48 minutes. The cobbler is done when the top is deeply golden brown, puffed and cracked in places, with visible edges pulling slightly away from the sides of the dish. A toothpick inserted into the *center of the top layer* (not the sauce) should come out with moist crumbs—not wet batter, not completely clean. Avoid opening the oven door before 35 minutes—the steam environment is vital for proper sauce formation.
- Cool & Set: Remove from oven and place on a wire rack. Let rest *undisturbed* for a minimum of 25 minutes. This allows the fudge layer to thicken from piping hot liquid to luxuriously viscous sauce, and the cake layer to set without collapsing. Resist cutting or serving early—the magic happens in this rest period.
- Serve Warm: Scoop generously with a large spoon, capturing both tender cake and rich fudge sauce. Serve immediately in wide, shallow bowls to maximize saucy exposure. Ideal accompaniments include house-made vanilla bean ice cream, freshly whipped cream infused with dark rum or orange zest, or crème fraîche for tangy contrast.
Tips
- Room Temperature Matters: Cold eggs or buttermilk can cause the melted butter to seize or create lumps in the batter. Let eggs sit in warm water for 5 minutes if forgotten; shake buttermilk well and measure it cold, then let it sit out 10 minutes before using.
- No Overmixing Zone: Once dry ingredients hit the wet, switch from whisk to silicone spatula and fold *just* until no streaks remain. Overmixed batter = dense, gummy cake and poor sauce separation.
- Boiling Water Must Be Truly Boiling: Use a kettle or pot—microwaved water often doesn’t reach full 212°F and won’t properly dissolve the sugar or initiate the thermal reaction needed for sauce formation. A rolling boil is non-negotiable.
- Glass > Metal: Ceramic or Pyrex dishes retain heat more evenly than aluminum or stainless steel, preventing burnt edges and undercooked centers. If using metal, reduce oven temp by 25°F and check 5 minutes earlier.
- Altitude Adjustments: At 3,000+ feet, decrease baking soda to ¾ tsp, increase flour by 2 tbsp, and extend bake time by 5–7 minutes—lower air pressure affects leavening and evaporation rates.
- Resting Is Non-Negotiable: Cutting in too soon releases steam and causes sauce to flood the plate instead of clinging to cake. That 25-minute wait isn’t passive—it’s active setting.
- Double Batch Wisdom: To scale, use two 9×13 dishes—not one larger pan. Uneven heat distribution in oversized pans leads to inconsistent doneness and sauce pooling.
- Make-Ahead Strategy: Assemble batter and keep covered in fridge for up to 12 hours. Bring to room temp 30 minutes before baking. *Never* refrigerate the assembled (water-poured) cobbler—it disrupts the delicate density gradient.
- Visual Doneness Cues: Look for a network of fine cracks across the surface, a slight jiggle only in the very center (like a custard), and a hollow sound when gently tapped on top—not a wet, sloshy wobble.
- Clean Pan Trick: Line the bottom of your dish with parchment paper, leaving 2-inch overhang on two opposite sides. After cooling, lift out the entire cobbler slab for easy slicing—or enjoy individual portions straight from the pan with zero sticking.
Variations and Customizations
While the classic Chocolate Fudge Cobbler is perfection incarnate, its adaptable framework invites endless creativity—always respecting its core chemistry (acid + soda + heat + liquid = rise + sauce). Explore these inspired twists:
- Espresso Swirl Cobbler: Dissolve 1 tbsp instant espresso powder in the boiling water before pouring over batter. Optional: swirl ¼ cup cooled, slightly thickened espresso ganache into the top layer before baking for marbled elegance.
- Peanut Butter Cup Cobbler: Fold 1 cup coarsely chopped peanut butter cups into the batter *after* adding buttermilk. Top with ½ cup crushed roasted peanuts before baking for crunch and salt contrast.
- Cherry Cordial Cobbler: Stir ¾ cup finely chopped dried cherries (soaked 10 min in 2 tbsp kirsch or brandy) into the batter. Replace ¼ cup of boiling water with cherry juice for intensified fruitiness.
- Spiced Mexican Hot Chocolate Cobbler: Add 1 tsp ground cinnamon, ¼ tsp ground chipotle, ⅛ tsp ground clove, and a pinch of grated orange zest to dry ingredients. Garnish with candied pepitas and a dusting of ancho chile powder.
- White Chocolate–Raspberry Ripple: Replace ¼ cup cocoa with white chocolate powder (or finely grated high-quality white chocolate). Swirl ⅓ cup seedless raspberry jam into the batter before baking—creates jewel-toned ribbons and bright acidity.
- Gluten-Free Fudge Cobbler: Substitute 1:1 gluten-free all-purpose flour blend (with xanthan gum) and add ½ tsp additional baking soda to compensate for reduced structure. Use certified GF cocoa and buttermilk.
- Vegan Fudge Cobbler: Replace butter with refined coconut oil (½ cup, melted), eggs with flax eggs (2 tbsp ground flax + 6 tbsp warm water, rested 5 min), buttermilk with almond milk + 1 tbsp apple cider vinegar, and use vegan chocolate chips in place of cocoa for deeper fat content. Increase baking soda to 1¼ tsp.
- Mini Mason Jar Cobblers: Divide batter among eight 12-oz wide-mouth mason jars (lightly greased). Pour 2 tbsp boiling sugar-water per jar. Bake at 350°F for 28–32 minutes. Perfect for portion control, gifting, or elegant dinner parties.
- Boozy Bourbon Fudge Cobbler: Replace ¼ cup of boiling water with good-quality bourbon. Add 1 tsp maple extract with vanilla. Serve with bourbon-spiked whipped cream and toasted pecans.
- Sea Salt & Caramel Crunch Cobbler: Sprinkle top with flaky sea salt and ½ cup homemade caramelized sugar shards (made by baking turbinado sugar at 400°F for 8–10 min until amber, then cooling on parchment) 5 minutes before end of bake.
Pro Tip: Always test new variations with a half-batch first—especially when altering leavening, liquids, or fats—to preserve the delicate balance between cake and sauce.
Health Considerations and Nutritional Value
Chocolate Fudge Cobbler is, first and foremost, a celebratory dessert—not a health food. However, understanding its nutritional profile empowers mindful enjoyment and informed customization. Per standard serving (1/12 of a 9×13-inch pan, approx. 185g), here’s a detailed breakdown based on the classic recipe:
- Calories: ~395 kcal — primarily from complex carbohydrates (flour, sugars) and healthy fats (butter, cocoa butter). Moderate for a dessert, especially considering satiety from fiber and fat.
- Total Fat: 16g (25% DV) — includes 10g saturated fat (50% DV). Butter contributes beneficial short-chain fatty acids (butyrate) and fat-soluble vitamins (A, D, E, K); cocoa butter contains heart-healthy stearic acid, which has neutral cholesterol impact.
- Carbohydrates: 58g (21% DV) — 42g sugars (84% DV), mostly added. Brown sugar offers trace minerals (calcium, potassium, iron); granulated sugar provides rapid energy. Fiber is low (~1.5g) unless whole wheat or oat flour substitutions are made.
- Protein: 4.5g — modest but valuable from eggs and milk solids in buttermilk. Enhance with collagen peptides (1 scoop stirred into buttermilk) or Greek yogurt substitution (see Variations).
- Sodium: 290mg (13% DV) — well within daily limits. Salt enhances flavor perception and reduces overall sugar needed for satisfaction—a functional, not just seasoning, role.
- Key Micronutrients: Significant sources of iron (from cocoa, 15% DV), magnesium (12% DV), manganese (22% DV), and copper (30% DV)—all vital for energy metabolism, antioxidant defense, and neurological health. Dark cocoa (>70%) boosts flavonoid content (epicatechin, procyanidins), linked to improved endothelial function and reduced inflammation.
Considerations for Special Diets:
- Diabetes-Friendly Options: Reduce total sugar by ¼ cup and replace with allulose or monk fruit blend (which behave like sugar in baking). Use high-fiber flour (oat, almond, or black bean) and add 1 tbsp ground chia seeds to slow glucose absorption. Always pair with protein/fat (e.g., Greek yogurt topping) to blunt glycemic response.
- Heart Health: Swap half the butter for avocado oil or walnut oil (rich in omega-3s); use unsweetened cocoa with >85% cocoa solids; omit added salt and rely on mineral-rich sea salt sparingly.
- Digestive Sensitivity: Buttermilk’s lactase and probiotics aid digestion for many lactose-sensitive individuals. For strict dairy-free, use coconut milk kefir (fermented, low-lactose) and ensure cocoa is processed on dairy-free lines.
- Pregnancy & Nursing: Safe in moderation. Choose pasteurized eggs and buttermilk. Cocoa’s theobromine is safe at dessert levels (<200mg/serving); avoid excessive caffeine sources elsewhere in diet.
Bottom line: Enjoy Chocolate Fudge Cobbler as part of a balanced pattern—not daily, but meaningfully. Its richness encourages slower eating, heightened sensory awareness, and genuine pleasure—cornerstones of intuitive, sustainable nutrition.
Ingredients
- ½ cup (1 stick / 113g) unsalted butter, melted and slightly cooled
- ¾ cup (150g) granulated sugar
- ½ cup (100g) packed light or dark brown sugar
- 1¼ cups (165g) all-purpose flour, spooned and leveled
- ¾ cup (75g) natural unsweetened cocoa powder (or Dutch-process, see notes)
- 1 teaspoon baking soda
- ½ teaspoon fine sea salt
- 2 large eggs, room temperature
- 2 teaspoons pure vanilla extract
- 1 cup (240ml) well-shaken cultured buttermilk
- 1 cup (240ml) boiling water
Directions
- Preheat oven to 350°F (175°C). Grease a 9×13-inch glass or ceramic baking dish.
- In a large bowl, whisk melted butter, granulated sugar, brown sugar, and salt until smooth and glossy (~1 minute).
- Add eggs one at a time, whisking well after each. Stir in vanilla.
- In another bowl, sift together flour, cocoa powder, baking soda, and salt.
- Gradually add dry ingredients to wet, folding gently with a spatula until just combined (small lumps ok).
- Pour in buttermilk and stir with a figure-eight motion until fully incorporated and smooth.
- Immediately pour batter into prepared dish and smooth top.
- In a small saucepan or heatproof cup, combine 1 cup boiling water and 1 cup granulated sugar; stir until sugar dissolves. Carefully pour hot mixture evenly over batter—do not stir.
- Bake 42–48 minutes, until top is deeply golden, puffed, and a toothpick in the cake layer (not sauce) comes out with moist crumbs.
- Let cool undisturbed on a wire rack for at least 25 minutes before serving.
- Scoop warm servings into bowls. Serve with vanilla ice cream, whipped cream, or crème fraîche.
FAQ
- Can I make this ahead of time?
- Yes! Bake fully, cool completely, cover tightly, and refrigerate for up to 4 days. Reheat individual portions in the microwave (30–45 sec) or entire dish covered with foil at 325°F for 15–20 minutes. Sauce will re-liquefy beautifully.
- Why did my cobbler not form a sauce?
- Most common causes: water wasn’t boiling (prevents proper sugar dissolution and thermal reaction), batter was overmixed (too dense to allow sinking), dish was too small or overcrowded (inhibits steam circulation), or oven temperature was too low (insufficient activation). Also verify your baking soda is fresh—test by mixing ¼ tsp with 2 tsp vinegar; it should bubble vigorously.
- Can I freeze Chocolate Fudge Cobbler?
- Absolutely. Cool completely, cut into portions, wrap each tightly in plastic + foil, and freeze up to 3 months. Thaw overnight in fridge, then reheat covered at 325°F until warmed through (20–25 min). Sauce may separate slightly—stir gently before serving.
- What’s the difference between natural and Dutch-process cocoa here?
- Natural cocoa is acidic and works perfectly with baking soda for optimal rise and sauce formation. Dutch-process is alkalized, milder, and less reactive—use it only if you also add ½ tsp baking powder to the dry ingredients to ensure proper leavening. Flavor-wise, natural yields brighter, fruitier chocolate; Dutch-process gives deeper, rounder, almost smoky notes.
- My batter looks too thick/thin—can I fix it?
- If too thick *after* adding buttermilk, stir in 1–2 tsp extra buttermilk—no more. If too thin (rare), add 1 tsp flour and fold gently. Never add water or milk post-buttermilk—it dilutes acidity critical for reaction.
- Can I use milk instead of buttermilk?
- You can substitute 1 cup milk + 1 tbsp white vinegar or lemon juice, stirred and left to curdle 5 minutes. However, real buttermilk contains live cultures and lactic acid that provide superior tenderness, tang, and consistent sauce texture—worth seeking out.
- Is there a lower-sugar version that still works?
- Yes—with caveats. Reduce total sugar to 1 cup (split evenly between granulated and brown), use a sugar substitute rated for baking (e.g., erythritol + monk fruit blend), and add 1 tsp apple cider vinegar to boost acidity for leavening. Expect slightly drier texture and less glossy sauce—but still delicious.
- Can I add nuts or fruit?
- Yes—but fold in *after* adding buttermilk and *before* pouring into the dish. Avoid watery fruits (fresh berries, peaches) unless tossed with 1 tsp cornstarch to absorb excess juice. Toasted walnuts, pecans, or almonds add wonderful crunch and richness.
- Why does it need to rest before serving?
- Resting allows residual heat to continue gently cooking the interior, while the fudge layer cools from liquid to viscous syrup. Skipping this step results in runny sauce that pools instead of coating—and a cake layer prone to crumbling.
- What’s the best way to store leftovers?
- Cover tightly with plastic wrap or airtight lid and refrigerate. Do not store at room temperature longer than 2 hours. Sauce may thicken further in fridge—reheat to restore fluidity. Avoid freezing in the original baking dish (thermal shock risk with glass).
Summary
Chocolate Fudge Cobbler is a masterclass in simple alchemy—where pantry staples transform in the oven into a stunning, self-saucing dessert of tender chocolate cake crowned with a deep, glossy pool of warm fudge, achieved through precise ratios, careful technique, and respect for baking science.
It’s deeply nostalgic yet endlessly adaptable, nutritionally thoughtful when approached intentionally, and guaranteed to deliver awe, comfort, and pure chocolate joy—every single time.