Mini Fruit Tartlets: A Delightful Bite-Sized Dessert
The History of Mini Fruit Tartlets
The origins of fruit tartlets can be traced back to French patisserie traditions, where delicate pastries filled with custard and topped with fresh fruit became a hallmark of refined dessert craftsmanship. Dating as far back as the 16th century, tarts were a staple in European royal courts, evolving from simple rustic pies into elegant confections. The miniature version—mini fruit tartlets—gained popularity in the 19th and 20th centuries as part of the growing trend for petit fours and bite-sized desserts served at afternoon tea, weddings, and fine dining establishments. These dainty treats combined the buttery richness of shortcrust pastry with the silky smoothness of pastry cream and the vibrant freshness of seasonal fruits, creating a harmonious balance of texture and flavor. Over time, bakers across Europe and North America adapted the recipe, incorporating local ingredients and modern techniques, making mini fruit tartlets a beloved dessert in both home kitchens and gourmet bakeries.
Ingredients Breakdown
Creating perfect mini fruit tartlets begins with understanding each component and its role in the final product:
- All-Purpose Flour: Provides structure to the tart shell. For a tender crust, it’s often paired with cold butter to limit gluten development.
- Unsalted Butter (cold): Adds richness and flakiness. Cold butter creates steam during baking, resulting in a light, crumbly texture.
- Granulated Sugar: Sweetens the dough and helps with browning. Powdered sugar can also be used for a more delicate crust.
- Salt: Enhances all flavors and balances sweetness.
- Egg Yolk: Binds the dough and adds richness without over-developing gluten.
- Ice Water: Keeps the butter cold and brings the dough together without warming it.
- Cream Cheese or Pastry Cream (Crème Pâtissière): Acts as the creamy base layer that supports the fruit and prevents sogginess.
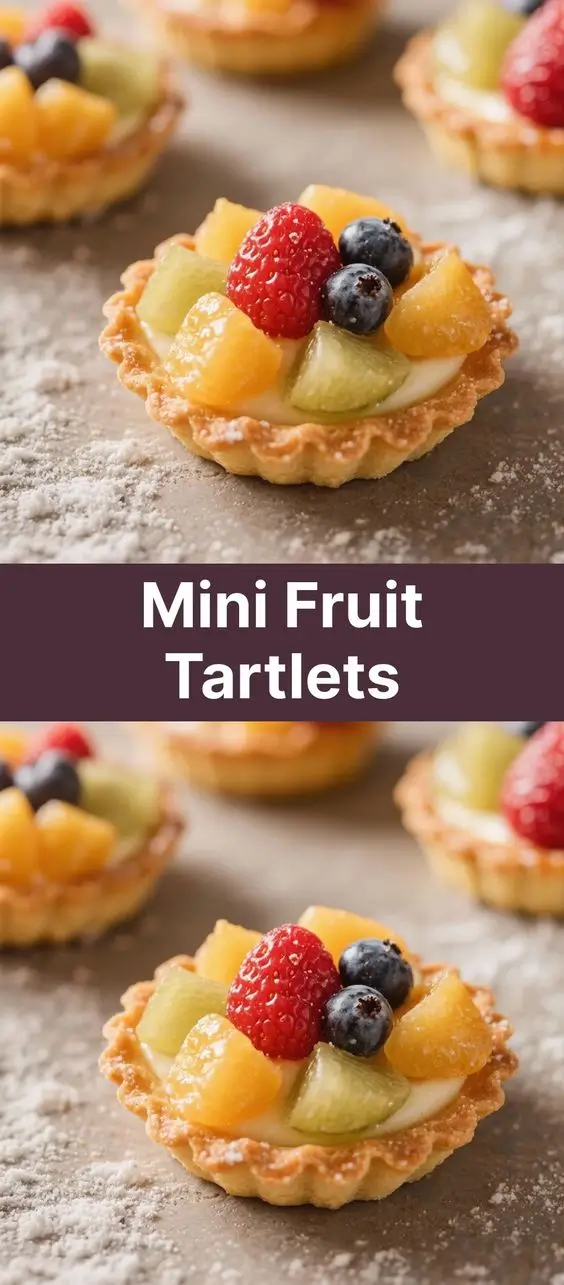
- Fresh Fruits: Strawberries, kiwis, blueberries, raspberries, mangoes, and blackberries are popular choices. They add color, freshness, and natural sweetness.
- Apricot Glaze (or Neutral Glaze): Brushed on top to give the tartlets a glossy finish and preserve the fruit’s appearance.
- Vanilla Extract: Often added to the pastry cream or filling for depth of flavor.
- Lemon Juice: Prevents browning of cut fruits and enhances brightness.
Step-by-Step Recipe
Ingredients
- 1 ½ cups (190g) all-purpose flour
- ½ cup (115g) unsalted butter, cold and cubed
- ¼ cup (50g) granulated sugar
- ¼ tsp salt
- 1 large egg yolk
- 2–3 tbsp ice water
- 1 ½ cups (375ml) pastry cream or sweetened cream cheese filling
- 2 cups mixed fresh fruits (e.g., strawberries, kiwi, blueberries, raspberries)
- 2 tbsp apricot jam, warmed and strained (for glaze)
- Optional: powdered sugar for dusting
Directions
- Prepare the Tart Dough: In a food processor, combine flour, sugar, salt, and cold cubed butter. Pulse until the mixture resembles coarse sand.
- Add the egg yolk and pulse again. Gradually add ice water, one tablespoon at a time, pulsing just until the dough begins to clump together. Do not overmix.
- Turn the dough out onto a clean surface and gently shape it into a disk. Wrap in plastic wrap and refrigerate for at least 1 hour (or up to 2 days).
- Preheat Oven: Preheat your oven to 350°F (175°C). Lightly grease or line a mini muffin tin with non-stick spray.
- Roll and Shape the Crusts: On a floured surface, roll the chilled dough to about ⅛-inch thickness. Use a round cutter slightly larger than the muffin cups to cut out circles. Press each gently into the muffin tin, ensuring there are no air pockets. Trim excess dough if needed.
- Blind Bake the Shells: Prick the bottom of each shell with a fork. Line with parchment paper and fill with pie weights or dried beans. Bake for 12 minutes. Remove weights and parchment, then bake for another 5–7 minutes until golden. Let cool completely.
- Prepare the Filling: While shells cool, make the pastry cream according to your preferred recipe or use store-bought. Alternatively, beat softened cream cheese with powdered sugar and vanilla until smooth.
- Fill the Tartlets: Once shells are cooled, pipe or spoon about 1 teaspoon of filling into each shell, spreading evenly.
- Arrange the Fruit: Slice fruits uniformly and arrange them decoratively on top of the filling. Be creative—use contrasting colors and shapes for visual appeal.
- Glaze the Tarts: Gently brush the apricot glaze over the fruit using a pastry brush. This adds shine and protects the fruit from drying out.
- Chill and Serve: Refrigerate the tartlets for at least 30 minutes before serving to set the filling. Dust lightly with powdered sugar just before serving, if desired.
Tips for Perfect Mini Fruit Tartlets
- Keep Everything Cold: Cold butter and ice water are essential for a flaky, tender crust. Warm dough melts the butter prematurely, leading to tough shells.
- Don’t Overwork the Dough: Mix only until it comes together. Overworking develops gluten, which makes the crust chewy instead of crisp.
- Uniform Fruit Slicing: Use a mandoline or sharp knife to ensure even slices that lay flat and look professional.
- Use a Piping Bag: For neat and consistent filling distribution, use a piping bag fitted with a plain tip.
- Work Quickly: If the dough becomes too soft while rolling, return it to the fridge for 15 minutes.
- Prevent Soggy Bottoms: Ensure the tart shells are fully baked and cooled before adding the filling. A thin layer of melted white chocolate or tempered dark chocolate inside the shell can act as a moisture barrier.
- Glaze Right Before Serving: For the shiniest finish, glaze the tartlets shortly before serving, especially if using delicate berries.
- Room Temperature Before Serving: Let the tartlets sit at room temperature for 10–15 minutes before serving for optimal flavor and texture.
Variations and Customizations
Mini fruit tartlets are incredibly versatile and can be customized to suit any occasion or dietary preference:
- Chocolate Tart Shells: Add 2 tablespoons of cocoa powder to the dry ingredients for a rich chocolate crust.
- Gluten-Free Version: Substitute all-purpose flour with a gluten-free flour blend containing xanthan gum for proper binding.
- Vegan Option: Use plant-based butter, flax egg (1 tbsp ground flax + 3 tbsp water), and vegan pastry cream made with almond milk and cornstarch.
- Different Fillings: Swap pastry cream for lemon curd, mascarpone, coconut cream, or nutella for unique flavor profiles.
- Seasonal Themes: Use red berries for Valentine’s Day, citrus fruits for winter, tropical fruits in summer, and autumnal apples or pears with cinnamon in fall.
- Edible Flowers: Garnish with edible flowers like pansies or violets for an elegant touch at weddings or garden parties.
- Mini Meringue Toppings: Top with small peaks of Italian meringue and lightly torch for a fruity Eton mess effect.
- Almond Crust: Replace ¼ of the flour with finely ground almonds for a nutty, marzipan-like crust.
Health Considerations and Nutritional Value
While mini fruit tartlets are undeniably indulgent, they can be adapted to be more health-conscious:
- Natural Sugars: Rely on the natural sweetness of ripe fruits to reduce added sugar in the filling or crust.
- Fruit Benefits: Berries are rich in antioxidants, vitamin C, and fiber. Kiwi offers digestive enzymes and high vitamin content.
- Portion Control: Their small size naturally limits calorie intake compared to full-sized desserts.
- Healthy Fats: Using grass-fed butter or plant-based alternatives can improve the fat profile.
- Low-Sugar Options: Use erythritol or monk fruit sweetener in place of sugar for diabetic-friendly versions.
- Protein Boost: Incorporate Greek yogurt into the filling for added protein and tanginess.
Approximate Nutritional Value per Tartlet (based on standard recipe):
| Calories | 120–150 kcal |
| Total Fat | 7–9g |
| Saturated Fat | 4–5g |
| Carbohydrates | 14–18g |
| Sugars | 8–10g |
| Protein | 1–2g |
| Fiber | 1g |
Note: Values vary based on size, ingredients, and specific recipes.
Frequently Asked Questions (FAQ)
- Can I make mini fruit tartlets ahead of time?
- Yes! You can bake the shells up to 2 days in advance and store them in an airtight container at room temperature. Fill and decorate no more than 4 hours before serving to prevent sogginess.
- How do I store leftover tartlets?
- Store in an airtight container in the refrigerator for up to 2 days. Place parchment between layers to prevent sticking. Note that the crust may soften over time.
- Can I freeze mini fruit tartlets?
- It’s not recommended to freeze assembled tartlets, especially with fresh fruit. However, unbaked or baked tart shells can be frozen for up to 3 months. Thaw before using.
- Why are my tart shells shrinking?
- This usually happens if the dough wasn’t chilled long enough or was stretched when placing in the pan. Always chill thoroughly and avoid stretching.
- What fruits should I avoid?
- Avoid very juicy fruits like watermelon or overripe peaches, which can release too much liquid. Also, bananas brown quickly unless coated with citrus juice.
- Can I use store-bought crusts?
- Yes, pre-made mini tart shells or phyllo cups can save time, though homemade shells offer superior flavor and texture.
- How do I get a shiny glaze without apricot jam?
- You can use warmed honey, apple jelly, or commercial neutral glaze (like LorAnn’s). Strain thoroughly for a smooth finish.
Summary
Mini fruit tartlets are an exquisite fusion of buttery shortcrust pastry, luscious cream filling, and vibrant fresh fruit—perfect for entertaining or treating yourself.
Elegant, customizable, and delightfully balanced in flavor, these petite desserts bring gourmet charm to any table with minimal effort and maximum impact.