Introduction
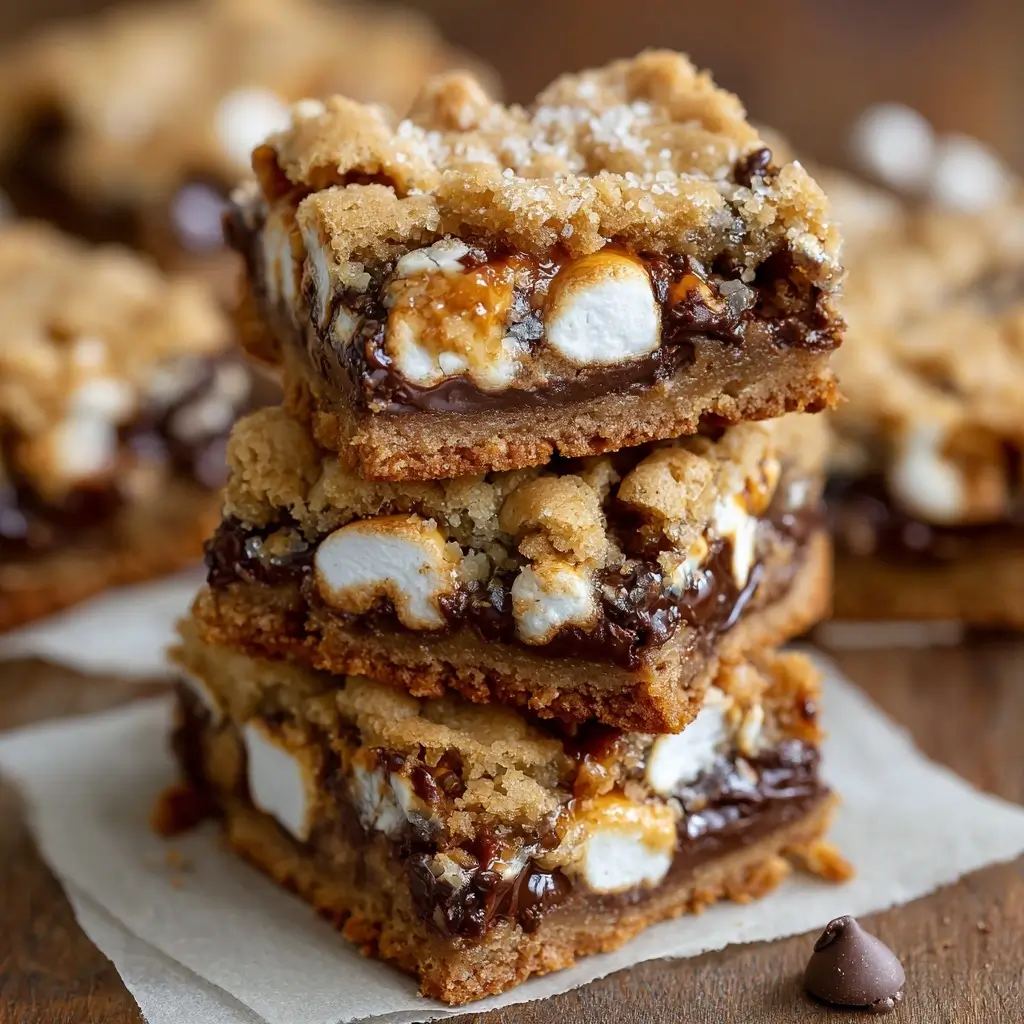
Imagine the gooey, melty magic of a s’more—crisp graham crackers, rich chocolate, and fluffy toasted marshmallow—all folded into a decadent, chewy cookie bar. S’mores Stuffed Cookie Bars are not just a dessert; they’re a nostalgic journey wrapped in golden-brown edges and soft, buttery centers. These indulgent treats combine the best elements of campfire classics with the comfort of homemade baked goods, making them perfect for parties, potlucks, family gatherings, or solo indulgence under a cozy blanket with a glass of cold milk. Whether you’re reliving childhood memories around a bonfire or introducing the next generation to this timeless flavor trio, these bars deliver big on taste, texture, and warmth.
Unlike traditional cookies or bars, S’mores Stuffed Cookie Bars go beyond surface-level flavor. They feature layers of chocolate chips, pockets of marshmallow fluff, and a base infused with crushed graham cracker crumbs, all baked into a dense yet tender bar that’s both chewy and crisp at the edges. The result? A dessert that’s greater than the sum of its parts—a symphony of sweet, smoky, and creamy notes in every bite. Whether you’re an amateur baker or a seasoned kitchen wizard, this recipe is approachable, forgiving, and endlessly customizable.
From summer barbecues to winter holiday trays, S’mores Stuffed Cookie Bars bring joy to any occasion. Their portable format makes them ideal for picnics, school events, or care packages sent to loved ones. Plus, they store well and can even be frozen for future cravings. In this comprehensive guide, we’ll dive deep into every aspect of crafting the perfect batch—from the history behind s’mores to ingredient breakdowns, detailed step-by-step instructions, expert tips, health-conscious variations, and frequently asked questions. By the end, you’ll have everything you need to master this beloved treat and make it your own.
The History
To truly appreciate S’mores Stuffed Cookie Bars, one must first understand the origin story of their star inspiration: the s’more. While the exact birthplace of the s’more remains debated, most food historians agree that it emerged in the United States during the early 20th century, closely tied to the rise of camping culture and the availability of mass-produced chocolate and marshmallows.
The word “s’more” is believed to be a contraction of “some more”—as in, “I want some more!”—a phrase likely uttered by countless children after devouring their first gooey, fire-toasted creation. The earliest known printed recipe for s’mores appeared in a 1927 Girl Scout camping guide titled *Tramping and Trailing with the Girl Scouts*, where it was called a “Graham Cracker Sandwich.” It called for half a toasted marshmallow and a piece of chocolate sandwiched between two graham crackers. This simple combination quickly became a staple of outdoor adventures across America.
The popularity of s’mores soared throughout the mid-1900s, thanks in part to the growing accessibility of key ingredients. Jacob’s Cream Marshmallows (now Kraft Jet-Puffed) began marketing pre-packaged marshmallows in the 1920s, while Nabisco’s graham crackers and Hershey’s milk chocolate bars were already household names. The convergence of these three items created the perfect storm for a cultural phenomenon.
Fast forward to the modern era, and the s’more has transcended the campfire. Chefs and home bakers alike have reimagined it in cakes, pies, ice creams, cupcakes, and even cocktails. The evolution into bar form—like our S’mores Stuffed Cookie Bars—represents a natural progression: taking a handheld favorite and transforming it into a shareable, sliceable dessert that captures all the flavor without requiring a fire pit or roasting stick.
Beyond nostalgia, the enduring appeal of s’mores lies in their balance—the slight bitterness of dark chocolate, the honeyed crunch of graham crackers, and the airy sweetness of melted marshmallows. This harmony is what drives innovation like stuffed cookie bars, where each element is embedded directly into the batter for maximum flavor distribution. Today, S’mores Stuffed Cookie Bars stand as a testament to American ingenuity and the universal love for comfort food done right.
Ingredients Breakdown
The magic of S’mores Stuffed Cookie Bars comes from a carefully balanced blend of ingredients, each playing a crucial role in flavor, texture, and structure. Let’s break down every component and explore why it belongs in this recipe—and how substitutions might affect the final product.
- Butter (Unsalted, 1 cup / 2 sticks, softened): Butter provides richness, moisture, and tenderness. Using unsalted butter allows you to control the salt level precisely. Softened butter ensures proper creaming with sugar, which incorporates air for a lighter texture. Margarine can be substituted, but it may alter flavor and browning.
- Granulated Sugar (3/4 cup): Adds sweetness and helps create a slightly crisp outer edge when baked. It also contributes to browning through caramelization.
- Brown Sugar (1 cup, packed): Contains molasses, which adds moisture, chewiness, and a warm, caramel-like depth. Packed brown sugar ensures consistent measurement and enhances the graham cracker notes.
- Large Eggs (2): Act as binders, helping hold the ingredients together. Eggs also add structure and contribute to leavening and color. Room temperature eggs mix more evenly into the batter.
- Vanilla Extract (2 teaspoons): Enhances overall flavor and complements the sweetness without overpowering. Pure extract offers better aroma than imitation.
- All-Purpose Flour (2 1/2 cups): The backbone of the dough, providing gluten structure. Too much flour leads to dryness; too little results in spreading. Spoon and level flour rather than scooping to avoid over-measuring.
- Graham Cracker Crumbs (1 1/2 cups finely crushed): Infuses the base with authentic s’mores flavor. You can use store-bought crumbs or crush whole sheets in a food processor. Honey graham crackers are traditional, but cinnamon or chocolate varieties offer fun twists.
- Baking Soda (1 teaspoon): A leavening agent that reacts with acidic components (like brown sugar and butter) to help the bars rise slightly and spread evenly.
- Salt (1/2 teaspoon): Balances sweetness and enhances other flavors. Omitting salt risks a flat, overly sweet profile.
- Semi-Sweet Chocolate Chips (2 cups): Melts into luxurious pockets of chocolate throughout the bars. Mini chips distribute more evenly, while regular chips give bold bursts. Dark, milk, or white chocolate can be used based on preference.
- Mini Marshmallows (1 1/2 cups): Create gooey, melt-in-your-mouth texture when baked. Larger marshmallows can be halved if needed. For extra flair, consider using colored or flavored marshmallows.
- Marshmallow Fluff (1/2 cup): Swirled into the batter or layered beneath the top for intense marshmallow richness. It prevents drying and keeps the center soft.
- Optional Add-ins: Chopped nuts (pecans, walnuts), crushed Oreos, peanut butter chips, or a sprinkle of sea salt on top before baking can elevate complexity.
Each ingredient works synergistically: the sugars and butter create a moist crumb, the flour and graham crumbs build structure, and the chocolate and marshmallows deliver that signature s’mores experience. Even small changes—like swapping in coconut oil for butter or using almond flour—can dramatically shift texture and taste, so proceed with intention when customizing.
Step-by-Step Recipe
Now that we’ve explored the components, let’s walk through the process of making S’mores Stuffed Cookie Bars from start to finish. Follow these detailed steps for flawless results every time.
- Preheat Oven & Prepare Pan: Preheat your oven to 350°F (175°C). Line a 9×13-inch baking pan with parchment paper, leaving overhang on two sides for easy removal. Lightly grease the parchment and any exposed pan edges to prevent sticking.
- Cream Butter and Sugars: In a large mixing bowl, beat the softened butter, granulated sugar, and brown sugar together using a hand mixer or stand mixer on medium speed until light and fluffy (about 2–3 minutes). Scrape down the sides of the bowl as needed.
- Add Wet Ingredients: Beat in the eggs one at a time, ensuring each is fully incorporated before adding the next. Mix in the vanilla extract until combined.
- Combine Dry Ingredients: In a separate bowl, whisk together the all-purpose flour, graham cracker crumbs, baking soda, and salt until uniform. This ensures even distribution and prevents clumping.
- Incorporate Dry Mixture: Gradually add the dry ingredients to the wet mixture, mixing on low speed just until the flour disappears. Do not overmix, as this can lead to tough bars.
- Fold in Chocolate Chips: Using a rubber spatula, gently fold in 1 1/2 cups of the semi-sweet chocolate chips, reserving the remaining 1/2 cup for topping.
- Layer Half the Dough: Transfer half of the prepared dough to the lined baking pan. Use a spatula or lightly floured hands to press it into an even layer, covering the bottom completely. Aim for about 1/4 to 1/2 inch thick.
- Add Marshmallow Layer: Dollop the marshmallow fluff over the base layer. Use a knife or offset spatula to spread it gently into a thin, even layer, leaving a small border near the edges to prevent overflow.
- Scatter Mini Marshmallows: Sprinkle 1 cup of mini marshmallows evenly over the fluff layer. They will melt and fuse during baking, creating a gooey core.
- Add Remaining Dough: Scoop spoonfuls of the remaining dough over the marshmallow layer. Gently press and pinch gaps closed to seal in the filling. Don’t worry about perfection—rustic is fine!
- Top with Final Mix-Ins: Sprinkle the reserved 1/2 cup chocolate chips and remaining 1/2 cup mini marshmallots over the top. For added flair, crush a few graham crackers and sprinkle them on last.
- Bake Until Golden: Place the pan in the preheated oven and bake for 28–35 minutes, or until the top is golden brown and a toothpick inserted into the center (avoiding marshmallow pockets) comes out with moist crumbs—not wet batter.
- Cool Completely: Remove from oven and allow the bars to cool in the pan for at least 30 minutes. Then, lift them out using the parchment overhang and transfer to a wire rack to cool completely before slicing. Cooling sets the structure and prevents collapse.
- Slice and Serve: Use a sharp knife dipped in hot water and wiped clean between cuts for neat squares. Serve at room temperature for optimal texture.
Pro Tip: For a bakery-style finish, lightly broil the cooled bars for 30–60 seconds to toast the top marshmallows—but watch closely to avoid burning!
Tips
Even the simplest recipes benefit from insider knowledge. Here are professional-grade tips to ensure your S’mores Stuffed Cookie Bars turn out perfectly every time:
- Use Room Temperature Ingredients: Cold butter or eggs won’t emulsify properly, leading to curdled batter and uneven texture. Take butter and eggs out 30–60 minutes before starting.
- Don’t Overmix the Dough: Once flour is added, mix only until combined. Overmixing develops gluten, resulting in tough, dense bars instead of soft and chewy ones.
- Pack Brown Sugar Firmly: When measuring brown sugar, press it tightly into the measuring cup so it holds its shape when inverted. This ensures accurate sweetness and moisture levels.
- Chill the Dough (Optional): If time allows, chill the assembled pan for 15–20 minutes before baking. This helps reduce spreading and improves texture.
- Line the Pan Properly: Always use parchment paper with overhang—it makes lifting the entire slab effortless and preserves your pan’s coating.
- Avoid Overbaking: These bars continue cooking slightly from residual heat after removal. Pull them out when the edges are golden and the center still looks slightly soft.
- Cool Before Cutting: Rushing to slice warm bars causes crumbling and gooey messes. Wait at least 1 hour for clean cuts.
- Toast Graham Crumbs First (Advanced Tip): For deeper flavor, spread graham cracker crumbs on a sheet pan and toast at 350°F for 5–7 minutes before using. Cool before adding to batter.
- Double the Batch: These disappear fast! Bake two pans—one to eat now, one to freeze for later.
- Storage Hack: Place parchment between layers when storing to prevent sticking. Keep in an airtight container for freshness.
Variations and Customizations
One of the greatest strengths of S’mores Stuffed Cookie Bars is their adaptability. Whether you’re catering to dietary needs, seasonal themes, or adventurous palates, there’s room for creativity. Explore these inspired variations:
- Peppermint S’mores: Add 1/2 teaspoon peppermint extract and swap chocolate chips for crushed candy cane pieces or Andes mints. Top with red-and-white mini marshmallows for a festive winter twist.
- S’mores Cookie Skillet: Press the dough into a cast-iron skillet instead of a pan. Bake and serve warm with ice cream for an ultra-indulgent dessert pizza effect.
- Peanut Butter Lover’s: Swirl 1/3 cup creamy peanut butter into the batter or layer it beneath the marshmallow fluff. Use peanut butter chips in place of half the chocolate chips.
- Dairy-Free Version: Substitute vegan butter (like Earth Balance), dairy-free chocolate chips (Enjoy Life brand), and egg replacers (flax eggs: 2 tbsp ground flax + 5 tbsp water).
- Gluten-Free Option: Replace all-purpose flour and graham cracker crumbs with gluten-free 1:1 baking flour and certified GF graham crackers. Ensure all other ingredients (like chocolate chips) are labeled gluten-free.
- Low-Sugar Alternative: Use monk fruit sweetener blends (like Lakanto), sugar-free chocolate chips, and reduce marshmallow content. Note: texture may vary slightly.
- Chocolate Graham Fusion: Use chocolate graham crackers instead of honey ones for a richer base. Pair with dark chocolate chips for a more sophisticated profile.
- Trail Mix Edition: Fold in chopped almonds, dried banana chips, and coconut flakes for a tropical campfire vibe.
- Salted Caramel Swirl: Drizzle 1/3 cup thick salted caramel sauce over the marshmallow layer before adding the top dough. Creates ribbons of buttery sweetness.
- Halloween or Birthday Theme: Use colored sprinkles, themed candies, or character-shaped marshmallows to match the occasion.
You can even turn leftovers into ice cream sandwiches by placing a scoop of vanilla ice cream between two cooled bars. Wrap in wax paper and freeze for 30 minutes—delicious!
Health Considerations and Nutritional Value
While S’mores Stuffed Cookie Bars are undeniably indulgent, understanding their nutritional makeup helps you enjoy them mindfully. Here’s an approximate nutritional breakdown per serving (based on 12 servings):
- Calories: ~420–480 kcal
- Total Fat: 22–26g (Saturated Fat: 12–14g)
- Cholesterol: 60–70mg
- Sodium: 280–350mg
- Total Carbohydrates: 58–65g (Dietary Fiber: 2–3g, Sugars: 38–42g)
- Protein: 4–6g
Note: Values vary depending on brands, substitutions, and portion size.
Key Health Notes:
- High Sugar Content: With nearly 40g of sugar per bar, these should be enjoyed occasionally, especially for those managing blood sugar or diabetes.
- Saturated Fat: Primarily from butter and chocolate. Opt for reduced-fat versions or plant-based alternatives if monitoring intake.
- Low in Fiber and Protein: Not nutritionally balanced. Pair with fresh fruit or Greek yogurt to round out the meal.
- Allergens: Contains wheat, dairy, eggs, and soy (in most chocolate and marshmallows). Check labels carefully for allergen warnings.
- Gluten and Vegan Modifications: As mentioned earlier, gluten-free and vegan versions exist but may differ in texture and calorie count.
For a slightly healthier take, consider reducing sugar by 1/4 cup, using dark chocolate (higher antioxidants), increasing graham cracker ratio (adds fiber), or incorporating oats for bulk. However, keep in mind that structural integrity may change.
Ingredients
- 1 cup (2 sticks) unsalted butter, softened
- 3/4 cup granulated sugar
- 1 cup brown sugar, packed
- 2 large eggs, room temperature
- 2 teaspoons pure vanilla extract
- 2 1/2 cups all-purpose flour
- 1 1/2 cups graham cracker crumbs (about 12 full sheets)
- 1 teaspoon baking soda
- 1/2 teaspoon salt
- 2 cups semi-sweet chocolate chips, divided
- 1 1/2 cups mini marshmallows, divided
- 1/2 cup marshmallow fluff
Directions
- Preheat oven to 350°F (175°C). Line a 9×13-inch baking pan with parchment paper and lightly grease.
- In a large bowl, cream together butter, granulated sugar, and brown sugar until fluffy (2–3 minutes).
- Beat in eggs one at a time, then stir in vanilla extract.
- In another bowl, whisk together flour, graham cracker crumbs, baking soda, and salt.
- Gradually add dry ingredients to wet mixture, mixing until just combined.
- Fold in 1 1/2 cups chocolate chips.
- Press half the dough into the bottom of the prepared pan.
- Spread marshmallow fluff evenly over the base. Scatter 1 cup mini marshmallows on top.
- Drop remaining dough in clumps over the marshmallow layer and gently press to cover.
- Sprinkle remaining 1/2 cup chocolate chips and 1/2 cup mini marshmallows on top.
- Bake for 28–35 minutes, until golden brown and set.
- Cool completely in the pan before lifting out and slicing into bars.
- Serve at room temperature. Store in an airtight container for up to 5 days or freeze for up to 3 months.
FAQ
Q: Can I make these bars ahead of time?
A: Absolutely! Bake and cool completely, then store in an airtight container at room temperature for up to 3 days or freeze for longer storage.
Q: Why did my bars come out too soft or gooey?
A: This could be due to underbaking, high humidity, or excess marshmallow. Ensure you bake until the center is set (toothpick test) and allow full cooling time.
Q: Can I use regular-sized marshmallows?
A: Yes, but cut them into quarters or halves for even distribution and better melting. Mini marshmallows integrate more smoothly.
Q: How do I prevent the marshmallows from burning?
A: Cover loosely with foil halfway through baking if the top browns too quickly. Avoid opening the oven frequently.
Q: Can I double the recipe?
A: Yes, but use two 9×13 pans or a larger 12×18 sheet pan (adjust baking time accordingly). Do not overcrowd one pan.
Q: Are these safe to mail as gifts?
A: Yes! Pack in a rigid container with parchment between layers. Ship via priority mail and include a gel pack if needed.
Q: Can I make these bars chewier or crispier?
A: For chewier bars, slightly underbake and cool fully. For crispier edges, extend baking by 2–3 minutes and cut smaller squares.
Q: What can I substitute for marshmallow fluff?
A: You can omit it or replace with additional mini marshmallows pressed into the center layer. Some use homemade marshmallow creme (3 egg whites + 1 cup sugar cooked to soft-ball stage).
Summary (in two lines)
S’mores Stuffed Cookie Bars capture the essence of campfire nostalgia in a rich, chewy, and irresistibly gooey dessert bar layered with chocolate, marshmallow, and graham cracker goodness. Easy to make, endlessly customizable, and perfect for sharing—these bars are guaranteed to become a new classic in your recipe collection.