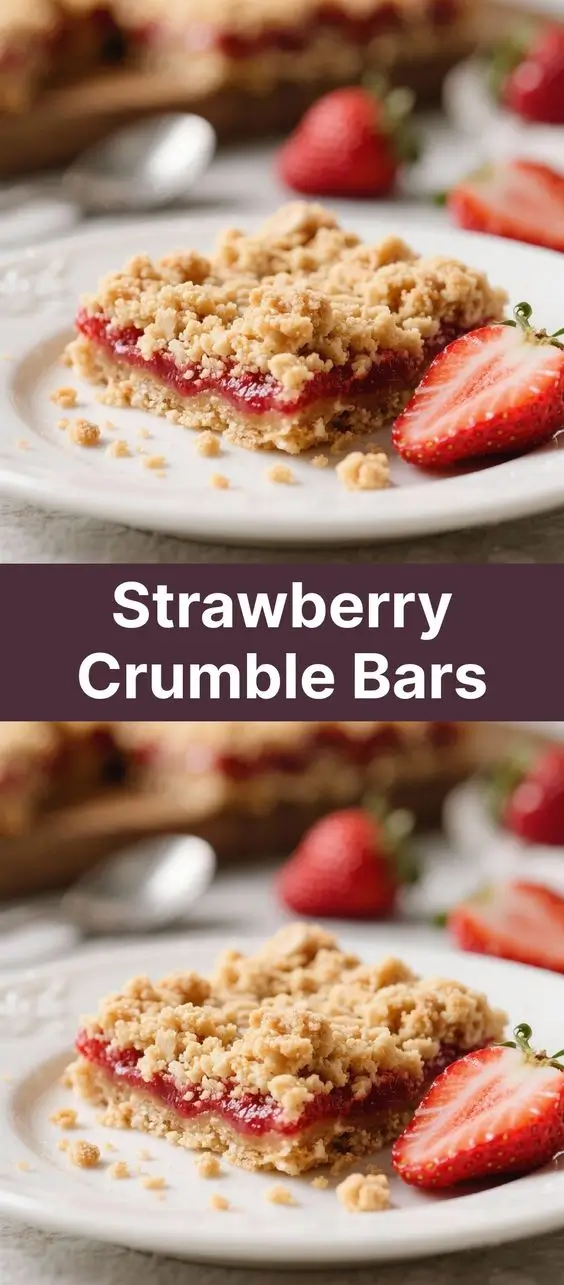
Strawberry Crumble Bars: A Sweet and Tangy Delight for Every Occasion
The History of Strawberry Crumble Bars
While the exact origin of strawberry crumble bars is difficult to trace, their roots lie in the rich traditions of American and British baking. During the early 20th century, both cultures embraced fruit-based desserts that combined seasonal produce with buttery, crumbly textures—hallmarks of rustic home cooking. The concept of “crumbles” began gaining popularity in Britain during World War II, when sugar and flour were rationed; bakers turned to simple combinations of fruit, oats, flour, and butter to create satisfying desserts without needing eggs or excessive sugar.
In the United States, similar treats evolved from bar cookies and fruit crisps commonly baked in farm kitchens across the Midwest. These portable desserts became staples at church suppers, school bake sales, and family gatherings. As strawberries became more accessible year-round due to improved farming and transportation, they emerged as a favorite fruit filling in these bars. By the late 20th century, recipes began merging the best of both worlds—the gooey, jam-like center of a fruit tart with the sturdy, crumbly base and topping of a crisp—giving rise to what we now know as strawberry crumble bars.
Today, strawberry crumble bars represent a harmonious blend of tradition and innovation. They reflect the growing interest in homemade, hand-held desserts that balance sweetness with freshness, and indulgence with approachability. Whether served at summer picnics or winter holiday tables, these bars continue to evolve while honoring their humble origins in resourceful, family-centered baking.
Ingredients Breakdown: What Makes These Bars Irresistible?
The magic of strawberry crumble bars lies not just in flavor, but in texture and structure. Each ingredient plays a crucial role in creating a dessert that’s buttery, slightly crisp on the edges, tender in the middle, and bursting with fruity brightness.
For the Crust and Crumble Topping:
- All-Purpose Flour: Provides structure and stability. It forms the backbone of the shortbread-like base and gives the crumble topping its signature sandy texture.
- Butter (Unsalted): The star of richness and flakiness. Cold butter cut into the dry ingredients creates pockets of steam during baking, resulting in a tender, melt-in-your-mouth crust. Its fat content also enhances mouthfeel and carries flavor.
- Granulated Sugar: Adds sweetness and helps with browning. It also contributes to the slight crispness of the baked crust.
- Brown Sugar: Offers deeper molasses notes and extra moisture, which keeps the bars soft and chewy. It also enhances caramelization during baking.
- Vanilla Extract: A touch of warm, floral depth that complements both the butter and the strawberries.
- Salt: Balances sweetness and heightens all other flavors. Even a small pinch can make the difference between flat and vibrant taste.
- Oats (Optional, but Recommended): Rolled oats add a heartier texture and nutty undertone to the crumble layer. They also increase fiber content and contribute to a more complex bite.
For the Strawberry Filling:
- Fresh Strawberries: Ideally ripe but firm, fresh strawberries deliver the most authentic, bright flavor. Their natural pectin helps thicken the filling as it bakes.
- Strawberry Jam or Preserves (Optional): Used to boost fruit intensity and ensure a jammy consistency, especially if using less-than-ideal berries.
- Granulated Sugar: Adjusts sweetness based on the tartness of the strawberries. Too little, and the filling may be too sharp; too much, and it overpowers the fruit.
- Cornstarch or Arrowroot Powder: Critical for thickening the juices released by the strawberries during baking. Without it, the bars would turn soggy or leak syrup when cut.
- Lemon Juice: Brightens the flavor, balances sweetness, and helps preserve the vibrant red color of the strawberries. It also activates pectin for better gel formation.
- Lemon Zest (Optional): Adds a citrusy perfume that elevates the entire dessert without being overtly sour.
- Cinnamon or Cardamom (Optional): Warm spices that subtly enhance the fruit without dominating it. A pinch goes a long way.
Step-by-Step Recipe: How to Make Perfect Strawberry Crumble Bars
Making strawberry crumble bars at home is simpler than it seems. With careful attention to texture and temperature, you can achieve professional-quality results in your own kitchen.
Ingredients You’ll Need:
- 2 cups (250g) all-purpose flour
- 1/2 cup (45g) old-fashioned rolled oats (optional)
- 1/2 cup (100g) granulated sugar
- 1/4 cup (50g) packed light brown sugar
- 1/2 teaspoon salt
- 1 teaspoon ground cinnamon (optional)
- 1 cup (226g) unsalted butter, cold and cubed
- 1 teaspoon pure vanilla extract
- 1 1/2 pounds (680g) fresh strawberries, hulled and finely chopped or sliced
- 1/3 cup (65g) granulated sugar (adjust based on berry sweetness)
- 2 tablespoons cornstarch or arrowroot powder
- 1 tablespoon fresh lemon juice
- 1 teaspoon lemon zest (optional)
- 1/4 teaspoon almond extract (optional, for depth)
Equipment:
- 9×13-inch baking pan
- Parchment paper (recommended for easy removal)
- Pastry cutter or food processor
- Mixing bowls
- Wooden spoon or spatula
- Cooling rack
Directions:
- Preheat Oven & Prepare Pan: Preheat your oven to 350°F (175°C). Line a 9×13-inch baking pan with parchment paper, leaving overhang on two sides for easy lifting later. Lightly grease any exposed areas of the pan.
- Make the Crust/Crumble Mixture: In a large mixing bowl, whisk together the flour, oats (if using), granulated sugar, brown sugar, salt, and cinnamon. Add the cold cubed butter and work it into the dry ingredients using a pastry cutter or your fingertips until the mixture resembles coarse crumbs with some pea-sized pieces. Stir in the vanilla extract. Do not overmix—this ensures a tender texture.
- Press Half for the Base: Transfer about 2 1/2 cups of the crumb mixture to the prepared pan. Press it firmly and evenly into the bottom using the back of a spoon or a flat measuring cup. This step is crucial—any thin spots will lead to leakage.
- Bake the Base (Optional Par-Bake): For extra sturdiness, bake the crust alone for 15–18 minutes until lightly golden around the edges. This prevents sogginess, especially with juicy berries. Let cool slightly while preparing the filling.
- Prepare the Strawberry Filling: In a medium bowl, combine the chopped strawberries, sugar, cornstarch, lemon juice, lemon zest, and almond extract (if using). Gently toss to coat. Let sit for 10–15 minutes to allow the strawberries to release some juice and the cornstarch to dissolve.
- Assemble the Bars: Pour the strawberry mixture over the baked (or unbaked) crust, spreading evenly. Try not to move the base too much. Sprinkle the remaining crumb mixture evenly over the top. Do not press down—let the crumbs stay loose for a true crumble effect.
- Bake Until Golden and Bubbly: Place the pan in the preheated oven and bake for 35–45 minutes, or until the topping is golden brown and the strawberry filling is thick and bubbling through the cracks. If the topping browns too quickly, tent loosely with aluminum foil.
- Cool Completely: This is perhaps the most important step. Allow the bars to cool in the pan on a wire rack for at least 2 hours. The filling needs time to set. Cutting too soon will result in a runny mess.
- Cut and Serve: Use the parchment overhang to lift the entire block out of the pan. Place on a cutting board and slice into squares or rectangles using a sharp knife wiped clean between cuts for neat edges.
Tips for Success: Expert Advice for Flawless Strawberry Crumble Bars
- Use Cold Butter: Just like in pie crusts, cold butter creates steam pockets that yield a flaky, tender texture. Don’t let it soften before mixing.
- Don’t Skip the Cornstarch: Fresh strawberries release a lot of liquid. Cornstarch binds this moisture and turns it into a luscious, jam-like filling. For every cup of berries, use about 1–1.5 teaspoons of cornstarch.
- Chop Berries Uniformly: Cut them into small, even pieces (about 1/4 to 1/2 inch) so they cook evenly and distribute well.
- Par-Bake the Crust: While optional, pre-baking the base for 15 minutes dramatically improves structural integrity, especially if your berries are very juicy.
- Let Them Cool Fully: Patience pays off. Cooling allows the filling to re-solidify and makes slicing clean and easy.
- Line the Pan Properly: Parchment paper isn’t just convenient—it prevents sticking and tearing. Aluminum foil works too, but parchment offers better non-stick performance.
- Adjust Sugar Based on Fruit Ripeness: Taste your strawberries first. Very sweet ones may need only 1/4 cup sugar; tart ones might require up to 1/2 cup.
- Add a Touch of Spice: A whisper of cinnamon, nutmeg, or cardamom can elevate the flavor profile without making it “spiced.” Start with 1/8 to 1/4 teaspoon.
- Freeze for Later: Once cooled and cut, store in an airtight container in the freezer for up to 3 months. Thaw at room temperature or warm slightly before serving.
- Serve with Style: Dust with powdered sugar, drizzle with white chocolate, or serve with a scoop of vanilla ice cream or whipped cream for an elegant finish.
Variations and Customizations: Make It Your Own
Strawberry crumble bars are wonderfully adaptable. Here are creative ways to personalize the recipe:
Gluten-Free Version:
Replace all-purpose flour with a 1:1 gluten-free baking blend (like Bob’s Red Mill or King Arthur). Ensure oats are certified gluten-free if needed. The texture remains delightfully crumbly.
Vegan Adaptation:
Use plant-based butter (such as Earth Balance) and check that your sugar is vegan-friendly. The bars will still be rich and flavorful, though slightly less creamy.
Different Fruits:
Swap strawberries for raspberries, blueberries, blackberries, peaches, cherries, or a mixed berry blend. Adjust sugar and thickener as needed—raspberries are tarter, peaches juicier.
Nutty Twist:
Add 1/2 cup chopped almonds, pecans, or walnuts to the crumb topping for added crunch and flavor complexity.
Chocolate Lover’s Edition:
Stir 1/2 cup mini chocolate chips into the crumb mixture or sprinkle on top before baking. Alternatively, dip cooled bars halfway in melted dark chocolate.
Coconut Bliss:
Mix 1/2 cup shredded coconut (toasted or raw) into the crumb topping for tropical flair. Pairs beautifully with strawberries.
Mini Bar Version:
Make individual servings using a muffin tin. Press crust into greased cups, fill with 1 tbsp strawberry mix, top with crumbs, and bake 20–25 minutes.
Layered Bars:
Add a streusel middle layer or sandwich the strawberry filling between two thinner crusts for a denser treat.
Infused Flavors:
Try adding a splash of balsamic vinegar to the filling for depth, or a few drops of rose water for floral elegance. Basil or mint can also add a surprising herbal note.
Health Considerations and Nutritional Value
While strawberry crumble bars are undeniably indulgent, they can be part of a balanced diet when enjoyed in moderation. Understanding their nutritional components helps you make informed choices.
Macronutrient Overview (Per Serving, Approx. 1 of 12 Bars):
- Calories: ~320–380 kcal
- Total Fat: 18–22g (mostly from butter)
- Saturated Fat: 11–13g
- Carbohydrates: 40–45g
- Sugars: 22–28g (natural and added)
- Fiber: 2–3g (more if oats or whole grain flour used)
- Protein: 3–4g
Health Highlights:
- Strawberries Are Nutrient-Dense: Rich in vitamin C, manganese, folate, and antioxidants like anthocyanins and ellagic acid, which support immune function and reduce inflammation.
- Natural Sweetness: When made with minimal added sugar, these bars leverage the natural fructose in fruit, reducing reliance on refined sugars.
- Portion Control: Pre-cut bars make it easier to manage serving sizes compared to free-form desserts.
Considerations:
- High in Saturated Fat: Due to butter content. Can be reduced using lower-fat alternatives, though texture may suffer.
- Refined Carbohydrates: White flour lacks fiber and nutrients. Substitute half with whole wheat pastry flour for a healthier twist.
- Sugar Content: Monitor total intake, especially for those managing diabetes or watching sugar levels. Natural sweeteners like coconut sugar or monk fruit can be experimented with, but may alter texture.
Making Healthier Swaps:
- Use half butter, half unsweetened applesauce to reduce fat.
- Increase oats and reduce flour for more fiber.
- Add chia seeds or ground flaxseed to the crust for omega-3s.
- Boost fruit content and reduce sugar by using macerated berries with a natural sweetener like honey or maple syrup.
Frequently Asked Questions (FAQ)
Can I use frozen strawberries?
Yes, but thaw and drain them thoroughly before use. Frozen berries release more liquid, so consider increasing cornstarch by 1/2 to 1 teaspoon. Sauté briefly to evaporate excess moisture if needed.
How long do strawberry crumble bars last?
Store in an airtight container at room temperature for up to 2 days, in the refrigerator for up to 5 days, or freeze for up to 3 months. Reheat gently in the oven for best texture.
Why are my bars soggy?
Common causes include skipping the cornstarch, not cooling fully, using overly juicy berries, or omitting the par-bake. Ensure proper thickening and patience during cooling.
Can I make these ahead of time?
Absolutely! Bake, cool, and store covered at room temperature for 1–2 days. They often taste better after the flavors meld overnight.
Can I double the recipe?
Yes, but use a larger pan (e.g., half-sheet tray) or make two batches. Avoid stacking layers—spread evenly for consistent baking.
Are strawberry crumble bars the same as strawberry bars or blondies?
They’re similar but distinct. Blondies are cake-like with mix-ins; strawberry bars may have a jam swirl or softer base. Crumble bars emphasize a shortbread base and crumb topping with fruit in the middle.
Can I use jam instead of fresh strawberries?
Yes! Use 1 to 1 1/4 cups of high-quality strawberry jam. Spread directly over the crust and top with crumbs. No thickener needed, and baking time may be slightly shorter.
What’s the best way to cut clean bars?
Cool completely, lift using parchment, use a sharp chef’s knife, and wipe the blade between cuts. Chilling for 30 minutes before slicing also helps.
Can I add nuts or chocolate?
Definitely! Fold chopped nuts into the crumb mixture or sprinkle on top before baking. Mini chocolate chips also work well—just don’t overdo it to avoid sinking.
Are these safe to eat raw?
No. The crust contains raw flour and butter, and the filling needs baking to thicken properly. Always bake as directed.
Summary
Strawberry crumble bars are a beloved dessert that marries a buttery shortbread base with a vibrant, jammy strawberry center and a crisp, crumbly topping. Easy to make, endlessly customizable, and perfect for sharing, they bring joy to any table.
Whether you’re baking for a crowd or treating yourself, these bars offer a perfect balance of sweet, tart, and rich—all in a portable, sliceable format that’s as beautiful as it is delicious.