Introduction
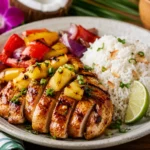
Crunchy, sweet, savory, and utterly addictive—Crispy Honey Garlic Chicken Tacos are the vibrant fusion dish that bridges the bold flavors of Asian-inspired marinades with the comforting, handheld joy of Mexican street food. Imagine golden-crisped chicken strips glazed in a glossy, aromatic honey-garlic sauce—tangy from rice vinegar, deeply umami from soy sauce and toasted sesame oil, with a gentle warmth from fresh ginger and red pepper flakes—nestled inside warm, pliable corn or flour tortillas and finished with vibrant, cooling toppings like pickled red onions, crisp cabbage slaw, fresh cilantro, and a drizzle of spicy sriracha-lime crema. These tacos aren’t just dinner—they’re an experience: a symphony of textures (crisp, tender, creamy, crunchy), temperatures (warm chicken, cool slaw), and layered flavor profiles that dance across the palate with every bite. Whether you’re hosting a casual taco Tuesday, meal prepping for busy weeknights, or seeking a crowd-pleasing centerpiece for game day or summer gatherings, these tacos deliver restaurant-quality depth and excitement without requiring professional kitchen skills—or hours of prep.
The History
While Crispy Honey Garlic Chicken Tacos don’t trace back to a single ancient culinary tradition, they are a brilliant, modern embodiment of global flavor migration and the rise of “remix cuisine.” The honey-garlic glaze has deep roots in East Asian cooking—particularly Chinese-American and Korean-inspired dishes—where caramelized honey, pungent raw garlic, soy sauce, and rice vinegar create a sticky-sweet-savory foundation used on everything from wings to stir-fried shrimp. Meanwhile, the taco format is intrinsically tied to Indigenous Mesoamerican heritage, evolving through centuries of Spanish colonization, regional adaptation across Mexico, and later, U.S. innovation (think Tex-Mex and Cal-Mex). The convergence began gaining momentum in the early 2000s with the explosion of food trucks—especially in cities like Los Angeles, Portland, and Austin—where chefs began boldly cross-pollinating traditions: Korean BBQ tacos, Thai peanut chicken tacos, and Japanese-inspired fish tacos all paved the way. Crispy Honey Garlic Chicken Tacos emerged organically from this movement: a response to consumer demand for bold, shareable, Instagram-worthy meals that honor authenticity while embracing creative liberty. They reflect a broader cultural shift—valuing flavor integrity over rigid tradition, celebrating technique (like double-frying for ultra-crisp chicken) alongside accessibility, and recognizing that deliciousness knows no borders.
Ingredients Breakdown
Every exceptional taco begins with intentionality—and understanding *why* each ingredient matters elevates your results from good to unforgettable:
- Chicken Breast or Thighs: Boneless, skinless chicken breast offers lean tenderness and maximum surface area for browning and glazing—but thighs provide superior juiciness and richer flavor, especially when cooked to crispy perfection. For best texture, slice against the grain into uniform ½-inch thick, 2-inch long strips to ensure even cooking and optimal crisp-to-tender ratio.
- All-Purpose Flour & Cornstarch: The dynamic duo of breading. Flour provides structure and light browning; cornstarch is the secret weapon—it dramatically increases crispness, creates a delicate shatter when fried, and helps the glaze cling tenaciously. A 2:1 ratio (flour to cornstarch) strikes the ideal balance.
- Egg Wash (with Dijon Mustard): More than just a binder—the Dijon adds subtle tang and emulsifying power, helping the breading adhere *and* contributing complexity to the final crust’s flavor profile.
- Soy Sauce (Low-Sodium Preferred): Delivers foundational umami and saltiness without overwhelming the delicate honey notes. Low-sodium versions give you precise control over salinity, especially important when balancing with salty toppings like cotija cheese or pickled onions.
- Honey (Raw or Clover): Not just sweetness—it’s the glaze’s body, sheen, and caramelization agent. Raw honey adds floral notes; clover is milder and more universally accessible. Avoid ultra-processed “honey blends” which contain corn syrup and lack depth.
- Fresh Garlic (Minced or Pressed): Non-negotiable. Pre-minced jarred garlic lacks the volatile aromatic compounds that bloom under heat. Fresh garlic provides the signature pungent, earthy backbone that defines the dish.
- Fresh Ginger (Grated): Adds bright, citrusy-woody warmth that cuts through richness and complements both the honey’s sweetness and the soy’s savoriness. Microplane-grated is essential for seamless integration and maximum flavor release.
- Rice Vinegar: Offers clean, mild acidity—softer than apple cider or white vinegar—to balance sweetness without sharpness. It also enhances the glaze’s gloss and helps prevent crystallization.
- Toasted Sesame Oil: Used *only* at the end—never heated to high temps—as its delicate nutty aroma would burn off. A single teaspoon stirred in post-cooking infuses the glaze with unmistakable depth and sophistication.
- Neutral High-Heat Oil (Avocado, Peanut, or Canola): Essential for achieving true crispness. These oils have smoke points well above 400°F, allowing the chicken to fry quickly and develop a shatteringly crisp exterior before the interior overcooks.
- Corn Tortillas (or Flour): Authenticity meets practicality. Blue or yellow corn tortillas offer earthy, slightly sweet notes and structural integrity when lightly charred—but they require proper warming (double-stack on a dry comal or skillet until pliable) to prevent cracking. Flour tortillas provide chewy softness and superior pliability, ideal for heavy fillings and on-the-go eating.
- Pickled Red Onions: A transformative topping. Their vibrant magenta hue, bright acidity, and subtle sweetness cut through the richness of the glaze and add a refreshing counterpoint. Quick-pickle them yourself (red onion + rice vinegar + sugar + salt + optional jalapeño) for maximum freshness and crunch.
- Asian-Inspired Slaw: Far beyond basic shredded cabbage. This typically combines Napa cabbage (tender and sweet), red cabbage (for color and crunch), carrots (for sweetness and texture), and scallions, tossed in a light dressing of rice vinegar, lime juice, sesame oil, and a touch of honey—providing cool contrast, acidity, and textural interest.
- Herbs & Garnishes: Fresh cilantro adds herbal brightness; chopped roasted peanuts or sesame seeds contribute nutty crunch and visual appeal; lime wedges offer essential finishing acidity to brighten each bite.
Step-by-Step Recipe
- Prep the Chicken: Place boneless, skinless chicken breasts or thighs on a cutting board. Using a sharp chef’s knife, slice *against the grain* into uniform ½-inch thick, 2-inch long strips. Pat *extremely* dry with paper towels—moisture is the enemy of crispness. Place in a large bowl.
- Make the Marinade: In a small bowl, whisk together ¼ cup low-sodium soy sauce, 2 tablespoons rice vinegar, 1 tablespoon grated fresh ginger, 4 cloves finely minced fresh garlic, 1 teaspoon sesame oil, ½ teaspoon red pepper flakes (adjust to taste), and 1 tablespoon brown sugar. Pour over chicken, toss thoroughly to coat, and marinate for *at least 30 minutes* (up to 2 hours refrigerated) for maximum flavor penetration.
- Prepare Breading Station: Set up three shallow dishes: (1) Whisk together ¾ cup all-purpose flour, ¼ cup cornstarch, 1 teaspoon garlic powder, 1 teaspoon onion powder, ½ teaspoon white pepper, and ½ teaspoon salt. (2) Whisk 1 large egg with 1 teaspoon Dijon mustard and 1 tablespoon water until frothy. (3) Have a wire rack set over a baking sheet ready for draining.
- Bread the Chicken: Remove chicken from marinade, letting excess drip off. Dredge each strip thoroughly in the flour mixture, shaking off excess. Dip into the egg wash, allowing excess to drip. Return to the flour mixture and press firmly to adhere a generous, even second coat. Place breaded strips on a parchment-lined plate. Refrigerate for 15–20 minutes—this crucial step sets the breading and prevents it from sloughing off during frying.
- Heat the Oil: Pour 1½ inches of neutral oil (avocado or peanut preferred) into a heavy-bottomed Dutch oven or deep, wide skillet. Heat over medium-high heat to 350–365°F (use a deep-fry thermometer for accuracy). Maintaining this precise temperature is critical—too low = greasy, soggy chicken; too high = burnt exterior, raw interior.
- Fry to Perfection: Carefully lower 4–5 breaded chicken strips into hot oil using tongs or a spider strainer—do not overcrowd. Fry for 3–4 minutes, turning once halfway, until deep golden brown and crispy. Transfer to the wire rack to drain. Repeat with remaining batches, allowing oil to reheat to 350°F between batches. Let chicken rest for 5 minutes—this allows internal heat to finish cooking and the crust to set.
- Make the Glaze: While chicken rests, prepare the glaze. In a clean small saucepan, combine ⅓ cup honey, 2 tablespoons soy sauce, 1 tablespoon rice vinegar, 1 tablespoon water, and 1 teaspoon cornstarch (whisk until smooth). Bring to a gentle simmer over medium heat. Cook, stirring constantly, for 2–3 minutes until thickened, glossy, and coats the back of a spoon. Remove from heat and stir in 1 teaspoon toasted sesame oil and 1 teaspoon fresh lime juice.
- Glaze & Toss: Return all fried chicken to a large, clean bowl. Pour the warm glaze over the chicken. Using two silicone spatulas or tongs, gently but thoroughly toss until every piece is evenly and luxuriously coated. Work quickly—the glaze will begin to set as it cools.
- Warm the Tortillas: Heat a dry cast-iron skillet or comal over medium-high heat. Warm corn tortillas one or two at a time for 15–20 seconds per side until soft, pliable, and lightly blistered. Stack wrapped in a clean kitchen towel to keep warm and steamy. For flour tortillas, heat for 10–15 seconds per side until soft and slightly puffed.
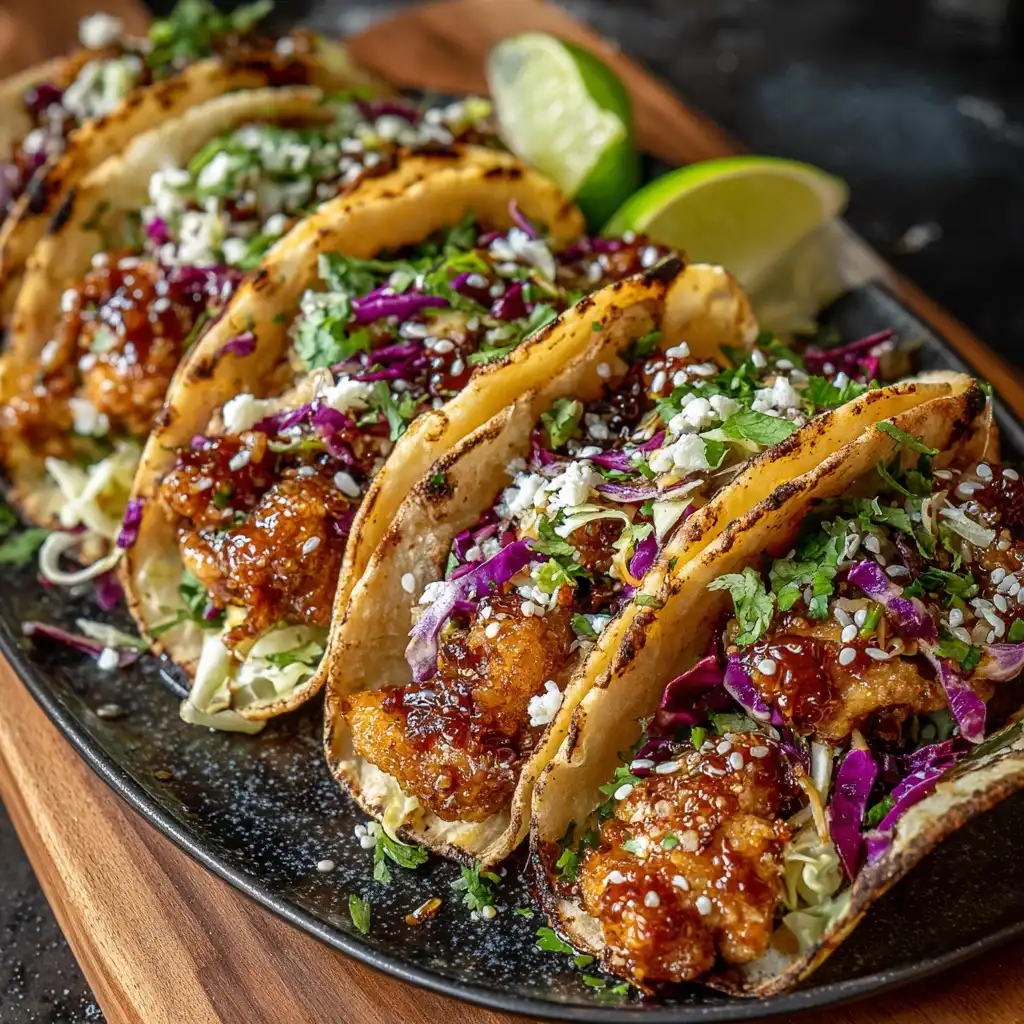
- Assemble with Intention: Place 2–3 glazed chicken strips down the center of each warm tortilla. Top generously with vibrant pickled red onions, a hearty scoop of Asian-inspired slaw, a sprinkle of chopped fresh cilantro, a light dusting of toasted sesame seeds or crushed roasted peanuts, and a final drizzle of sriracha-lime crema (mix ¼ cup sour cream or Mexican crema with 1 teaspoon sriracha and ½ teaspoon lime zest).
- Serve Immediately: These tacos shine brightest when served piping hot—the chicken is crispiest, the glaze is most lustrous, and the contrast with cool toppings is most pronounced. Offer extra lime wedges, additional crema, and hot sauce on the side.
Tips
- Dry Chicken is Key: Patting the marinated chicken *thoroughly* with paper towels before breading removes surface moisture that would otherwise create steam and prevent crisp adhesion. Don’t skip this step—even 30 seconds of extra patting makes a dramatic difference.
- Double-Dredge for Maximum Crunch: The two-stage breading (flour → egg → flour again) creates a thicker, more textured, and significantly crispier crust than a single dredge. Pressing the second flour coat firmly ensures it adheres completely.
- Chill Before Frying: Refrigerating the breaded chicken for 15–20 minutes firms up the coating, preventing it from sliding off in the hot oil and promoting even browning. It also helps the chicken cook more evenly.
- Thermometer Non-Negotiable: Guessing oil temperature leads to disaster. A reliable deep-fry thermometer is the single most impactful tool for consistent, restaurant-quality crispness. Invest in one—it pays for itself in saved chicken and oil.
- Fry in Small Batches: Overcrowding the pan drops the oil temperature drastically, causing the chicken to steam instead of fry, resulting in greasy, limp results. Fry only what fits comfortably in a single layer with space between pieces.
- Don’t Glaze Too Early: Glazing cold chicken causes the sauce to seize and become clumpy. Always glaze the chicken while it’s still hot from frying—or reheat briefly in a 350°F oven for 2 minutes if assembling later.
- Glaze Thickness Control: If your glaze thickens too much while sitting, whisk in 1 teaspoon of warm water at a time until desired consistency returns. Conversely, if it’s too thin, return to low heat and simmer for another 30–60 seconds.
- Tortilla Tenderizing Trick: For corn tortillas prone to cracking, wrap a stack of 6 in damp paper towels and microwave for 30–45 seconds. Then immediately transfer to a tortilla warmer or clean kitchen towel. This adds essential steam and pliability.
- Prep Toppings Ahead: Make the pickled onions and slaw up to 3 days in advance. They actually improve in flavor as they marinate. Having them ready streamlines assembly and ensures freshness.
- Leftover Magic: Leftover glazed chicken is phenomenal chopped and tossed into fried rice, folded into omelets, or served over butter lettuce cups with extra slaw for a deconstructed taco salad.
Variations and Customizations
This recipe is a vibrant canvas—adapt it to suit dietary needs, seasonal ingredients, pantry staples, or pure culinary curiosity:
- Gluten-Free Version: Swap regular soy sauce for certified gluten-free tamari or coconut aminos. Use gluten-free all-purpose flour blend (like Bob’s Red Mill 1-to-1) and ensure cornstarch is GF-certified. Serve in certified GF corn tortillas.
- Vegetarian/Vegan Option: Replace chicken with extra-firm pressed tofu (cubed or sliced), seitan strips, or crispy cauliflower florets. Marinate and bread as directed. For vegan glaze, use maple syrup instead of honey and vegan “fish sauce” or liquid aminos for umami depth.
- Spice Spectrum: Dial up heat with gochujang (Korean chili paste) swirled into the glaze, extra red pepper flakes, or a splash of sambal oelek. For mild palates, omit pepper flakes entirely and add a pinch of five-spice powder for aromatic warmth.
- Protein Swaps: Try crispy shrimp (peeled, deveined, tails on or off), thinly sliced flank steak (marinated longer, 2+ hours), or even tempeh for a fermented, nutty twist.
- Topping Twists:
- Mexican-Inspired: Swap slaw for quick-pickled jalapeños and crumbled queso fresco.
- Korean Fusion: Add kimchi slaw and a drizzle of gochujang mayo.
- Thai-Inspired: Top with crushed peanuts, fresh mint, Thai basil, and a lime-chili vinaigrette.
- Breakfast Taco Style: Add a softly scrambled egg and avocado slices.
- Oven-Baked Crispy Alternative: For a lighter approach, skip frying: place breaded chicken on a wire rack over a baking sheet, spray generously with avocado oil spray, and bake at 425°F for 18–22 minutes, flipping halfway, until golden and cooked through. Finish with glaze under the broiler for 1 minute to caramelize.
- Air Fryer Method: Arrange breaded chicken in a single layer in the air fryer basket. Spray lightly with oil. Cook at 400°F for 12–15 minutes, shaking basket halfway, until crispy and internal temp reaches 165°F. Glaze as directed.
- Deconstructed “Taco Bowl”: Serve the glazed chicken over steamed jasmine rice or quinoa, topped with all the same vibrant toppings and extra lime wedges—a hearty, grain-based alternative perfect for meal prep.
- Flavor Infusions: Add 1 teaspoon of grated orange zest to the glaze for brightness; stir 1 tablespoon of black bean garlic sauce into the marinade for deeper funk; or finish with a sprinkle of furikake for authentic Japanese umami crunch.
Health Considerations and Nutritional Value
While undeniably indulgent, Crispy Honey Garlic Chicken Tacos can be thoughtfully adapted to support balanced nutrition—without sacrificing satisfaction:
- Protein Powerhouse: Chicken breast provides ~26g of high-quality, complete protein per 3-ounce serving—essential for muscle maintenance, satiety, and metabolic health. Thighs offer slightly more healthy monounsaturated fats and iron.
- Smart Carbohydrate Choices: Corn tortillas are naturally gluten-free and lower in calories (~60 calories each) than flour tortillas (~90–100 calories), while offering fiber and antioxidants from the corn. Opting for whole-grain or sprouted flour tortillas boosts fiber content significantly (up to 4g per tortilla).
- Healthy Fats Focus: Using heart-healthy avocado or peanut oil for frying introduces beneficial monounsaturated fats. Toasted sesame oil adds potent antioxidants (sesamin, sesamolin) and anti-inflammatory lignans.
- Sugar Awareness: The glaze contains natural sugars from honey—about 12–15g per serving. To reduce added sugar, decrease honey by 1 tablespoon and compensate with extra ginger, garlic, and a splash of orange juice for brightness and body. Avoid substituting with artificial sweeteners, which don’t caramelize or provide the same mouthfeel.
- Sodium Savvy: Soy sauce is the primary sodium source. Using low-sodium soy sauce cuts sodium by ~40%. Further reduce by rinsing marinated chicken briefly before breading (though this sacrifices some flavor) or using coconut aminos (lower sodium, slightly sweeter).
- Vegetable Volume Boost: The slaw and pickled onions aren’t just garnish—they’re nutrient-dense powerhouses. Cabbage is rich in vitamin C, K, and sulforaphane (a potent antioxidant); red onions provide quercetin (anti-inflammatory flavonoid); carrots deliver beta-carotene.
- Portion Perspective: One taco (2–3 chicken strips + toppings) typically ranges from 380–480 calories, depending on tortilla choice and oil absorption. Serving two tacos with a side of roasted vegetables or a simple green salad creates a nutritionally complete, satisfying meal.
- Dietary Accommodations: Naturally adaptable for keto (use low-carb tortillas or lettuce cups), paleo (coconut aminos, almond flour breading, no sugar), and Whole30 (compliant aminos, no honey—substitute with date paste or omit glaze entirely for a dry-rubbed version).
- Food Safety Note: Always ensure chicken reaches a safe internal temperature of 165°F. Use a meat thermometer—not color or texture—as the sole indicator of doneness.
Ingredients
For the Chicken & Breading:
- 1 ½ pounds boneless, skinless chicken breasts or thighs, sliced against the grain into ½-inch thick, 2-inch long strips
- ¼ cup low-sodium soy sauce
- 2 tablespoons rice vinegar
- 1 tablespoon freshly grated ginger
- 4 cloves fresh garlic, finely minced
- 1 teaspoon toasted sesame oil
- ½ teaspoon red pepper flakes (adjust to taste)
- 1 tablespoon brown sugar
- ¾ cup all-purpose flour
- ¼ cup cornstarch
- 1 teaspoon garlic powder
- 1 teaspoon onion powder
- ½ teaspoon white pepper
- ½ teaspoon kosher salt
- 1 large egg
- 1 teaspoon Dijon mustard
- 1 tablespoon water
- 1 ½ inches neutral high-heat oil (avocado, peanut, or refined coconut oil) for frying
For the Honey Garlic Glaze:
- ⅓ cup raw or clover honey
- 2 tablespoons low-sodium soy sauce
- 1 tablespoon rice vinegar
- 1 tablespoon water
- 1 teaspoon cornstarch
- 1 teaspoon toasted sesame oil (added off-heat)
- 1 teaspoon fresh lime juice
For Assembly & Toppings:
- 8–12 small corn tortillas (blue or yellow) or flour tortillas
- 1 cup quick-pickled red onions (see Tips)
- 2 cups Asian-inspired slaw (Napa + red cabbage, carrots, scallions, rice vinegar, lime, sesame oil)
- Fresh cilantro leaves
- 1–2 tablespoons toasted sesame seeds or crushed roasted peanuts
- Lime wedges, for serving
- Optional Drizzle: Sriracha-lime crema (¼ cup sour cream or Mexican crema + 1 tsp sriracha + ½ tsp lime zest)
Directions
- Marinate the Chicken: In a medium bowl, whisk together soy sauce, rice vinegar, ginger, garlic, sesame oil, red pepper flakes, and brown sugar. Add chicken strips, tossing to coat evenly. Cover and refrigerate for 30 minutes to 2 hours.
- Prepare Breading Station: Set up three shallow dishes: (1) Whisk flour, cornstarch, garlic powder, onion powder, white pepper, and salt. (2) Whisk egg, Dijon, and water until frothy. (3) Place a wire rack over a baking sheet.
- Bread & Chill: Remove chicken from marinade, letting excess drip off. Pat *very* dry with paper towels. Dredge each strip in flour mixture, shake off excess. Dip in egg wash, let excess drip. Return to flour mixture, pressing firmly to adhere a thick, even second coat. Place on a parchment-lined plate. Refrigerate for 15–20 minutes.
- Heat Oil: Pour oil into a heavy pot to 1½-inch depth. Heat over medium-high to 350–365°F (use thermometer).
- Fry Chicken: Fry chicken in small batches (4–5 pieces) for 3–4 minutes, turning once, until deep golden and crispy. Transfer to wire rack. Repeat, reheating oil to 350°F between batches. Let rest 5 minutes.
- Make Glaze: Whisk honey, soy sauce, rice vinegar, water, and cornstarch in a small saucepan. Simmer over medium heat 2–3 minutes, stirring constantly, until thickened and glossy. Remove from heat; stir in sesame oil and lime juice.
- Glaze Chicken: Place fried chicken in a large bowl. Pour warm glaze over top. Gently toss with two spatulas until evenly coated.
- Warm Tortillas: Heat a dry skillet over medium-high. Warm tortillas 15–20 sec per side until pliable and lightly blistered. Keep wrapped in a towel.
- Assemble: Place 2–3 glazed chicken strips down center of each tortilla. Top generously with pickled onions, slaw, cilantro, sesame seeds or peanuts, and a drizzle of sriracha-lime crema.
- Serve Immediately: Enjoy hot, with extra lime wedges on the side.
FAQ
- Can I make these ahead of time?
- Yes! Marinate chicken and prep toppings (slaw, pickled onions) up to 3 days ahead. Bread chicken and refrigerate (unfried) for up to 24 hours. Fry and glaze *just before serving* for peak crispness. Leftover glazed chicken keeps refrigerated for 3 days—reheat gently in a 350°F oven for 5–7 minutes to revive crispness before serving.
- Why is my glaze not sticking or becoming clumpy?
- This usually happens if the chicken is too cold or the glaze is too cool. Ensure chicken is hot from frying (or briefly reheated) before glazing. Also, whisk the glaze constantly while simmering and remove from heat promptly once thickened—overcooking causes separation. If clumping occurs, whisk in 1 tsp warm water and return to low heat for 15 seconds.
- Can I use frozen chicken?
- For best texture and food safety, use fully thawed, *pat-dry* chicken. Frozen chicken holds excess moisture, leading to poor breading adhesion and uneven frying. Thaw overnight in the refrigerator or use the cold-water method (sealed bag, submerged, changed every 30 mins).
- What’s the best oil for frying?
- Avocado oil (smoke point 520°F) is ideal—neutral flavor, ultra-high heat tolerance, and heart-healthy