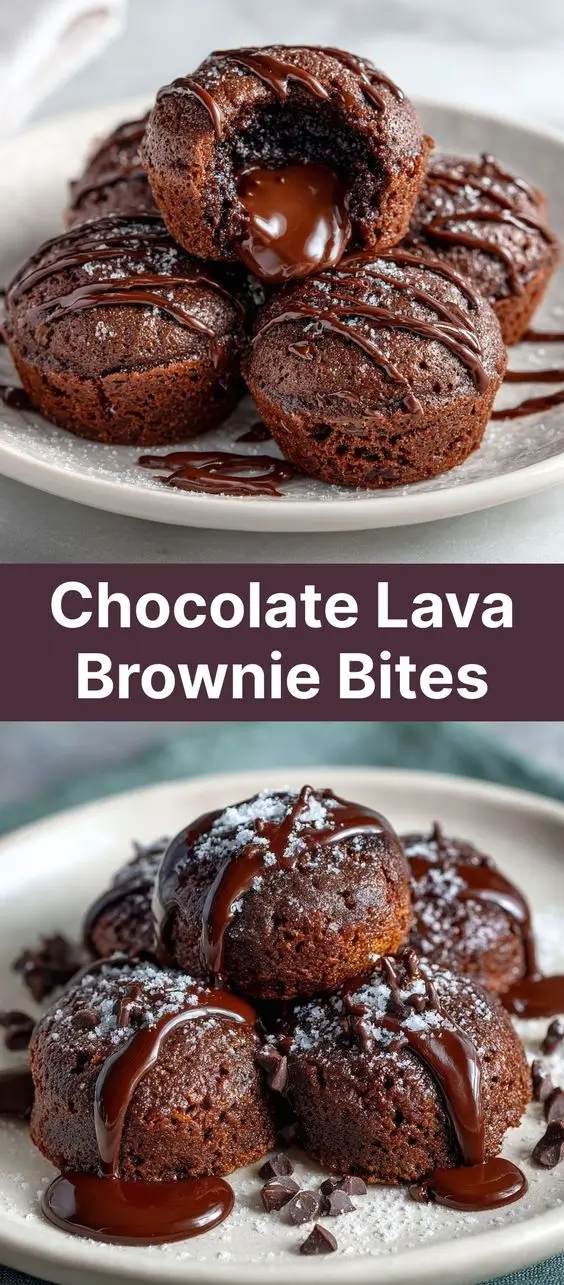
Chocolate Lava Brownie Bites: A Decadent Delight in Every Bite
Introduction
Imagine biting into a warm, fudgy chocolate brownie only to discover a rich, molten center oozing with velvety chocolate—this is the magic of Chocolate Lava Brownie Bites. These bite-sized treats combine the best of two indulgent desserts: the dense, chewy texture of a classic brownie and the dramatic, gooey surprise of a chocolate lava cake. Perfect for dinner parties, romantic evenings, holiday gatherings, or simply treating yourself after a long day, these little morsels are guaranteed to impress. Whether you’re a seasoned baker or a kitchen novice, this recipe is designed to deliver consistent, luxurious results every time.
The History
The origins of the Chocolate Lava Brownie Bites can be traced back to the late 20th century with the rise of the modern dessert phenomenon known as the “molten chocolate cake” or “chocolate fondant.” Chef Jean-Georges Vongerichten famously claimed to have accidentally invented the molten chocolate cake in the 1980s when he pulled a chocolate sponge cake out of the oven too early, discovering that the underbaked center created a luscious, flowing core. The dessert quickly gained popularity in fine dining restaurants around the world.
Brownies themselves date back to the late 1800s, with the first known recipe appearing in the 1897 Fannie Farmer Cookbook. Over time, bakers began experimenting by combining the concepts of molten centers and brownie textures, leading to the creation of Chocolate Lava Brownie Bites—a hybrid dessert that brings restaurant-quality indulgence into home kitchens. Their compact size makes them ideal for portion control (as much as one can resist seconds) and elegant presentation on dessert platters.
Ingredients Breakdown
Creating the perfect Chocolate Lava Brownie Bites requires attention to ingredient quality and balance. Each component plays a crucial role in achieving the signature texture contrast between the firm outer shell and the molten center.
- Dark Chocolate (70% cocoa): High-quality dark chocolate is essential. It provides depth of flavor, richness, and helps form the lava core. Avoid using chocolate chips meant for baking; opt for bars that melt smoothly.
- Unsalted Butter: Adds moisture and contributes to the fudgy texture. Using unsalted butter allows you to control the salt content more precisely.
- Granulated Sugar: Sweetens the batter while also helping to create a slightly crisp exterior when baked.
- Eggs and Egg Yolks: Whole eggs give structure, while extra yolks enhance creaminess and promote the soft, custard-like center.
- All-Purpose Flour: Used sparingly to provide just enough structure without making the bites cakey. Too much flour will prevent the lava effect.
- Cocoa Powder (Dutch-processed preferred): Intensifies the chocolate flavor and deepens the color.
- Salt: Enhances all the flavors and balances sweetness.
- Vanilla Extract: Adds aromatic complexity and rounds out the chocolate notes.
- Mini Chocolate Chunks or Dark Chocolate Truffle Centers: The secret to the lava! Embedding small chunks or chilled ganache centers ensures a molten core upon baking.
- Optional Add-ins: Sea salt flakes for garnish, espresso powder to amplify chocolate taste, orange zest for brightness, or liqueurs like Grand Marnier or Kahlúa for an adult twist.
Step-by-Step Recipe
- Preheat Oven & Prepare Pan: Preheat your oven to 375°F (190°C). Line a 24-cup mini muffin tin with silicone liners or grease thoroughly with butter and lightly dust with cocoa powder to prevent sticking.
- Melt Chocolate and Butter: In a heatproof bowl set over a simmering water bath (double boiler), melt 8 oz of chopped dark chocolate and 1/2 cup (1 stick) unsalted butter together. Stir gently until smooth and glossy. Remove from heat and let cool slightly.
- Whisk in Sugar and Eggs: In a separate bowl, whisk together 3/4 cup granulated sugar, 2 large eggs, 2 additional egg yolks, and 1 teaspoon vanilla extract until pale and slightly thickened—about 2–3 minutes with a hand mixer or vigorous whisking.
- Combine Wet Ingredients: Slowly pour the melted chocolate mixture into the egg-sugar mixture, whisking constantly to avoid scrambling the eggs. Mix until fully incorporated and silky.
- Incorporate Dry Ingredients: Sift in 1/4 cup all-purpose flour, 1/4 cup Dutch-processed cocoa powder, and 1/4 teaspoon salt. Gently fold with a spatula until just combined. Do not overmix—this keeps the texture tender.
- Add Chocolate Centers: Fold in 1/2 cup mini chocolate chunks. For extra lava intensity, consider placing a 1/2-inch cube of solid chocolate (or chilled chocolate ganache) into each muffin cup before filling.
- Fill Muffin Cups: Divide the batter evenly among the 24 cups, filling each about 3/4 full. If using additional chocolate cubes, place one in the center of each filled cup and top with a bit more batter to cover.
- Bake to Perfection: Bake for 12–14 minutes. The edges should appear set and slightly cracked, but the centers should still look soft and jiggly. This is key—the underbaked center creates the lava effect.
- Cool Briefly and Serve Warm: Let the brownie bites sit in the pan for 2–3 minutes. Then, carefully remove them using a small spoon or offset spatula. Serve immediately while warm for optimal molten flow.
Tips
- Use Room Temperature Eggs: They blend more easily into the batter and help create a smoother texture.
- Don’t Overbake: Even 60 seconds too long can turn your lava center into a fully cooked brownie. Set a timer and check at 12 minutes.
- Chill Chocolate Cores: If using ganache centers, chill them for at least 30 minutes before adding to prevent premature melting.
- Test One First: Bake a single bite first to dial in your oven’s timing, especially if it runs hot or cold.
- Grease Liners Well: Even with liners, greasing ensures easy release. Silicone works better than paper for these delicate bites.
- Serve Immediately: The lava effect diminishes as they cool. Reheating can partially restore the flow, but fresh is best.
- Tap the Pan: After filling, tap the muffin tin gently on the counter to eliminate air bubbles and ensure even distribution.
Variations and Customizations
While classic dark chocolate lava bites are divine, feel free to get creative:
- White Chocolate Raspberry: Replace half the dark chocolate with white chocolate and add a fresh raspberry to the center of each bite.
- Peanut Butter Swirl: Drop 1/4 tsp of creamy peanut butter into the center before baking, then cover with batter.
- Spiced Mexican Chocolate: Add 1/4 tsp cinnamon, a pinch of cayenne, and a few crushed ancho chili bits for warmth and complexity.
- Peppermint Crunch: Add 1/2 tsp peppermint extract and crushed candy canes before baking. Top with a dusting of powdered sugar and crushed candy.
- Gluten-Free Version: Substitute all-purpose flour with a gluten-free 1:1 baking blend. Ensure cocoa powder and chocolate are certified gluten-free.
- Vegan Option: Use plant-based butter, flax eggs (2 tbsp ground flax + 5 tbsp water), and dairy-free chocolate. Note: the texture may be softer, so chilling the centers becomes even more important.
- Alcohol-Infused: Add 1–2 tbsp of bourbon, rum, or Baileys to the batter for a sophisticated twist.
- Nutty Delight: Fold in chopped toasted walnuts, pecans, or hazelnuts for added crunch.
Health Considerations and Nutritional Value
While undeniably indulgent, Chocolate Lava Brownie Bites can be enjoyed in moderation as part of a balanced diet. Here’s a breakdown per serving (1 bite, assuming 24 servings):
| Nutrient | Amount (Approximate) |
|---|---|
| Calories | 130–150 kcal |
| Total Fat | 9–11 g |
| Saturated Fat | 5–6 g |
| Cholesterol | 45–55 mg |
| Sodium | 30–40 mg |
| Total Carbohydrates | 12–14 g |
| Sugars | 9–11 g |
| Protein | 2–3 g |
| Fiber | 1–2 g |
Health Notes:
- Dark chocolate contains antioxidants like flavonoids, which may support heart health in moderation.
- High sugar and saturated fat content means these should be occasional treats, especially for those managing diabetes or cholesterol.
- To lighten the recipe: reduce sugar by 1–2 tbsp (use monk fruit sweetener for sugar-free), use applesauce in place of some butter (though this alters texture), or increase cocoa and decrease chocolate quantity.
- Portion control is naturally built in due to their size—just don’t eat six in a row!
Ingredients
- 8 oz (225g) high-quality dark chocolate (70% cocoa), finely chopped
- 1/2 cup (115g / 1 stick) unsalted butter
- 3/4 cup (150g) granulated sugar
- 2 large eggs
- 2 large egg yolks
- 1 tsp pure vanilla extract
- 1/4 cup (30g) all-purpose flour
- 1/4 cup (20g) Dutch-processed cocoa powder
- 1/4 tsp fine sea salt
- 1/2 cup (90g) mini chocolate chunks or dark chocolate truffle centers, chilled
- Cocoa powder or powdered sugar, for dusting (optional)
- Sea salt flakes, for garnish (optional)
Directions
- Preheat oven to 375°F (190°C). Grease a 24-cup mini muffin tin with butter and lightly dust with cocoa powder, or line with silicone liners.
- In a heatproof bowl over simmering water, melt the chopped dark chocolate and butter, stirring until smooth. Remove from heat and allow to cool slightly.
- In a medium bowl, whisk together sugar, eggs, egg yolks, and vanilla until light and frothy, about 2–3 minutes.
- Gradually add the warm chocolate mixture to the egg mixture, whisking continuously until fully combined.
- Sift in flour, cocoa powder, and salt. Fold gently with a spatula until no dry streaks remain.
- Stir in mini chocolate chunks. Chill remaining chocolate centers (if using) for 15–30 minutes.
- Divide batter evenly among the prepared muffin cups, filling each about 3/4 full.
- If using solid chocolate centers, place one in the middle of each filled cup, then cover with a spoonful of batter.
- Bake for 12–14 minutes, until edges are set but centers are still soft and slightly jiggly.
- Let cool in the pan for 2–3 minutes. Carefully remove with a small spatula.
- Serve warm, optionally dusted with powdered sugar or cocoa, and garnished with sea salt.
FAQ
Q: Can I make these ahead of time?
A: Yes! You can prepare the batter and fill the muffin cups, then refrigerate (covered) for up to 24 hours before baking. You may need to add 1–2 minutes to the bake time if starting cold.
Q: Can I freeze Chocolate Lava Brownie Bites?
A: Absolutely. Once completely cooled, freeze on a tray, then transfer to an airtight container. Reheat in a 350°F oven for 5–7 minutes straight from frozen—centers will still melt beautifully.
Q: Why didn’t my centers become lava?
A: Most likely, they were overbaked. Try reducing the time by 1–2 minutes. Also ensure you’re using sufficient chocolate centers and not overmixing the batter.
Q: Can I use milk chocolate instead of dark?
A: Yes, but milk chocolate has a lower melting point and less structure. The lava may be too runny, and the overall flavor less intense. For best results, mix dark and milk chocolate (e.g., 60% dark, 40% milk).
Q: Are these safe to eat with raw eggs?
A: The eggs are partially cooked during baking. However, if you’re concerned, use pasteurized eggs or egg substitutes.
Q: What’s the best way to serve these?
A: Serve warm with accompaniments like vanilla ice cream, whipped cream, fresh berries, or a drizzle of caramel sauce for a stunning dessert experience.
Summary
Chocolate Lava Brownie Bites are rich, decadent treats that deliver a luxurious molten chocolate center encased in a fudgy brownie exterior—perfect for any occasion.
Baked in just 12–14 minutes, these easy-to-make delights combine the best of brownies and fondants, offering gourmet flavor with simple ingredients and endless customization options.