Mini Chocolate Cheesecake Cups: A Decadent Delight in Every Bite
Introduction
If you’re craving something rich, creamy, and irresistibly chocolatey, look no further than Mini Chocolate Cheesecake Cups. These bite-sized treats are the perfect fusion of velvety cheesecake filling and indulgent chocolate flavor, all nestled into a buttery graham cracker crust. Ideal for parties, holiday gatherings, or as an elegant dessert to impress guests, these mini desserts deliver maximum flavor in a petite package. Whether you’re a seasoned baker or trying your hand at cheesecakes for the first time, this recipe is designed to be approachable, foolproof, and absolutely delicious.
The History
Cheesecake itself has ancient roots, dating back to the Greeks over 4,000 years ago who served it to athletes during the first Olympic Games as a source of energy. Over centuries, cheesecake evolved across Europe and eventually made its way to America, where the modern version—often featuring cream cheese—was popularized in the early 20th century by companies like Kraft with the introduction of Philadelphia cream cheese. The concept of individual portioned cheesecakes emerged as a convenient and elegant alternative to large baked versions, particularly in commercial bakeries and fine dining establishments.
Chocolate cheesecake, on the other hand, is a more modern twist, likely gaining popularity in the mid-20th century as bakers began experimenting with flavor infusions. Combining two universally loved desserts—chocolate cake and cheesecake—into one harmonious treat was a natural progression. Mini Chocolate Cheesecake Cups take this innovation even further by offering portability, visual appeal, and portion control without sacrificing taste. Today, they’re a staple at dessert bars, weddings, and gourmet food trucks, beloved for their luxurious texture and eye-catching presentation.
Ingredients Breakdown
The magic of Mini Chocolate Cheesecake Cups lies in the balance of high-quality ingredients that create layers of flavor and texture. Here’s a detailed breakdown:
- Graham Cracker Crumbs (or Chocolate Cookie Crumbs): Forms the base of the crust. Traditional graham crackers provide a slightly sweet, nutty foundation, but using chocolate wafer cookies enhances the chocolate profile.
- Unsalted Butter (melted): Binds the crust together and adds richness. Using unsalted butter allows better control over the overall salt content.
- Granulated Sugar: Sweetens both the crust and the filling. Adjustments can be made based on desired sweetness.
- Cream Cheese (full-fat, softened): The star of the filling. Full-fat cream cheese ensures a luxuriously smooth and dense texture. It should be at room temperature to avoid lumps.
- Dark Chocolate (chopped or chips): High-quality dark chocolate (60–70% cocoa) provides depth and a slight bitterness that balances the sweetness. Semi-sweet or milk chocolate can be used for a sweeter result.
- Heavy Cream or Whipping Cream: Used to melt the chocolate and later folded into the mixture to add airiness and silkiness.
- Vanilla Extract: Enhances flavor complexity and rounds out the sweetness.
- Eggs (room temperature): Provide structure and help the filling set properly when baked. Cold eggs can cause the batter to curdle.
- Sour Cream or Greek Yogurt (optional): Adds tanginess and moisture, improving mouthfeel and preventing cracking.
- Cocoa Powder (unsweetened): Reinforces the chocolate flavor and deepens the color of the filling.
- Salt (a pinch): Balances flavors and elevates the sweetness and chocolate notes.
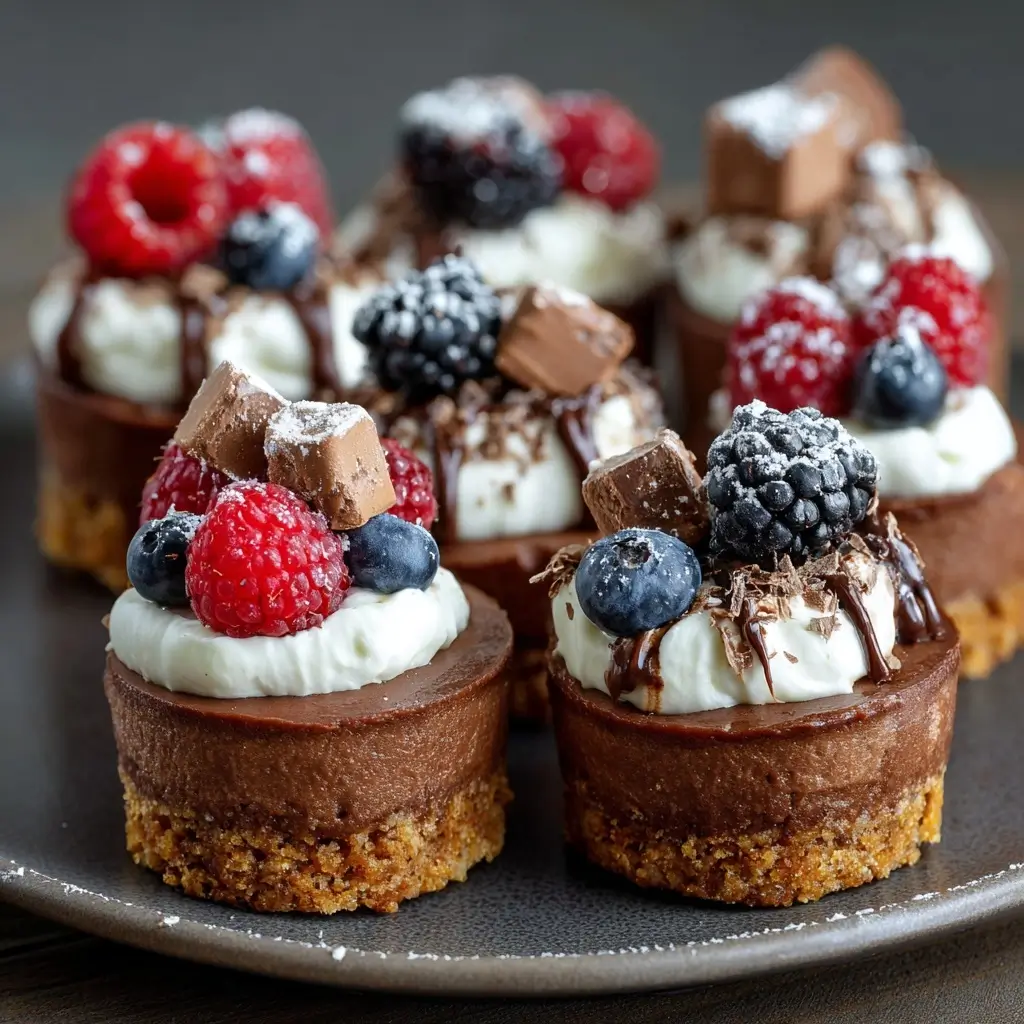
- Toppings (optional): Whipped cream, chocolate shavings, fresh berries, caramel drizzle, or crushed nuts for garnish.
Step-by-Step Recipe
Ingredients
- 1 ½ cups graham cracker crumbs (or chocolate cookie crumbs)
- 6 tablespoons unsalted butter, melted
- 3 tablespoons granulated sugar
- ¼ teaspoon salt
- 16 oz (2 packages) full-fat cream cheese, softened
- ¾ cup semi-sweet or dark chocolate chips
- ⅓ cup heavy cream
- ⅓ cup granulated sugar
- 2 large eggs, room temperature
- 1 teaspoon vanilla extract
- 2 tablespoons sour cream (optional)
- 2 tablespoons unsweetened cocoa powder
Directions
- Preheat the Oven: Begin by preheating your oven to 325°F (160°C). Line a standard 12-cup muffin tin with parchment paper liners or silicone baking cups for easy removal.
- Prepare the Crust: In a medium bowl, combine graham cracker crumbs, 3 tablespoons sugar, and a pinch of salt. Pour in melted butter and mix until the crumbs are evenly moistened and resemble wet sand.
- Form the Base: Divide the crust mixture evenly among the 12 muffin cups. Use a small spoon or the back of a measuring spoon to press the mixture firmly into the bottom of each liner. Aim for a compact, even layer. Place the pan in the refrigerator to chill while you prepare the filling.
- Melt the Chocolate: In a heatproof bowl, combine chocolate chips and heavy cream. Melt using a double boiler or microwave in 20-second bursts, stirring between each interval until smooth and glossy. Set aside to cool slightly.
- Make the Filling: In a large mixing bowl, beat softened cream cheese on medium speed until smooth and creamy, about 2 minutes. Add the remaining ⅓ cup sugar and beat until incorporated. Scrape down the sides of the bowl.
- Incorporate Flavor: Add the slightly cooled melted chocolate mixture and beat until fully combined. Mix in vanilla extract, sour cream (if using), and cocoa powder until smooth.
- Add Eggs: Add eggs one at a time, beating on low speed just until each is incorporated. Do not overmix—this prevents air bubbles and cracking. Overbeating can also lead to a dense texture.
- Fill the Cups: Remove the muffin tin from the fridge. Divide the filling evenly among the prepared crusts, filling each cup almost to the top.
- Bake: Place the muffin tin in the preheated oven and bake for 20–25 minutes, or until the edges are set but the centers still have a slight jiggle (like Jell-O when gently shaken).
- Cool Gradually: Turn off the oven, crack the door open slightly, and let the cheesecakes sit inside for another 15 minutes. This slow cooling helps prevent cracks.
- Chill: Remove from the oven and let cool completely at room temperature. Then cover loosely and refrigerate for at least 4 hours, preferably overnight, to allow the filling to fully set.
- Serve: Carefully peel away the parchment liners or remove silicone cups. Top with whipped cream, chocolate curls, berries, or a drizzle of ganache before serving.
Tips
- Room Temperature Ingredients: Ensure cream cheese and eggs are fully at room temperature to avoid lumps and achieve a silky-smooth batter.
- Don’t Overmix: Once eggs are added, mix only until just combined. Overmixing incorporates too much air and can cause cracking.
- Use Parchment Liners: They make removal effortless and give a clean, professional look. Silicone liners also work well.
- Water Bath Alternative: For extra insurance against cracking, place a shallow pan of water on the lower rack of the oven while baking to maintain humidity.
- Check Doneness Properly: The center should wobble slightly—it will continue to firm up as it cools.
- Chill Thoroughly: Patience pays off. Fully chilled cheesecakes have the best texture and cleanest slice.
- Wipe the Bowl: After mixing, scrape the entire bowl and beater to ensure uniform consistency.
- Double Batch? These freeze beautifully! Store in an airtight container with parchment between layers for up to 2 months.
Variations and Customizations
One of the best things about Mini Chocolate Cheesecake Cups is how easily they can be customized to suit different tastes, dietary needs, and occasions:
- White Chocolate Swirl: Melt white chocolate and drizzle into the filled cups before baking. Use a toothpick to swirl for a marbled effect.
- Peanut Butter Lovers: Swirl in peanut butter or add a dollop on top after chilling.
- Mint Chocolate: Add ¼ teaspoon peppermint extract to the filling and top with crushed candy canes or mint chocolate chips.
- Oreo Crust: Replace graham crackers with finely crushed Oreo cookies for a double-chocolate crunch.
- Gluten-Free: Use gluten-free chocolate cookies or almond flour-based crusts.
- Dairy-Free: Substitute with dairy-free cream cheese, coconut cream, and vegan chocolate.
- Low-Sugar/Keto: Use erythritol or monk fruit sweetener, keto-friendly chocolate, and almond flour crust.
- Fruit Infused: Top with raspberry coulis, strawberry slices, or blueberry compote for a fruity contrast.
- Salted Caramel: Drizzle with homemade or store-bought salted caramel sauce before serving.
- Espresso Kick: Add 1 teaspoon instant espresso powder to the filling for a mocha twist.
- Holiday Themes: Decorate with seasonal colors—red and green sprinkles for Christmas, pastel hues for Easter, orange for Halloween.
Health Considerations and Nutritional Value
While Mini Chocolate Cheesecake Cups are undeniably indulgent, understanding their nutritional profile can help with mindful enjoyment:
- Calories: One average cup contains approximately 280–320 calories, depending on size and ingredients.
- Fat: High in saturated fat due to cream cheese, butter, and heavy cream. Each serving may contain 20–25g of fat.
- Sugar: Around 25–30g per cup, mostly from crust, chocolate, and added sugar in the filling.
- Protein: Provides about 5–6g per serving, primarily from eggs and dairy.
- Calcium: A good source due to dairy content, supporting bone health.
- Portion Control: Their mini size naturally encourages moderation—perfect for satisfying a sweet tooth without overindulging.
- Dietary Modifications: Can be adapted for lower sugar, gluten-free, or dairy-free diets with appropriate substitutions.
- Balanced Enjoyment: Best enjoyed occasionally as part of a balanced diet. Pair with fresh fruit or a cup of herbal tea to offset richness.
FAQ
Q: Can I make these ahead of time?
A: Absolutely! These cheesecakes can be made 2–3 days in advance and stored covered in the fridge. They also freeze well for longer storage.
Q: Why did my cheesecakes crack?
A: Cracking is usually due to overbaking, overmixing, or rapid temperature changes. Always cool gradually in the turned-off oven with the door ajar.
Q: Can I use a different pan?
A: Yes! Use a silicone mold, tartlet pan, or even a mini muffin tin for smaller bites (adjust baking time accordingly).
Q: How do I get smooth filling?
A: Make sure all ingredients are at room temperature and avoid overbeating after adding eggs.
Q: Are these safe for pregnant women?
A: Yes, since the eggs are fully cooked during baking. However, if concerned, use pasteurized eggs.
Q: Can I skip the crust?
A: You can, but the crust adds essential texture and balance. For a crustless version, grease the liners well to prevent sticking.
Q: How long do they last?
A: Up to 5 days in the refrigerator or 2 months in the freezer when properly stored.
Summary
Mini Chocolate Cheesecake Cups are the ultimate handheld dessert, combining a crisp crust with a rich, creamy chocolate cheesecake center. Easy to customize, perfect for any occasion, and utterly irresistible—one bite and you’ll be hooked.